How to install a 2005-2010 Skoda FABIA Radio with touch screen DVD navigation

So, you’ve just come home with a fancy new aftermarket Skoda FABIA Radio and a brand new set of speakers. Should you install them in your car yourself?

First show you a picture of Seicane 2005-2010 Skoda FABIA Radio after installation.

2005-2010 Skoda FABIA radio after installation

Do you think it’s awesome? By the way, you should make sure whether the new radio fits your car well. I’d like to share a good one which fits 2005-2010 Skoda FABIA with you.

http://www.seicane.com/android-2005-2010-skoda-fabia-radio-dvd-player-gps-navigation-system-hd-touch-screen-obd-dvr-bluetooth-canbus-tv-3g-wifi-rear-view-camera-ipod-s168032


This Skoda FABIA Radio has High quality RK3188 1.6 GHz Cortex A9 Quad-core processor with 1GB Samsung DDR3. And 8 inch HD 1024*600 multi-touch screen with smooth operation, high sensitivity and abundant interaction for the better view of your road ahead. The most attractive is it’s intelligent pure android 4.4.4 operation system with exquisite and user-friendly user interface. You can set any of your favorite application icons as shortcut on the main menu and set the position of the icons according to your preference.

Do you think this unit fits your Skoda FABIA perfect? Let’s remove the factory radio now.


2005-2010 Skoda FABIA radio installation

1) Pry up the panel around the original radio with plastic tool

2005-2010 Skoda FABIA radio installation step 1

2) Pick up the panel on the original car radio
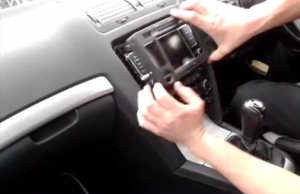
2005-2010 Skoda FABIA radio installation step 2

3) Remove the four screws around the radio with a screwdriver

2005-2010 Skoda FABIA radio installation step 3

4) Pull out the original radio

2005-2010 Skoda FABIA radio installation step 4

5) Disconnect the radio antenna in the back of the radio

2005-2010 Skoda FABIA radio installation step 5

6) Unplug the electrical plugs running to the back of the radio

2005-2010 Skoda FABIA radio installation step 6

7)Make antennas and cables connected step by step as installation instructions show,and you should be very careful when you are doing this for it will affect whole procedure.

8)Connected the new aftermarket radio to your Skoda FABIA, you should check whether your connections are correct, the new unit is in right position,and you’d better have a tidy for the cables.

9)Finally, you can turn on your new aftermarket radio. If it works without problem, and then you can fix four screws on your new aftermarket radio.Finally put trim panel on the surface of your new Skoda FABIA Radio.


Some notices during installation:

1)Before connecting, please make sure the ignition is off to avoid short circuit.

2)Ensure connect the yellow and red power cable at last.

3)Ensure that all loose wires are isolated with electricaltape

4)Ensure don’tangle the wire when tighten the moving parts(Such as seat rails).

5)Ensure that all GND is connected to the same place.

6)Using the improper fuse may cause damage of fire,so when replace the fuse,please consult the professional.

2003 2004-2007 Honda Accord Radio with DVD GPS navigation installation

First show you a picture, this is Seicane 2003-2007 Honda Accord Radio after installation.

2003-2007 Honda Accord Radio after installation

If you are owners of 2003-2007 Honda Accord, and you want to install a new aftermarket radio in your car. Please read this essay patiently, you can learn something to help you complete this job. And don’t worry, this unit will surely fit for your car if it belongs category in the title, which is mainly depend on the trim panel of the radio and next we will begin to know the specific steps for Honda Accord radio installation.


2003-2007 Honda Accord Radio installation

1)First pry off the top vent panel.

2003-2007 Honda Accord Radio installation step 1

2)Remove three screws under the panel with a Phillips screwdriver.

2003-2007 Honda Accord Radio installation step 2

3)Set the flat screwdriver into the shifter panel, and move down the shifter knob.

2003-2007 Honda Accord Radio installation step 3

4)Pry off the shifter panel.

2003-2007 Honda Accord Radio installation step 4

5)Unplug two connectors behind the panel.

2003-2007 Honda Accord Radio installation step 5

6)Pry off this unit.

2003-2007 Honda Accord Radio installation step 6

7)Then pry off this box.

2003-2007 Honda Accord Radio installation step 7

8)Remove two screws under the box with a Phillips screwdriver.

2003-2007 Honda Accord Radio installation step 8

9)Remove this whole box and unplug the connector behind it.

2003-2007 Honda Accord Radio installation step 9

10)Remove two screws under the box.

2003-2007 Honda Accord Radio installation step 10

11)Then pry off this glove box.

2003-2007 Honda Accord Radio installation step 11

12)Remove two screws holding the radio in dash.

2003-2007 Honda Accord Radio installation step 12

13)Now pull out the factory radio.

2003-2007 Honda Accord Radio installation step 13

14)Unplug the connectors behind radio, and you can use a vise to help you.

2003-2007 Honda Accord Radio installation step 14

12) Connect the harness with the new Seicane radio as user manual shows.

13) Firm removed screws on the radio then install removed panels and screws back to your Honda Accord.

14) If everything set well, turn on your radio and check all functions whether operate well.


Before installation, you should to know whether the new aftermarket radio fits your car, here is a good aftermarket radio of Seicane for 2003-2007 Honda Accord I’d like to share with you:

 http://www.seicane.com/car-stereo-radio-replacement-upgrade-for-2003-2004-2005-2006-2007-honda-accord-7-gps-dvd-hd-touch-screen-bluetooth-tv-tuner-mp3-aux-reverse-camera-ipod-iphone-steering-wheel-control-t6019


This Honda Accord Radio has intelligent WinCE operation system, Cortex A9 Star 785 1 GHz CPU with 1G RAM, and 7 inch HD 800*480 Pixels 2‐DIN WVGA HD Digital TFT LCD touch screen with smooth operation high sensitivity.

Built-in worldwide GPS with voice cues, distance information, POIs, road planning all the way;You can get to any of your desired destination with it! Support DVD play with auto memory. All the set parameter can be memorized and restored automatically; Adopts cutting-edge electronic shock protection(ESP) technology, being shockproof; Compatible with formats including DVD±R, DVD±RW, CD-R/RW, VCD, HDVD, DVCD, DIVX etc. You can operate your IPOD and Iphone directly on the big dynamic graphic interface for playing your favorite tunes and charging them as you play. And you can enjoy music at the same time while navigating.


Now just install your new Honda Accord Radio and check the great functions in it!

How to install 2013 2014 Ford Edge Radio with DVD navigation touch screen mirror link airplay

Look at this picture, this is Seicane 2013 2014 Ford Edge Radio after installation.

2013 2014 Ford Edge Radio after installation

To install a new aftermarket radio is a simple thing with true instructions. And first you’ll need to know how to install a radio on your Ford Edge.


If you insist to do it yourself, you can ask a professional for help. The following steps are for your reference. You can refer to it but not rely on it. Please disconnect the negative cable on the vehicle battery to ensure security. Please prepare tools for the upgrade. A lever and a screwdriver are needed. Please protect the front seats and trim panel during upgrade, too.


Before installation, you should make sure whether the new aftermarket radio fits your car, here is a good aftermarket radio of Seicane for 2013 2014 Ford Edge I’d like to share with you:

 http://www.seicane.com/seicane-s09255-2013-ford-edge-android-4-4-4-dvd-player-gps-navigation-system-obd2-bluetooth-radio-hd-1024-600-touch-screen-mirror-link-dvr-tv-video-canbus-wifi-usb-sd-backup-camera-steering-wheel-control-quad-core-cpu

This Ford Edge Radio has intelligent android 4.4.4 operation system, high quality RK PX3 with 1.66 GHz frequency Quad-core CPU, and 9 inch HD 1024*600 Pixels multi touch screen with smooth operation high sensitivity.

Equipped with a WiFi module, the systems supports Internet surfing via 3G or WiFi. You can use the Quick Search Box on the Google search for roads, playing online games, watching videos, downloading online data, and checking emails by connecting to any WiFi hotspot in scope or 3G Internet. You can also install or remove any apps on RAM or SD according to your preference. The real-time traffic congestion maps can suggest you alternative routes to take so as to save you a lot of time.


2013 2014 Ford Edge Radio installation

1)First remove the trim panels on either side of the center console.

2013 2014 Ford Edge Radio installation step 1

2)Remove the four screws attaching the lower dashboard trim panel to the upper dashboard trim panel.

2013 2014 Ford Edge Radio installation step 2

3)Gently pry the two trim panels apart.

2013 2014 Ford Edge Radio installation step 3

4)Remove the four screws attaching the upper trim panel and air condition control assembly to the dashboard.

2013 2014 Ford Edge Radio installation step 4

5)Once all four screws have been removed, lift the trim panel away from the dashboard and disconnect the air condition control wiring harness attached to its backside.

2013 2014 Ford Edge Radio installation step 5

6)Remove the four screws securing the touch screen to the dashboard and turn it to the side in order to access the factory wiring harness.

2013 2014 Ford Edge Radio installation step 6

7)Remove original touch screen and unplug the connectors behind it.

2013 2014 Ford Edge Radio installation step 7

8)Remove the four screws securing the radio to the dashboard.

9)Pull out the radio and unplug the wiring harnesses behind the radio.

10)Have a patient look at those cables and antennas,plug them one by one as the instructions show,which is very important in your installation.

11) After all cables are pluged well, install Seicane radio into it.

12) Firm screws on the radio and touch screen then install removed panels back to your Ford Edge.

13) With everything set well, turn on your radio and check all functions whether operate well.


These above are whole instructions of Ford Edge Radio installation, wish you can learn something from this eassy and have a great journey with your new radio!

14 steps to install 2009 2010 Ford mondeo Radio with DVD player WiFi OBD2

This is Seicane 2009 2010 Frod mondeo Radio after installation. Do you think it’s better than your original radio? Yes, Seicane aftermarket radio has more functions, and it can meets most of your needs. You can enjoy your driving life with this radio.

2009 2010 Ford mondeo Radio after installation

So, you may think it’s a all day job to install a new aftermarket radio on your Ford mondeo. To be honest, it’s a simple thing and you can absolutely do it by yourself. And here are instructions of 2009 2010 Ford mondeo Radio installation.

2009 2010 Ford mondeo Radio installation

1)Pry the shifter cover panel with the plastic tool.

2009 2010 Ford mondeo Radio installation step 1

2)Then pry the trim panel around the shifter knob.

2009 2010 Ford mondeo Radio installation step 2

3)Now remove two small chips with plastic tool.

2009 2010 Ford mondeo Radio installation step 3

4)Remove two screws holding the trim panel in place.

2009 2010 Ford mondeo Radio installation step 4

5)Then remove two screws as the picture shows

2009 2010 Ford mondeo Radio installation step 5

6)Pull out the trim panel on the interface of the radio slowly.

2009 2010 Ford mondeo Radio installation step 6

7)Next unplug connectors behind the trim panel.

2009 2010 Ford mondeo Radio installation step 7

8)Remove four screws holding the radio in the dashboard.

2009 2010 Ford mondeo Radio installation step 8

9)Then pull out the radio from the dash.

2009 2010 Ford mondeo Radio installation step 9

10) Disconnect connectors behind the radio.

2009 2010 Ford mondeo Radio installation step 10

11) Have a patient look at those cables and antennas,plug them one by one as the instructions show,which is very important in your installation.

12) After all cables are pluged well, install Seicane radio into it.

13) Firm 4 screws on the radio and install removed panels and screws back to your Ford mondeo.

14) With everything set well, turn on your radio and check all functions whether operate well.


By the way, you should make it sure whether the new aftermarket radio fits your car well before the installation. I’d like to share a good unit of Seicane which fits 2009 2010 Ford mondeo with you:

http://www.seicane.com/seicane-s09003-cuatro-nucleos-android-4-4-4-gps-radio-sistema-de-navegacion-para-2009-2010-ford-mondeo-focus-s-max-con-reproductor-dvd-wifi-obd2-bluetooth-vinculo-espejo-hd-1024-600-pantalla-tactil-dvr-tv-video-canbus-usb-sd-camara-de-reser

This Ford mondeo Radio has intelligent android 4.4.4 operation system, high quality RK PX3 with 1.66 GHz frequency Quad-core CPU, and 6.2 inch HD 1024*600 Pixels multi touch screen with smooth operation high sensitivity.

Loaded with a lot of upgraded software and hardware components, this remarkable 2009 2010 Ford mondeo Radio will bring you a totally different driving experience for you. You can enjoy a visually radiant display and an easier operation on its 6.2 inch multi-touch screen with 1024*600 pixel resolution. The built-in GPS can support updating the latest traffic information and provide turn-by-turn voice direction for you to get to the desired location. You can enjoy playing DVDs, VCDs, bluetooth music, FM/AM radio tuner to enrich your journey. You can also connect your bluetooth-enable cell phone with this unit for hands-free calls and streaming audio to ensure a safe and cheerful journey. Your steering wheel control can still work after installation.


Wish you can learn something from this essay, install Ford mondeo Radio by youself.

How to install a 2008 2009 2010 Opel Astra Radio with DVD GPS DVR TV CANBUS by 7 steps

First show you a picture of Seicane 2008 2009 2010 Opel Astra Radio after installation. If you are owners of 2008-2010 Opel Astra, the original radio may can’t meets your needs. Compare to the original radio, Seicane aftermarket radio have more great functions. With the multi-touch screen, things are wonderful now. You can improve your driving quality, and have great fun with your Opel Astra via the new aftermarket radio.

2008-2010 Opel Astra Radio after installation

By the way, you should make sure whether the new aftermarket radio fits your car well before your radio installation. This is most important thing you should do first. I’d like to share a good radio of Seicane which fits 2008-2010 Opel Astra with you:

http://www.seicane.com/seicane-s09019-android-4-4-4-car-stereo-obd2-bluetooth-gps-navigation-system-for-opel-astra-with-dvd-player-mirror-link-touch-screen-dvr-tv-usb-sd-radio-wifi-steering-wheel-control-quad-core-cpu-hd-1080p-video-canbus-backup-camera

This Opel Astra Radio has intelligent android 4.4 operation system, high quality RK PX3 with 1.66 GHz frequency Quad-core CPU, and 6.2 inch HD 1024*600 multi touch screen with smooth operation high sensitivity.

Loaded with a lot of upgraded software and hardware components, this remarkable 2008-2010 Opel Astra Radio will bring you a totally different driving experience for you. You can enjoy a visually radiant display and an easier operation on its 6.2 inch multi-touch screen with 1024*600 pixel resolution. The built-in GPS can support updating the latest traffic information and provide turn-by-turn voice direction for you to get to the desired location. You can enjoy playing DVDs, VCDs, bluetooth music, FM/AM radio tuner to enrich your journey. You can also connect your bluetooth-enable cell phone with this unit for hands-free calls and streaming audio to ensure a safe and cheerful journey. Your steering wheel control can still work after installation.

2008-2010 Opel Astra Radio installation

1) Before your installation by removing the negative cable from the battery. Then return to the inside of your Opel Astra.

2)First set four radio unlock tools into the radio.

2008-2010 Opel Astra Radio installation step 1

3)Pull out the radio via the radio unlock tools, the clips on the four sides of the radio must be pushed inside before you can pull the radio out.

2008-2010 Opel Astra Radio installation step 2

4)Unplug connectors behind the original radio.

2008-2010 Opel Astra Radio installation step 3

5)Make antennas and cables connected step by step as installation instructions show,and you should be very careful when you are doing this for it will affect whole procedure.

6)Connected the new Seicane radio to your Opel Astra as the user manual shows, you should check whether your connections are correct, the new unit is in right position,and you’d better have a tidy for the cables.

7)If everything is OK, put back the Seicane radio into the dash.


So whole installation has finished, new 2008-2010 Opel Astra Radio can be use now. Do you think it’s so easy? Let’s check the great function in it!