Before starting this article,here is an image for you:head unit after installation,stereo radio with gps navigation system of 2006-2012 Toyota Rav4.

You can have a careful look at its trim panel if you are someone who wants to upgrade the stereo of your Toyota Rav4.You should firstly make sure that this unit is suitable for your car and then you can go on think about the question of 2006-2012 Toyota Rav4 stereo radio with bluetooth music touch screen installation.
Some people ask dealers of the market to help them install the head unit,however there’s no need to do so for the installation can actually be one thing that can be accomplished by yourself.Of course,it’s under the condition that you have learned clearly about specific steps to mount a new stereo and act them according to right instructions.
Precautions before installation:
1.Have a check for your car head unit to see whether all factory equipment are well
2.Please remember to unplug negative power cable before you start any work,you really need to ensure it before installation
3.Please mind that you should be gentle during the following installation to avoid some damage to the unit and place things that are removed in a safe and visible place
Before we get to know detailed mount procedure for Toyota Rav4 radio,I think we can have a view at next video first:
2006-2012 Toyota Rav4 original radio removal:
1. Use an automotive tool to take the upper dashboard trim panel out,set the panel aside which was removed

2.Pry the air conditioning vents gently away from the dashboard,which are on the left and right-hand sides of the factory touch careen unit


3.Lever the clock display gently and remove lamp panel away from the dashboard and set it to the side

4.Take the four retaining screws out which attaches factory unit to the dashboard

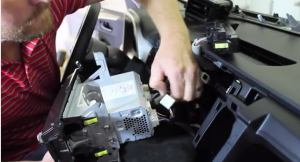
5.Gently pull the touch screen unit off from trim panel and lean it forward to gain access to the wiring harnesses on the reverse side

6.Disconnect the individual harnesses to remove original cd radio

7.Totally removed stereo

2006-2012 Toyota Rav4 new radio installation:
8.After this,connect new radio’s cables to right wires of the car
9.Let the screws and trim panels back to their places and turn on your new radio to have a test for it
Whole installation guide for Toyota Rav4 gps radio has all been introduced in above part,if you still account other issues during this process,you can visit some websites which can help you solve them,for example:http://www.seicane.com/2006-2012-toyota-rav4-radio-dvd-audio-3d-gps-system-tv-tuner-wifi-3g-bluetooth-mp3-ipod-steering-wheel-control-dvr-aux-hd-1080p-pop-backup-camera-c018,or reflect them to someone who is more professional in this aspect.
Precautions after installation:
1.Please don’t pull the CD card of GPS out in case of data corruption
2.To avoid antenna problems please don’t shorten or lengthen the GPS antenna
3.Please try to protect touch screen well,do not use other things except touch screen pen for prolonged usage
