How to remove a 2009-2012 MAZDA 5 car radio with Android 5.1.1 GPS navigation system DVD player Radio Mirror link multi-touch screen OBD DVR TV 3G WIFI USB SD Bluetooth IPOD

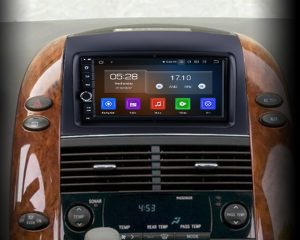
2009-2012 MAZDA 5 car radio after installation

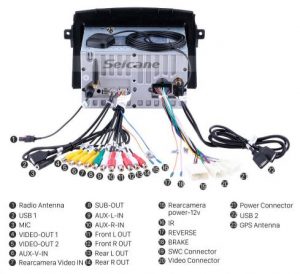
Here shows you an intelligent 2009-2012 MAZDA 5 car radio from Seicane after installation. If you want to enjoy more modern features in your car, it’s a great choice for you to consider the replacement of your factory radio. If yon don’t know how to install a new unit in your car, you can ask a professional for help. Now I’d like to share a detailed 2009-2012 MAZDA 5 car radio installation guide from Seicane with you. Wish you can get some help from it.

2009-2012 MAZDA 5 car radio after installation

Tips about the installation: 

1.Please disconnect the power before the installation.

2.Please prepare a lever and a screwdriver before the removal and the installation.

3.Please keep all the separate parts from the car. Please take great care of the dashboard to avoid scratching it during its detachment and installation. Please keep handy any parts from the car and make use of all the original screws from the car as much as possible. so each related part of the unit can be fixed securely.

4.For your convenience, here’s the recommended tools for removal and installation from Seicane, please check for more details: http://www.seicane.com/car-dvd-dismantling-device-srd-400

2009-2012 MAZDA 5 PREMACY car radio installation guide

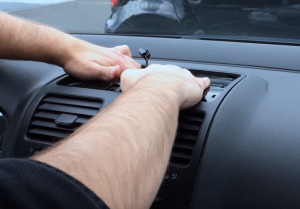
1.Unclip and remove the cup holder panel in the center console.

2. Unclip and remove the small pocket panel on the back of the center console behind shifter.

3. Remove 2 8mm bolts under cup holder panel holding the back half of the center console to the front half.

4. Unscrew and remove the shift knob.

5. Unclip and remove the shifter trim panel.

6. Unclip and remove the shifter trim panel.

7. Unclip and pull back the panels at the lower front sides of the center console.

8. Unclip and pull back the panels at the lower front sides of the center console.

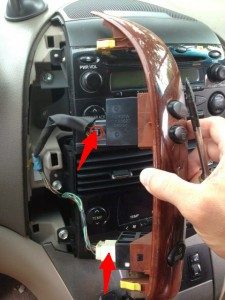
9. Unclip and remove the vent panel including the hazard switch above the factory radio.

10. Its easier to remove 2 screws by setting this piece on the top of the dash.

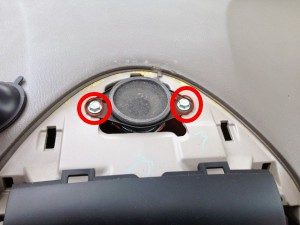
11. Remove 2 screws from behind the shifter trim.

12. Pull center console toward, this will help gain access to 2 screws under the climate controls.

13. Remove 2 screws.

14. Unclip harness and pull rear center console backwards.

15. Press in shifter release trigger and pull shifter down, make sure to have e brake on.

16. Press in side prongs to release climate controls.

17. Remove one screw and one 10mm bolt.

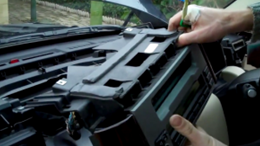
18. Pull factory stereo out to release clips, then unplug original radio’s connectors.

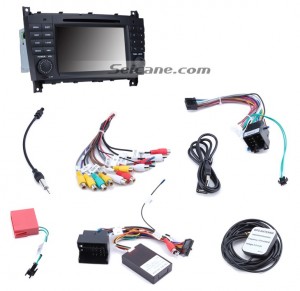
19. Connect the harnesses to the back of the new Seicane car radio.

20. Connect the Seicane car radio to your original car radio ‘s plugs.

21. Turn on the new Seicane radio to have a careful check if everything works well. If it doesn’t, please check whether all the cables are connected correctly.

22. Put the new Seicane radio into the dash.

23. Put everything into their original place. All the installation is done.

Is it easy for you to understand all the installation steps for a 2009-2012 MAZDA 5 car radio? If not, it’s suggested you consult your dealer. Or you can also directly have a professional install it. If you haven’t found an ideal head unit for your car, you can refer to this amazing 2009-2012 MAZDA 5 car radio from Seicane. It comes with the latest features and capabilities for you to upgrade your factory radio. For more details, you can click:

http://www.seicane.com/2009-2012-mazda-5-android-gps-navigation-system-with-dvd-player-radio-mirror-link-multi-touch-screen-obd-dvr-rear-view-camera-tv-3g-wifi-usb-sd-bluetooth-ipod-s168005

This intelligent 2009-2012 MAZDA 5 car radio comes with a large 8 inch multi-touch screen, which is ideal for you to enjoy the simple operation and clear display in your beloved car. Just enjoy all your trips with this wonderful GPS navigation system DVD multimedia player which enables you to play DVD disks in diverse types, movies, music, iPod, FM/AM radio, TV, etc. Good luck to you!

Specific installation steps for a Mercedes-Benz B Class W245 car stereo before 2011 with with 3G WiFi Capacitive Touch Screen TPMS DVR OBD II Rear camera AUX Steering Wheel Control USB Bluetooth Video

When you are going to upgrade your factory radio, you may probably find the best car stereo specially for your car. The best one is not the one which costs you the most, but that which comes with all the features you need in your car. It’s not easy to find it as long as you are clear what you need. If you own a Mercedes-Benz B Class W245 before 2011, you can take this Mercedes-Benz B Class W245 car stereo before 2011 installation guide as a reference to help with the installation.

Mercedes-Benz B Class W245 car stereo before 2011 after installation

Please pay attention to the following safety notes

1.Before connecting, please make sure the ignition is off to avoid short circuit.

2.Ensure connect the yellow and red power cable at last.

3.Ensure that all loose wires are isolated with electrical tape

4.Ensure don’t tangle the wire when tighten the moving parts(Such as seat rails).

5.Ensure that all ground is connected to the same place.

6.Using the improper fuse may cause damage of fire, so when replace the fuse, please consult the professional.

Mercedes-Benz B Class W245 car stereo before 2011 installation guide

1. Detach the outer frame of the original car radio.

Detach the outer frame of the original car radio

2. Use a screw driver to remove the screws marked with red circles.

Use a screw driver to remove the screws marked with red circles

3. Remove the screw on the lower right.

Remove the screw on the lower right

4. Remove the screw on the lower left.

Remove the screw on the lower left

5. Remove the screw on the upper left.

Remove the screw on the upper left

6. Remove the screw on the upper right.

Remove the screw on the upper right

7. Use a screw driver to remove the screws marked with red circles.

Use a screw driver to remove the screws marked with red circles

8. Remove the original car radio.

Remove the original car radio

9. Check all the accessories for the new Seicane car stereo.

Check all the accessories for the new Seicane car radio

10. Connect the harnesses to the back of the new Seicane car stereo.

Connect the harnesses to the back of the new Seicane car radio

11. Insert the plug of the car into the socket of unit.

Insert the plug of the car into the socket of unit

12. Remarks

a. Plug in the radio antenna.

b. Plug in the GPS antenna.

Remarks a. Plug in the radio antenna. b. Plug in the GPS antenna.

13. Install the new Seicane car stereo into the dashboard.

Install the new Seicane radio into the dashboard

14. Fasten the new Seicane car stereo with 4 screws and install the frame back.

Fasten the new Seicane radio with 4 screws and install the frame back

15. Turn on the new Seicane car stereo to have a comprehensive check. If everything works well, all the installation is done. If not, please check if all the cables are connected correctly.

Wish the detailed installation guide for a Mercedes-Benz B Class W245 car stereo before 2011 can be helpful for you. If your dashboard is different from that shown in the guide above, please don’t worry, the installation is similar, and it won’t have much influence on the whole. For any questions, you can consult your dealer. If you don’t find a suitable stereo for your car, I’d like to recommend this excellent Mercedes-Benz B Class W245 car stereo before 2011 from Seicane to you, please click for more details:

http://www.seicane.com/9-inch-cheap-mercedes-benz-b200-before-2011-android-radio-gps-navigation-system-with-3g-wifi-capacitive-touch-screen-tpms-dvr-obd-ii-rear-camera-aux-steering-wheel-control-usb-sd-bluetooth-video-s085993

With this Mercedes-Benz B Class W245 car stereo before 2011 in your car, the latest GPS system will lead you to your destinations with voice guidance and intelligent route planning. The Bluetooth technology allows for safer driving while talking on the phone so you can keep your hands on the wheel and your eyes on the road at all times. Just take it right now and go! Wish you have a wonderful time with it!

A step-by-step installation guide for a 2008-2013 VW Volkswagen Scirocco Passat CC Golf 6 head unit with 3G WiFi Mirror Link OBD2 Bluetooth Quad-core CPU

If you want to have a more relaxing in-car environment in your car, it’s a great idea for you to upgrade your factory radio with a new aftermarket head unit which can bring you a lot of convenience and enjoyment for you. Generally speaking, it’s easy to install an aftermarket. Here I’d like to share a detailed 2008-2013 VW Volkswagen Scirocco Passat CC Golf 6 head unit installation guide from Seicane with you. If you also have the same dashboard, you can take it as a reference.

2008-2013 VW Volkswagen Scirocco Passat CC Golf 6 head unit after installation

Before and during installation, you should notice:

1.Before connecting, please make sure the ignition is off to avoid short circuit.

2.Ensure connect the yellow and red power cable at last.

3.Ensure that all loose wires are isolated with electrical tape.

4.Ensure don’t tangle the wire when tighten the moving parts(Such as seat rails).

5.Ensure that all ground is connected to the same place.

6.Using the improper fuse may cause damage of fire, so when replace the fuse, please consult the professional.

7.For your convenience, here’s the recommended tools for removal and installation from Seicane, please check for more details: http://www.seicane.com/car-dvd-dismantling-device-srd-400

2003-2013 VW Volkswagen Scirocco Passat CC head unit installation guide

1.Remove the top panel with a lever.

Remove the top panel with a lever

2. Disconnect the connector at the back of the panel.

Disconnect the connector at the back of the panel

3. Unscrew the screw with a screwdriver.

Unscrew the screw with a screwdriver

4. Remove the metal sheet on the top with your hands.

Remove the metal sheet on the top with your hands

5. Unscrew two screws circled in red shown as follows under the metal sheet.

Unscrew two screws circled in red shown as follows under the metal sheet

6. Remove the air conditioner vent with your hands.

Remove the air conditioner vent with your hands

7. Unscrew two screws under the vent with a screwdriver.

Unscrew two screws under the vent with a screwdriver

8. Remove the panel on the original car radio.

Remove the panel on the original car radio

9. Unscrew four screws holding the original car radio with a screwdriver.

Unscrew four screws holding the original car radio with a screwdriver

10. Take the original car radio out of the dash.

Take the original car radio out of the dash

11. Disconnect all the connectors at the back of the original car radio.

Disconnect all the connectors at the back of the original car radio

12. Check all the accessories for the new Seicane head unit.

Check all the accessories for the new Seicane car radio

13. Connect the harnesses to the back of the new Seicane head unit.

Connect the harnesses to the back of the new Seicane car radio

14. Connect the Seicane head unit to your original car radio ‘s plugs.

15. Turn on the new Seicane head unit to have a careful check if everything works well. If it doesn’t, please check whether all the cables are connected correctly.

16.Put the new Seicane head unit into the dash.

17. Put everything into their original place.

Wish the 2008-2013 VW Volkswagen Scirocco Passat CC Golf 6 head unit installation above can be helpful you. If you have any question, it’s suggested you turn to your dealer for help. If you don’t have any experience on the installation, you’d better have it installed by a professional. Besides, you need to confirm your new stereo can be suitable for your car. To check the compatibility, you are welcome to click the link below which is about a top VW Volkswagen Scirocco Passat CC Golf 6 head unit from Seicane.

http://www.seicane.com/seicane-s128002w-8-inch-android-radio-car-navigation-head-unit-for-2008-2013-vw-volkswagen-scirocco-passat-cc-golf-6-with-3g-wifi-mirror-link-obd2-bluetooth-quad-core-cpu-16g-flash

Its upgraded 1.6 GHz Cortex A9 Quad-core CPU can fast process multiple routes and provide accurate directions to destinations via the graphic maps and voice guidance within seconds. The VW Volkswagen Scirocco Passat CC Golf 6 head unit has a large 8 inch LCD touchs creen with 1024*600 widescreen resolution. The easy-to-use interface screen has been designed to offer intuitive operation and please your eyes. What’s more, you can safely make phone calls or access your favorite music library you have built in your device. Good luck to you!

A step-by-step installation guide for a 2001-2008 TOYOTA RAV4 head unit with touch screen DVD Player Radio RDS Bluetooth 3G WiFi Mirror Link OBD2 IPOD Backup Camera

With a professional step-by-step installation guide, can you finish the installation of a new car stereo on your own? If not, you’d better ask a professional for help. But If you have some related installation experience and want to have a try, you can refer to a detailed installation instruction. Here comes a skillful 2001-2008 TOYOTA RAV4 head unit installation instruction from Seicane for your reference.

2001-2008 TOYOTA RAV4 head unit after installation

Some tips before the installation:

1.Please disconnect the power before the installation.

2.Please prepare a lever and a screwdriver before the removal and the installation.

3.Please keep all the separate parts from the car. Please take great care of the dashboard to avoid scratching it during its detachment and installation. Please keep handy any parts from the car and make use of all the original screws from the car as much as possible. so each related part of the unit can be fixed securely.

4.For your convenience, here’s the recommended tools for removal and installation from Seicane, please check for more details: http://www.seicane.com/car-dvd-dismantling-device-srd-400

2001-2008 TOYOTA RAV4 head unit installation guide

1.Remove two trim panels at each side of the center console and set it aside.

Remove two trim panels at each side of the center console and set it aside

2.Remove the top panel and set it aside.

Remove the top panel and set it aside

3.Remove 4 screws holding the unit with a Phillips screwdriver.

Remove 4 screws holding the unit with a Phillips screwdriver

4.Gently take out the panel on the radio interface.

Gently take out the panel on the radio interface

5.Take out the radio and disconnect cables at back of it.

Take out the radio and disconnect cables at back of it

6.Check all the accessories for the new Seicane head unit.

Check all the accessories for the new Seicane head unit

7.Connect the harnesses to the back of the new Seicane head unit.

Connect the harnesses to the back of the new Seicane head unit

8.Connect the Seicane head unit to your original car radio ‘s plugs.

9.Put the new Seicane head unit into the dash.

10.Turn on the new Seicane head unit and have a comprehensive check if it works well.

11.Install 4 screws back to their original position.

12.Install the trim panel back to its original place.

By the way, if you don’t find a suitable head unit and don’t know which aftermarket unit is better, then this 2001-2008 TOYOTA RAV4 head unit can be a good choice for you. It has intelligent pure android 5.1.1 operation system and a 6.2 inch HD 800*480 multi-touch screen. Here’s the link for you to check more details, please click:

http://www.seicane.com/seicane-s126003-oem-android-gps-navigation-system-for-2001-2008-toyota-rav4-with-touch-screen-dvd-player-radio-rds-steering-wheel-control-bluetooth-3g-wifi-mirror-link-obd2-ipod-backup-camera

This modern 2001-2008 TOYOTA RAV4 head unit comes with an a large 6.2 inch touch screen with 800*480 flawless high definition for a better display and operation. Besides, with built-in GPS, bluetooth, DVD, radio, USB connection, you will find everything you need in a car stereo to transform your car into an entertainment paradise! To have fun all the way, this excellent 2001-2008 TOYOTA RAV4 head unit is just your best choice!

How to upgrade a 2002 2003 2004 Range Rover car radio with Bluetooth Radio Tuner 3G WiFi Mirror Link OBD2 Quad-core CPU DVR

If you want to upgrade your factory radio, you’d better figure out what features you need most, which can help you easily find an ideal car stereo in a sea of goods. If you don’t know how to install a new stereo, you can either go to a car stereo upgrade center or ask a professional for help. The following is a step-by-step 2002 2003 2004 Range Rover car radio installation instruction from Seicane. If you have the same dashboard as the picture below, you can refer to it.

2002 2003 2004 Range Rover car radio after installation

Before and during installation, you should notice:

1.Before connecting, please make sure the ignition is off to avoid short circuit.

2.Ensure connect the yellow and red power cable at last.

3.Ensure that all loose wires are isolated with electrical tape

4.Ensure don’t tangle the wire when tighten the moving parts(Such as seat rails).

5.Ensure that all ground is connected to the same place.

6.Using the improper fuse may cause damage of fire, so when replace the fuse, please consult the professional.

7.For your convenience, here’s the recommended tools for removal and installation from Seicane, please check for more details: http://www.seicane.com/car-dvd-dismantling-device-srd-400

2002 2003 2004 Range Rover car radio installation instruction

1·First pry off the top panel with flat screwdriver and set it aside.

First pry off the top panel with flat screwdriver and set it aside

2·Next remove two screws under the top panel with a Phillips screwdriver as the picture shows.

Next remove two screws under the top panel with a Phillips screwdriver as the picture shows

3·Remove all screw holding the panel above the radio.

Remove all screw holding the panel above the radio

4·Pull out the panel as the picture shows.

Pull out the panel as the picture shows

5·Then remove screws holding the radio in dashboard with a Phillips screwdriver as the picture shows.

Then remove screws holding the radio in dashboard with a Phillips screwdriver as the picture shows

6·Pull out the whole console with radio slowly.

Pull out the whole console with radio slowly

7·Disconnect the original harness.

Disconnect the original harness

8·Pry off the control panel.

Pry off the control panel

9·Remove the screws and remove the radio frame.

Remove the screws and remove the radio frame

10·Check all the accessories for the new Seicane car radio.

Check all the accessories for the new Seicane car radio

11. Connect the harnesses to the back of the new Seicane car radio.

Connect the harnesses to the back of the new Seicane car radio

12. Connect the Seicane car radio to your original car radio ‘s plugs.

13.Turn on the new Seicane radio to have a careful check if everything works well. If it doesn’t, please check whether all the cables are connected correctly..

14.If everything is OK, firm removed screws that are put aside, then make trim panel back on your new Seicane radio.

Can you understand all the installation steps for a 2002 2003 2004 Range Rover car radio? If not, it’s suggested you consult your dealer. Or you can also directly have a professional install it. If you haven’t found an ideal head unit for your car, you can refer to this amazing 2002 2003 2004 Range Rover car radio from Seicane. It comes with the latest features and capabilities for you to upgrade your factory radio. For more details, you can click:

http://www.seicane.com/seicane-s127018l-16g-android-car-stereo-dvd-gps-system-for-2002-2003-2004-range-rover-with-bluetooth-radio-tuner-3g-wifi-mirror-link-obd2-quad-core-cpu-rearview-camera-dvr-s127018l

This modern 2002 2003 2004 Range Rover car radio comes with many improved and upgraded features including Quad-core CPU, GPS navigation, DVD player and Bluetooth, a lot of convenience is given to you and you can have much enjoyment in the car while you are driving. Hands-free calls are also supported by Bluetooth connection with your bluetooth-enabled mobile phones for a safer journey. Have a good time with this top 2002 2003 2004 Range Rover car radio and good luck to you!

How to replace a 1998-2006 BMW 3 Series E46 car stereo with Quad-core CPU Bluetooth Radio Tuner Mirror Link OBD2 3G WiFi

1998-2006 BMW 3 Series E46 car stereo after installation

Now I’d like to show you a wonderful 1998-2006 BMW 3 Series E46 car stereo from Seicane to you. It’s taken after the installation. With such an intelligent car stereo in your car, you can not only get to various destination under the guidance of the most accurate GPS navigation system, but also have great fun with its powerful entertainment function. Here comes the detailed installation instruction for it, wish it can be helpful for you.

1998-2006 BMW 3 Series E46 car stereo after installation

Before and during installation, you should notice:

1.Before connecting, please make sure the ignition is off to avoid short circuit.

2.Ensure connect the yellow and red power cable at last.

3.Ensure that all loose wires are isolated with electrical tape

4.Ensure don’t tangle the wire when tighten the moving parts(Such as seat rails).

5.Ensure that all ground is connected to the same place.

6.Using the improper fuse may cause damage of fire, so when replace the fuse, please consult the professional.

7.For your convenience, here’s the recommended tools for removal and installation from Seicane, please check for more details: http://www.seicane.com/car-dvd-dismantling-device-srd-400

1998-2006 BMW 3 Series E46 car stereo installation guide

1. The original car radio.

The original dashboard

2. Use a lever to remove the trim strip.

Use a lever to remove the trim strip

3. Remove the two screws marked in the picture, pull out the original car radio and the air conditioner controller.

Remove the two screws marked in the picture, pull out the original CD player and the air conditioner controller

4. Remove the storage box.

Remove the storage box

5. Remove the four screws marked in the picture and pull out the radio bracket.

Remove the four screws marked in the picture and pull out the CD bracket

6. The radio bracket and the storage box.

The CD bracket and the storage box

7. Install the air conditioner controller in the place where the storage box used to be.

Install the air conditioner controller in the place where the storage box used to be

8. Check all the accessories for the new Seicane car stereo.

Check all the accessories for the new Seicane car radio

9. Connect the harnesses to the back of the new Seicane car stereo.

Connect the harnesses to the back of the new Seicane car radio

10. Connect the Seicane car stereo to your original car radio ‘s plugs.

Connect the Seicane car radio to your original car radio 's plugs
Connect the Seicane car radio to your original car radio ‘s plugs

11. Have a test to check if everything works properly.

Have a test to check if everything works properly

12. Fasten the screws and install the trim strip back.

Fasten the screws and install the trim strip back

Can you install this 1998-2006 BMW 3 Series E46 car stereo in you car with the help of the installation instruction ? If not, you can directly have a professional install it. If there is any question, you can ask your dealer for help. But if you haven’t found an ideal head unit for your car, you can refer to this amazing BMW 3 Series E46 car stereo from Seicane. It comes with the latest features and capabilities for you to upgrade your factory radio. For more details, you can click:

http://www.seicane.com/seicane-s12746-16g-1998-2006-bmw-3-series-e46-316i-318i-320i-323i-325i-android-gps-navigation-in-car-dvd-system-with-bluetooth-radio-tuner-mirror-link-obd2-3g-wifi-hd-1024-600-multi-touch-screen


This intelligent BMW 3 Series E46 car stereo can support multimedia formats like DVD/VCD/CD/MP3/MPEG4/DIVX/CD-R/WMA/JPEG etc. to bring you lots of fun while driving. It has turn-by-turn GPS navigation and tons of POIs! You can also safely make and receive hands-free phone calls, scroll contact lists and stream audio with Bluetooth from your enabled smart phone. Just take it and have great fun with it. Good luck to you!

Detailed installation instruction for a 2007-2011 VW Volkswagen Tiguan head unit with 8 inch multi-touch screen Android 5.1.1 DVD Radio Bluetooth 3g WIFI

2007-2011 VW Volkswagen Tiguan head unit after installation

Have you ever installed a new car radio on your own before? If not, you may think it too hard to do it by yourself. Actually, it’s not too difficult since most of the aftermarket car stereos are just plug and play with special wiring harness. If you are a car owner of a 2007-2011 VW Volkswagen Tiguan and have the same dashboard as the picture below, you can take this detailed 2007-2011 VW Volkswagen Tiguan head unit installation instruction from Seicane for reference before and during the installation.

2007-2011 VW Volkswagen Tiguan head unit after installation

Precautions:

1.Please apply the parking brake and remove the negative cable on the vehicle battery before the removal to ensure safety.

2.A lever and a screwdriver need to be prepared before the installation.

3.For your convenience, here’s the recommended tools for removal and installation from Seicane, please check for more details: http://www.seicane.com/car-dvd-dismantling-device-srd-400


2007-2011 VW Volkswagen Tiguan head unit installation guide

1.Remove the top panel with a lever.

Remove the top panel with a lever

2.Disconnect the connector at the back of the panel.

Disconnect the connector at the back of the panel

3.Unscrew the screw with a screwdriver.

Unscrew the screw with a screwdriver

4.Remove the metal sheet on the top with your hands.

Remove the metal sheet on the top with your hands

5.Unscrew two screws circled in red shown as follows under the metal sheet.

Unscrew two screws circled in red shown as follows under the metal sheet

6.Remove the air conditioner vent with your hands.

Remove the air conditioner vent with your hands

7.Unscrew two screws under the vent with a screwdriver.

Unscrew two screws under the vent with a screwdriver

8.Remove the panel on the original car radio.

Remove the panel on the original car radio

9.Unscrew four screws holding the original car radio with a screwdriver.

Unscrew four screws holding the original car radio with a screwdriver

10.Take the original car radio out of the dash.

Take the original car radio out of the dash

11.Disconnect all the connectors at the back of the original head unit.

Disconnect all the connectors at the back of the original car radio

12.Check all the accessories for the new Seicane head unit.

Check all the accessories for the new Seicane car radio

13.Connect the harnesses to the back of the new Seicane head unit.

Connect the harnesses to the back of the new Seicane car radio

14.Connect the Seicane head unit to your original car radio ‘s plugs.

15.Turn on the new Seicane head unit to have a careful check if everything works well. If it doesn’t, please check whether all the cables are connected correctly.

16.Put the new Seicane head unit into the dash.

17.Put everything into their original place.


The above is all the installation guide for a 2007-2011 VW Volkswagen Tiguan head unit. If you find the dashboard above is different from yours, please don’t worry, the installation is similar on the whole, it won’t have much influence. If you think it too hard for you to install it, you’ d better ask a professional to help.

Here shows you an amazing 2007-2011 VW Volkswagen Tiguan head unit from Seicane. If you don’t find an ideal unit for your car, it’s your ideal choice. For more details, please click:

http://www.seicane.com/seicane-s128405-8-inch-android-dvd-radio-car-navigation-head-unit-for-2008-2013-vw-volkswagen-scirocco-with-3g-wifi-mirror-link-obd2-bluetooth

The amazing VW Volkswagen Tiguan head unit is equipped with built-in the advanced Bluetooth technology which allows you to make and receive phone calls wirelessly as well as stream music wirelessly from your smart phone to the head unit.

To upgrade your in-car entertainment, this amazing VW Volkswagen Tiguan head unit is just your best choice, which comes with a large 8 inch HD touch screen, GPS navigation system, Bluetooth connection, FM/AM Radio and everything you will ever need to transform your car into an entertainment powerhouse!

How to install a 2004-2011 Mercedes Benz CLK Class W209 head unit with Radio RDS Bluetooth 3G WiFi Mirror Link OBD2 16G Flash

Can you believe that you are able to install a new car radio even though you are not a professional? The answer is absolutely yes. With some related installation experience, you can easily achieve the installation with the help of a step-by-step installation guide. Now please look at the picture below, it’s a 2004-2011 Mercedes Benz CLK Class W209 head unit after installation from Seicane. If you also have the same or similar dashboard, then you can refer to this detailed installation instruction for 2004-2011 Mercedes Benz CLK Class W209 in particular.

2004-2011 Mercedes Benz CLK Class W209 head unit after installation

Some tips before the installation:

  1. Please disconnect the power before the installation.
  2. Please prepare a lever and a screwdriver before the removal and the installation.
  3. Please keep all the separate parts from the car. Please take great care of the dashboard to avoid scratching it during its detachment and installation. Please keep handy any parts from the car and make use of all the original screws from the car as much as possible. so each related part of the unit can be fixed securely.
  4. For your convenience, here’s the recommended tools for removal and installation from Seicane, please check for more details: http://www.seicane.com/car-dvd-dismantling-device-srd-400


2004-2011 Mercedes Benz CLK Class W209 head unit installation guide

1.The picture of the original car radio and 6-disc CD player.

The picture of the original car radio and 6-disc original car radio

2.First detach the gear shift panel.

First detach the gear shift panel

3.Use a screw driver to remove the screw marked with a red circle to release the car charger and ashtray.

Use a screw driver to remove the screw marked with a red circle to release the car charger and ashtray

4.Remove the car charger and ashtray assembly.

Remove the car charger and ashtray assembly

5.Use a screw driver to remove the screw marked with a red circle.

Use a screw driver to remove the screw marked with a red circle

6.Pry the air conditioner panel out with a plastic lever.

Pry the air conditioner panel out with a plastic lever

7.Remove the original air conditioner panel.

Remove the original air conditioner panel

8.Remove the heated seat and control panel assembly.

Remove the heated seat and control panel assembly

9.Pay attention to this buckle.

Pay attention to this buckle

10.Remove two screws.

Remove two screws
Remove two screws

11.Pull out the original car radio.

Pull out the original car radio

12.Check all the accessories for the new Seicane head unit.

Check all the accessories for the new Seicane head unit

13.Connect the harnesses to the back of the new Seicane head unit.

Connect the harnesses to the back of the new Seicane head unit

14.Connect the Seicane head unit to your original car radio ‘s plugs.

15.Install the new Seicane radio back after the wiring harness has been connected. Fasten the four screws.

Install the new Seicane radio back after the wiring harness has been connected. Fasten the four screws

16.Install the air conditioner panel, the car charger, the ashtray, the heated seat and the control panel back.

Install the air conditioner panel, the car charger, the ashtray, the heated seat and the control panel back

17.Reinstall cigarette lighter.

Reinstall cigarette lighter

18.Turn on the new Seicane head unit and have a careful check if everything works well.


Can you understand all the installation steps for the 2004-2011 Mercedes Benz CLK Class W209 head unit? If not, you’d better ask your dealer or a professional for help. If you don’t find a  fitting unit for your car, I’d like to introduce a wonderful 2004-2011 Mercedes Benz CLK Class W209 head unit from Seicane to you, please check it out:

http://www.seicane.com/seicane-s127508-pure-android-autoradio-dvd-gps-head-unit-for-2004-2011-mercedes-benz-clk-class-w209-clk270-clk320-clk350-clk500-clk550-with-radio-rds-bluetooth-3g-wifi-mirror-link-obd2-16g-flash-s127508

This double din Mercedes Benz CLK Class W209 head unit comes with a large 7 inch multi-touch screen which is ideal for watching various kinds of videos to have more fun in your car. Thanks to the dual zone, you can also enjoy your favorite music on the way while you are navigating to your destination. Coming with the A/V input and output, this unit can support a rearview camera and will automatically switch to the reversing image for you to park easily. Why not take it right now and have great fun in your car in the future?

How to upgrade a 1999-2009 VW Volkswagen Sharan car stereo with Android 5.1.1 Radio GPS Multimedia DVD Player Quad-core CPU HD 1024*600 Multi-touch Capacitive Screen

For most car owners, driving in a beloved car stereo with great pleasure is the most exciting thing to the destination. To get more fun on the way, you can easily upgrade your factory radio with a new aftermarket car radio. Here I’d like to introduce a great 1999-2009 VW Volkswagen Sharan car stereo installation guide from Seicane to you . If you have the same dashboard as the picture below, then you can read this passage carefully for reference.

1999-2009 VW Volkswagen Sharan car stereo after installation

Precautions:

  1. Please apply the parking brake and remove the negative cable on the vehicle battery before the removal to ensure safety.
  2. A lever and a screwdriver need to be prepared before the installation.
  3. For your convenience, here’s the recommended tools for removal and installation from Seicane, please check for more details: http://www.seicane.com/car-dvd-dismantling-device-srd-400

1999-2009 VW Volkswagen Sharan car stereo installation instruction

1.The original car radio.

The original car radio

2.Insert four removal keys into the holes of the original car radio.

Insert four removal keys into the holes of the original car radio

3.Gently take the original car radio out of the dashboard by pulling the removal keys as the following picture shows.

Gently take the original car radio out of the dashboard by pulling the removal keys as the following picture shows

4.Disconnect the connectors at the back of the original radio.

5.Check all the accessories for the new Seicane car stereo.

Check all the accessories for the new Seicane car radio

6.Connect the harnesses to the back of the new Seicane car stereo.

Connect the harnesses to the back of the new Seicane car radio

7.Connect the Seicane car stereo to your original car radio ‘s plugs.

8.Turn on the new Seicane stereo to have a careful check if everything works well. If it doesn’t, please check whether all the cables are connected correctly.

9.Put the new Seicane stereo into the dash.

10.Put everything into their original place.


Can you install this new 1999-2009 VW Volkswagen Sharan car stereo on your own with the help of this step-by-step installation guide? If you think it too hard for you, you’d better ask a professional for help. If you encounter any question during the whole process, you can consult your dealer. If you don’t have an ideal car stereo for your car, I’d like to recommend this intelligent 1999-2009 VW Volkswagen Sharan car stereo from Seicane to you. Here’s the link, please click:

http://www.seicane.com/seicane-s127648-1999-2009-vw-volkswagen-sharan-android-radio-gps-multimedia-car-dvd-player-with-bluetooth-mirror-link-obd2-3g-wifi-hd-1024-600-multi-touch-capacitive-screen

This amazing VW Volkswagen Sharan car stereo comes with a built-in latest GPS navigation system is desirable for you to find the best way to your destination within the least time. As long as you have a mobile phone with bluetooth feature, you can easily pair it with this unit via the bluetooth connection for hands-free calls and music streaming to ensure the safety and pleasure on a long trip.

To keep your passengers enjoyable on all trips, this multifunctional VW Volkswagen Sharan car stereo is just your best choice!

Upgrade a 2004-2012 Mercedes Benz A Class W169 head unit with Bluetooth 3G WiFi Mirror Link OBD2 HD 1024*600

Here comes a modern 2004-2012 Mercedes Benz A Class W169 head unit from Seicane after installation. If you want to enjoy a more comfortable car interior environment and a more exciting driving experience, it’s a great idea for you to install such a multifunctional stereo in your car. To install a new aftermarket car stereo, you can find a step-by-step installation guide to help. Now I’d like to share a detailed Mercedes Benz A Class W169 head unit installation guide with you. You can read it carefully if you also have the same dashboard as the picture below.

2004-2012 Mercedes Benz A Class W169 head unit after installation


Tips about the installation:

1.Please disconnect the power before the installation.

2.Please prepare a lever and a screwdriver before the removal and the installation.

3.Please keep all the separate parts from the car. Please take great care of the dashboard to avoid scratching it during its detachment and installation. Please keep handy any parts from the car and make use of all the original screws from the car as much as possible. so each related part of the unit can be fixed securely.

4.For your convenience, here’s the recommended tools for removal and installation from Seicane, please check for more details: http://www.seicane.com/car-dvd-dismantling-device-srd-400


2004-2012 Mercedes Benz A Class W169 head unit installation guide

1. Detach the outer frame of the original car radio.

1. Detach the outer frame of the original car radio.


2. Use a screw driver to remove the screws marked with red circles.

2. Use a screw driver to remove the screws marked with red circles.


3. Remove the screw on the lower right.

3. Remove the screw on the lower right.


4. Remove the screw on the lower left.

4. Remove the screw on the lower left.


5. Remove the screw on the upper left.

5. Remove the screw on the upper left.


6. Remove the screw on the upper right.

6. Remove the screw on the upper right.


7. Use a screw driver to remove the screws marked with red circles.

7. Use a screw driver to remove the screws marked with red circles.


8. Remove the original car radio.

8. Remove the original car radio.


9. Check all the accessories for the new Seicane head unit.

9. Check all the accessories for the new Seicane head unit.


10. Connect the harnesses to the back of the new Seicane head unit.

10. Connect the harnesses to the back of the new Seicane head unit.


11. Insert the plug of the car into the socket of unit.

11. Insert the plug of the car into the socket of unit.


12.Remarks

a. Plug in the radio antenna.

b. Plug in the GPS antenna.

12. Remarks a. Plug in the radio antenna. b. Plug in the GPS antenna.


13. Install the new Seicane head unit into the dashboard.

13. Install the new Seicane radio into the dashboard.


14. Fasten the new Seicane head unit with 4 screws and install the frame back.

14. Fasten the new Seicane radio with 4 screws and install the frame back.


15. Turn on the new Seicane head unit to have a comprehensive check. If everything works well, all the installation is done. If not, please check if all the cables are connected correctly.

With this detailed installation guide, can you install your new 2004-2012 Mercedes Benz A Class W169 head unit on your own? If not, you’d better ask a professional to help you. If you encounter any question during the whole process, you can consult your dealer. In addition, you need to find a suitable head unit for your car. If you don’t have one, you can refer to this advanced 2004-2012 Mercedes Benz A Class W169 head unit from Seicane, please click for more details:

http://www.seicane.com/seicane-s127682-7-inch-2004-2012-mercedes-benz-a-class-w169-a150-a160-a170-android-autoradio-navigation-car-dvd-head-unit-with-bluetooth-3g-wifi-mirror-link-obd2-hd-1024-600-multi-touch-screen-flash 

Designed with a large 7 inch multi-touch screen, you can enjoy a more intuitive interface and an easier operation with this Mercedes Benz A Class W169 head unit. As an amazing multimedia player, it can support almost all the multimedia formats like DVD/VCD/CD/MP3/MPEG4/DIVX/CD-R/WMA/JPEG, etc., so that you can keep your passengers entertained all the way on a long trip.

To keep safer and more cheerful, you can put the Bluetooth technology into good use for hands-free calls and streaming music. The GPS navigation system of high accuracy is desirable for you to get to your destination with the best way and within the least time.

To keep entertained on all your trips, this amazing Mercedes Benz A Class W169 head unit is just your best choice. Good luck to you!