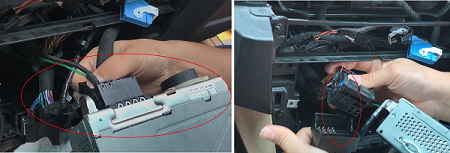
Step-By-Step Guide for BMW 5 Series E60 2009-2012 Stereo Navigation System with Bluetooth Carplay

In a BMW, there’s nothing better than installing a car radio, especially if the driver is used to using the way of carplay during the driving time. And it is regarded as the smartest and the safest way to use your phone while you’re on the road. Therefore, most of those who pursue high-quality driving life will always put the installation of car stereo as an important role as the correct installation steps can help them reduce the budget as well as the extra energy. As for those who has no experience before installation, I sincerely recommend you to read the following easy guide for BMW 5 Series E60 2009-2012 Stereo Navigation System as a reference.

Before installation, you should pay attention to some important tips. First of all, you can disconnect the power and prepare some tools such as lever before the removal and the installation. Secondly, you should keep all the separate parts from the car and take great care of the dashboard to avoid scratching it during its detachment and installation.

Last but not least, you should keep handy any parts from the car and make use of all the original screws from the car as much as possible so that each related part of the unit can be fixed securely.

Installation Instruction of Navigation for BMW 5 Series E60 2009-2012 Radio

Step 1: Take off the left screw and the right screw.

Step 2: Lever original car screen frame and Pull out the frame.

Step 3: Disconnect LVDS connector and the power cable.

Step 4: Lever the vent panel as reveal from the right side and the middle vent panel from the bottom.

Step 5: Lever the left panel as reveal and Take off the emergency light cable.

Step 6: Take off the left screw and the screws on the right side.

Step 7: Pull out the air conditioner panel and Unplug air conditioner connectors

Step 8: Lever the box from the right side and the same box from its left side.

Step 9: Take off the 2 screws, then Pull out the head unit and disconnect power cable.

Step 10: Pull out new wires( power cable, USB wire,GPS antenna) and original car LVDS connector.

Step 11: Connect above wires with the new android screen

Step 12: Install new screen, first put bottom inside, then fix the screen to stand and adjust to exact screw position on the top.

Step 13: Fix the screws and take out original car optical fiber connector.
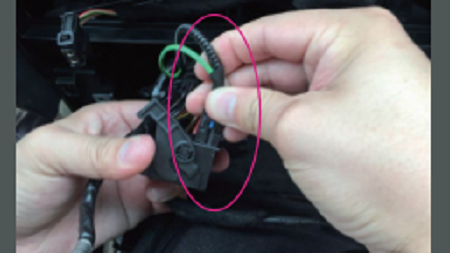
Step 14: Connect original car power cable with new power cable and the unplugged fiber optical connector with new wiring.

Step 15: Connect new power cable with the car head unit, then Install the head unit and fix the 2 screws.

Step 16: Put the AC vent assembly back and fix 2 screws.

Step 17: After installing AC panel, Connect emergency light wire and Put emergency light assembly back.

After the installation, you can check whether the new head unit can be used as normal. And as you can see the process of the installation is not difficult as long as you would like to learn these steps above even you have no skills before. However, if you think there is still a bit hard for you to get these knowledge from the article, you can ask for a trained professional technicians for help or consult your car dealer directly. There are dozens of resource available on the Internet and you can click them for more information as you wish. Here I would like to shark a link of a product of BMW 5 Series E60 Car Audio System from Seicane. Hope you can benefit from it as you want.

With the latest and fastest responsive operation System -Android 10.0, it supports your entertainment time in a more flexible way. Besides, without uninstalling your old stereo, this new android car navigation system will keep your original radio ,idrive system and amplifer system.

Compared to other car radio ,this one can provide a chance for you to hear from the center being surrounded from all direction instead of hearing of the main sound from front right direction. In addition, with high speed CPU and large storage, you can download various apps and make phone call as smooth as usual when you are driving on the road.

Last but not least, it can be connected to the Internet whenever you drive, and the DVR functions can support you to record every moment in your journey, which will make you never miss anything. So if you have desire to make your car a place you love to be, please grab this chance from now on.

The necessary 13 steps of installation guide of an Android Car Screen in 2009-2015 BMW X1 Series E84 CIC System

It has been proven to be popular that replacing a new touch screen car stereo for the old vehicle’s stock stereo these years. As long as you have the experience before for a similar car radio system, you will finish this complex procedures with just a few minutes by your hands and some useful tools. But for the most beginner who tried to set up this installation by themselves, it is never too late to start to learn some effective skills and read some steps to finish it smoothly. And the following 13 steps is a necessary installation guide of BMW X1 E84 2009-2015 CIC Radio which can help them to understand the difficult points during the installation as the reference.

Before installation:

1. Please disconnect the power before the installation.

2. Please prepare a lever and a screwdriver before the removal and the installation.

3. Please keep all the separate parts from the car. Please take great care of the dashboard to avoid scratching it during its detachment and installation. Please keep handy any parts from the car and make use of all the original screws from the car as much as possible. so each related part of the unit can be fixed securely.

Installation guide of BMW X1 E84 2009-2015 CIC Radio

1.Lever marked console assembly,the outer frame of AC control and the frame of DVD part

2.Lever right and left trim, let the gap towards on both sides

3.Pull the whole frame out and take off the 4 screws as reveal

4.Pull out DVD(Notice that there are 2 places might be obstacles) and disconnect the wiring shown in the picture

5.Lever AC vent assembly and disconnect the wire.

6.Lever the screen outer frame and remove the frame

7.Remove the screws on both right and left sides.

8.Pull out the whole original screen and Unplug wires as reveal

9.Remove the the optical fiber connector and Put the fiber connector into the new wire

10.Connect original cable with new main cable and plug the cable to the DVD.

11.Put original DVD back and connect new wires with OEM connectors

12.Install new car touch screen and Fix the screws

13.Plug AUX connector and Re-install the decorative panel.

If you read the above steps with enough patience, you can finish this job easily even as the one who has no experience before with just a few time. But if you still have problems during the whole installation, you can ask a professional for help or consult your car dealer who can offer the excellent advice to you. And if you still think it is too hard for you, there are plenty of online services and companies available, here is a recommended online link of BMW X1 E84 2009-2015 CIC Radio from Seicane. You can check more details from it.

This car stereo is running on the latest Android 10.0 operation system. With 1.8Ghz and 8-core CPU, you can have the most stable and fast response during the driving. And the special 16EQ DSP Settings, you can enjoy high quality sound effect as well.

With bluetooth carplay and large CPU memory inside the radio, you can freely enjoy phone applications and the smooth operation on the driving way. What’s more, it is safer for you to have phone calls and listen to music as it can provide the advanced services . After installing a DVR, you can also record every moment in your journey and never miss anything at the same time.

Compared to the other screen, this IPS screen comes with high resolution, providing clearer image and stronger sense of hierarchy. And with a more realistic and transparent new screen color and higher visual angle, it can support multiple popular videos.

It is the most fashionable and safest choice for you if you want to find the new car stereo online. Just click it and don’t miss this chance.

For 2013-2016 BMW 3 Series F30 F31 F34 F35 Factory Radio Upgrade Guide

Instead replacing the whole car radio system, lots of BMW owners would rather than choosing to change the radio screen, which is indeed a quick and easy way to upgrade the factory radio system in recent years.

As a professional supplier of aftermarket car radio GPS system, Seicane not only produces quality radio system for various car models, but provides comprehensive installation guides for car owners. And here is a detailed guide to install an upgraded android radio screen unit in 2013-2016 BMW 3 Series F30 F31 F34 F35. Hope it be useful for you.

  • Tools: Plastic pry tool, screwdrivers.
  • Note: Cut off the car power during the installation process to ensure safety.

The original car radio system

Step 1, Removing the A/C vent panel. We need to start this from the co-pilot position. Use the plastic pry tool to pry the panel, then take down the whole vent panel and disconnect the plug.

Step 2, Next we go to remove the trim panel at the bottom of the radio system. Still need to pry it, then take it down and unplug the connector.

Step 3, Remove screws that fixed the button panel. Take down the panel and disconnect the plugs.

Step 4, Remove screws that fixed the original radio screen, take it down and unplug its connectors.

Step 5, Remove screws that fixed the original CD unit, take out the unit and unplug the connectors.

Step 6, Have a check for the new car radio screen unit to make sure everything of it in good condition.

Step 7, According to the radio user manual, correspondingly connect the new wiring harness to the car.

Step 8, Connect the new screen to the car.

Step 9, Connect the original CD unit.

Step 10, Test the new radio system. If it works normally, install all the car parts back. If there is problem, check again the wiring condition.

Key features of Seicane upgraded radio screen for BMW models

  • The 10.25” IPS screen can greatly improve your viewing experience when watch videos and use navigation.
  • Equipped with the latest Android system, it provides stable operation and performance.
  • It supports all original car functions, keeping you comfortable using experience.
  • There are built-in Bluetooth and microphone, so you can use Bluetooth to call and listen to music.
  • It’s able to support Carplay, just connect your phone to the radio with a Carplay USB dongle, then you can use phone applications freely, being the best way to play phone while drive safe on the road.
  • You can also add DVR, rear view camera, TPMS and so on to help increase driving safety as they are supported by this Android radio screen.

How to Install Seicane H826 Touchscreen Radio System for 2001-2008 BMW 7 Series E65 E66?

Installing an upgraded radio screen in BMW 7 Series is not so difficult. I am sure the new radio screen do make differences in your drive. If you are planning to upgrade your BMW’s basic radio screen, take a look at this installation guide, you may get some tips from it.

Tools: Plastic pry tools, screwdrivers.

Note: Make sure the car power is off before working.

The original car radio system.

Step 1, Pry to open the front cover plate of the radio screen, then remove the cover plate.

Step 2, Remove 3 screws that fixed on the top of the radio screen, then pry to remove the radio screen, unplug its connector.

Step 3, Remove screws that fixed the A/C outlet panel; Pry to open the outlet panel from the side of co-pilot.

Step 4, Take down the whole A/C outlet panel and unplug the connector.

Step 5, Remove screws that fixed the original CD unit, take it down and disconnect its plugs.

Step 6, Pry to remove the metal sheet on the back of the original radio screen, then disassemble the screen and frame, and unplug the cable.

Step 7, Use new cable to assemble the frame on the new radio screen.

Step 8, Connect new wiring harness to the car plugs, then connect new radio screen and original CD unit.

Step 9, Start the car to test whether the new radio system can work normally, if there is no problem, install all the car accessories back; if there is something wrong, check whether the cables are correctly connected.

Know about Seicane car stereo GPS navigation system for BMW 7 Series E65 E66 2001-2008

It’s an 8.8” IPS screen system integrated with various functions including radio, music and video playing, Bluetooth, GPS navigation etc. It also supports the original car functions to keep you comfortable using experience. Besides, it supports Carplay, giving you the ability to freely enjoy your smartphone Carplay function on the radio display.   

On the other hand, the product is able to support external car cameras such as DVR, rear view camera and so on. With the DVR, you can record everything of traffic accident, providing accident liability certificate. While a rear view camera can show you clear rear images whenever you park and reverse the car, so that you park the car easier and more convenient.  

Choosing Seicane, you never regret!

Instructions of How to Upgrade the (2009-2010) BMW 5 Series E60 Factory Radio System

Cars are one of important parts in our life, we spend much time with the car. We drive to work, to picnic, to outdoor activities, to road trips and so on. To keep a comfortable and convenient drive, we do more or less changes to the car, and installing an aftermarket car radio system is one of popular modifications since many cars only come with standard button-operated radio.

In this post, we would like to share an installation guide of BMW 5 Series E60 radio with you. You’ll learn to know how to remove the original radio and install the new radio to the car.

We recommend the Seicane touchscreen radio system, which is easy to install and use. The basic tools you need to prepare are plastic pry tools, screwdrivers. Before the work, you must power off the car. Check the original radio system here.

Step 1, Pry to remove the A/C vent panel, take it down and unplug connector.

Step 2, Remove screws that fixed the CD button panel, then pry to take down the panel and unplug its connector.

Step 3, Pry the button panel at the bottom, take it down and unplug the connector.

Step 4, Remove screws that fixed the CD unit, take down the unit and unplug its connectors.

Step 5, Remove screws that fixed the radio screen, take down the screen and unplug connector.

Step 6, Check the new wiring harness of the Seicane touchscreen radio system, and correspondingly connect them to the car plugs.

Step 7, Connect the new radio screen with the new wiring harness.

Step 8, Connect the original radio CD unit with the new cables, then install it back to the dashboard.

Step 9, Install the bottom button panel back.

Step 10, Install the CD button panel back.

Step 11, Tighten the screws of the new radio screen to fix it.

Step 12, Finally, install the A/C vent panel back.

Step 13, Turn on your car to test the working conditions of the new radio system.

Why choose Seicane car radio system for BMW E60?

  • The product comes with an 8.8” IPS touchscreen with exquisite look, offering you with smooth and flawless operation.
  • This unit only exchanges your original car TFT monitor, which is easy to install and perfectly fit the car.
  • All original car functions are kept as before, you won’t have trouble to use the product.
  • The big size screen gives you a better view when navigate, watch videos&movies. You can use Carplay to enjoy more fun.
  • When you attach a rear view camera to the radio system, it displays rear image automatically when you reverse the car, help you park easily.

You will enjoy better drive after installing the Seicane android car radio!

Seicane Touchscreen Radio System to Upgrade BMW X1 F48 2016-2017 NBT System

Perhaps for many people, owning a BMW is one of their life goals. This is also my dream, and it’s worth celebrating that I finally got a BMW ten months ago, even it’s just a second-hand 2016 BMW X1 F48. I love it so much and often drive it for picnic, camping, road trips etc.

A few weeks ago, I made up my mind to make my BMW better, while the first thing I done was to upgrade the original radio screen. I just finished the installation with the help of my brother last week. You can find all the instructions in following content. 

After doing some researches online, I purchased the Seicane touchscreen android radio system for my car. To do the installation, we need to prepare plastic pry tools and screwdrivers. Below is the original radio system of my car.

Part 1, Removal

Step 1, Use the plastic pry tool to remove the button panel.

Step 2, Take down the button panel, disconnect the plugs.

Step 3, Remove screws that fixed the CD unit, take out the unit, and unplug the connectors.

Step 4, Pry the A/C vent panel, take it down and unplug the connectors.

Step 5, Remove screws that fixed the car radio screen, take down the screen and disconnect the plugs.

Part 2, Installation

Step 6, Before the installation, have a check for the wiring harness of the Seicane radio screen system to make sure everything is good. Also have the radio user manual in your hand to avoid inconvenience.

Step 7, Use the new wiring harness to connect the car plugs and the original CD unit.

Step 8, Install the CD unit to the dashboard.

Step 9, Connect the new radio screen and install it back. Then turn on the car to test the new radio system. If it works well, you can move to Step 10; If there is problem, please check whether the cables are connected correctly.

Step 10, Install the A/C vent panel back.

Step 11, Install the button panel back. The whole installation done.

Seicane touchscreen radio system for BMW X1 F48 2016-2017 NBT System provides with you plenty of amazing features and functions. The 10.25 inches IPS touchscreen is designed with exquisite look and 1280*480 resolution, giving you a very smooth and stable operation. Since the new radio system can support all the original car functions, you won’t have special troubles to use it, keeping you comfortable along the road.

The product also expands more functions. For example, it’s able to support Carplay, so you can use phone applications freely on the radio screen with this function. On the other hand, it also support rear view camera, and the rear images will help you park and reverse car easily. You will have a more happy drive with this Seicane radio navigation system.

How to Install an Android Radio Screen with Bluetooth in BMW 3 Series?

All we know that BMW is one of famous and popular car brands in the world. Most people dream of having a car from BMW.

Three years ago, I was lucky enough to get a BMW 3 Series car from my uncle. I love the car so much, and always try my best to take care of it. If there was a bigger touchscreen radio system, it must be perfect. So I decided to find a way to upgrade the original radio system. Just last month, I got a 10.25 inches Android touchscreen radio system from Seicane and had it install in my BMW. Now at this article, I share the upgrade guide as well as the use of Seicane radio system.  

Part 1, Upgrade the BMW 3 Series car screen 

A new radio screen for BMW 3 Series, plastic pry tools and screwdrivers are needed for the upgrade work. As there will involve the power plugs in the process, cut off the car power at the beginning is must.

Original car radio system

Step 1, Remove the air conditioning vent: Use the plastic pry tool to pry the A/C vent, take it down and unplug the connector.

Step 2, Remove these two screws that fixed the original radio screen, take down the screen and unplug the connector.

Step 3, Remove screws that fixed the CD button panel, take down the panel and unplug the connector.

Step 4, Remove screws that fixed the original CD unit, take down the unit and unplug the connectors.

Step 5, Check the wiring harness and other accessories of the new radio screen.

Step 6, Connect the new radio screen and original CD unit with the new wiring harness. You’d better check the user manual of the new radio screen if you are not sure the cable interfaces.

Step 7, Turn on the power to test whether the new radio functions normally. If there is no problem, install all the accessories including CD button panel and A/C vent back. If it doesn’t work, please check whether cables are connected correctly.

Part 2, The Seicane Bluetooth touchscreen radio for BMW 3 Series

Based on Android 10.0 system, the 10.25 inches IPS touchscreen looks very exquisite and provides users with smooth operation. It does make huge differences compared to using the original screen, especially when you navigate.

Apart from supporting all original car functions, this new radio system with large screen expands more functions such as Bluetooth music and phone, Carplay, rear view camera image etc. With Bluetooth technology, drivers are able to stream music wirelessly from the phone and answer hand-free call while keeping safe drive. On the other hand, for those who always have difficulties in parking, with rear view camera installing, there will be rear images shown on the unit display, thus they can see the rear situation clearly and park the car easily.

The product also designed with various wonderful UI displays, greatly improving user experience.

How to Install or Replace 2011 2012 BMW 5 Series F10/F11 CIC GPS Navigation Radio


car gps navigation radio for 2011 2012 BMW 5 Series
Car GPS Navigation radio for 2011 2012 BMW 5 Series

Nowadays, car are playing very important roles in our daily life and it seems that the factory radio can not meet most people’s needs.The GPS Navigation Radio can not only guide your way ,but also entertain your dull trip. The dual zone function makes it possible to listen to radio/USB/SD music while navigating. In demand of good driving experiences, people would like to choose the GPS Navigation Radio to replace the original radio.  However, most people don’t know how to install a GRS Navigation Radio by themselves. Here, our Seicane will lead your way to know how to install or replace 2011 2012 BMW 5 Series F10/F11 CIC GPS Navigation Radio.


Precaution for Installation:

1. Cut off the power before installation to avoid any danger.

2. Please prepare professional car radio dismantling tools, screwdriver, 3M electronic tape, 3M double side tape, sleeve, cotton cloth.

3. Please keep all the separate parts from the car.

4. For your convenience, here’s the recommended tools for removal and installation from Seicane, please check for more details: http://www.seicane.com/car-dvd-dismantling-device-srd-400


Before installation, please check your car firstly. If it is similar to this type, then you can refer to this video to install or replace 2011 2012 BMW 5 Series F10/F11 CIC GPS Navigation Radio.


If you still have no idea of how to install or replace this kind of GPS Navigation Radio after watching the video, you can consult us or ask professional people around for help. And if you don’t know how to choose a GPS Navigation Radio, I would like to share you a remarkable 2011 2012 BMW 5 Series F10/F11 CIC GPS Navigation Radio for you. For more detailed information, you can go to the following website:

https://www.seicane.com/android-2011-2012-bmw-5-series-f10-f11-cic-hd-touchscreen-car-stereo-radio-head-unit-gps-navigation-bluetooth-phone-mp3-steering-wheel-control-wifi-backup-camera-s028208

With 8.8 /10.25 inch IPS screen, this unit looks very exquisite. Its screen feels very smooth and flawless. Just enjoy a visual feast on this 1280*480 resolution unit. It can support the original car’s all functions, such as radio or Bluetooth function, or the users can utilize this unit’s built-in radio or music function. Besides, its customized wallpaper allows you to set your own photo as background of the main menu.

If you have any question, please feel free to let us know!

How to easily upgrade a 1996-2003 BMW X5 E53 head unit with 8-core CPU DVD Radio RDS Bluetooth Mirror Link OBD2 3G WiFi

BMW is one of the most well-know car brands all over the world.Unfortunately it seems like the auto companies launch new car models every year. Little hard for ordinary people to follow it to upgrade their cars.Luckily we can easily update the car radio which is loaded with advanced GPS navigation system and a great multimedia player so that we also can get much convenience and enjoyments. Here I’d like to share a step-by-step 1996-2003 BMW X5 E53 GPS Navigation installation guide from Seicane if you gonna level-up your factory radio. If you don’t have any experience on the installation, you’d better ask a professional for help. Or incorrect installation guide may cause some unexpected damage to both your car and your new unit. Let’s get started.

Tips before the installation:

1.Please disconnect the power before the installation.

2.Please prepare a lever and a screwdriver before the removal and the installation.

3.Please keep all the separate parts from the car and take care of the dashboard to avoid scratching it during its detachment and installation.

4.For your convenience, link below is the recommended tools for removal and installation from Seicane, please check for details:  http://www.seicane.com/car-dvd-dismantling-device-srd-400

1996-2003 BMW X5 E53 car stereo installation guide

  1. Use a plastic trim tool to remove trim strip.

  1. Remove screws marked by red arrows.

  1. Take out original DVD player

  1. Unplug the connectors behind the unit.

  1. Connect the power cables as the picture shows.

  1. Remove screws in the spare tire in the trunk.

  1. Take out the spare tire.

  1. Remove four screws marked with red arrows.

  1. Remove screws in triangle crutch.

  1. Take out triangle crutch.

  1. Connect original plug of the car with power plug of DVD GPS.

  1. Check all the accessories for the new Seicane head unit.

  1. Connect the harnesses to the back of the new Seicane head unitrefer to instructions.

  1. Connect the Seicane head unit to your original car radio ‘s plugs.
  2. Turn on the new Seicane head unit to have a careful check if everything works well.
  3. Put the new Seicane head unit into the dash and install the four screws.
  4. Install the trim panel into its original place.


Absolutely you done it if you can smoothly install your new car radio without doubt by following this article for 1996-2003 BMW X5 E53 DVD Player. First of all, you need to confirm that your new unit can be suitable for your car in advance. If you don’t have one, I’d like to recommend an ideal 1996-2003 BMW X5 E53 head unit from Seicane to you. Here’s the link please click:

https://www.seicane.com/barato-tudo-em-um-android-2000-2007-bmw-x5-e53-3-0i-3-0d-4-4i-4-6is-4-8is-radio-substituic-o-com-sat-nav-sistema-hd-touch-tela-cd-dvd-player-3g-wifi-bluetooth-musica-obd2-mirror-link-aux-volante-controle-mp3-mp4-s6902g

Above link related head unit for 1996-2003 WBMW X5 E53 car radio comes with the latest Android Radio, RAM 4GB \ ROM 64GB \ CPU 8-core \ Build-in Carplay \ 2.5D IPS Screen, Support RDS, SWC, XM radio APP etc. The car stereo is equipped with worldwide real-time navigation function of high accuracy. With current location, speed, mileage, landmark building display, 3D street view, destination search and turn-by-turn voice directions, it will be your perfect road companion. With dual zone function, the music from radio/AV/TV etc can be played behind the scene under GPS mode and it will switch to the GPS voice automatically.Have a safe driving all the time.

How to upgrade a 2005-2012 BMW 3 Series E90 E91 E92 E93 car stereo with DVD Player GPS Navigation System Radio Bluetooth 1080P Video TV Tuner   

Have you ever upgraded your factory radio before? If not, you will be greatly amazed at the different experience if you try to replace your factory radio with a new one. You may worry about the installation. Now I’d like to introduce a step-by-step 2005-2012 BMW 3 Series E90 E91 E92 E93 car stereo installation guide from Seicane to you as a reference.

2005-2012 BMW 3 Series E90 E91 E92 E93 car stereo after installation


Tips about the installation:


1.Please disconnect the power before the installation.

2.Please prepare a lever and a screwdriver before the removal and the installation.

3.Please keep all the separate parts from the car. Please take great care of the dashboard to avoid scratching it during its detachment and installation. Please keep handy any parts from the car and make use of all the original screws from the car as much as possible. so each related part of the unit can be fixed securely.


2005-2012 BMW 3 Series E90 E91 E92 E93 car stereo installation guide

  1. The original dashboard before installation.

    1. The original dashboard before installation.
    1. The original dashboard before installation.


  1. Pry the panel off with a lever. You need to lift the air-conditioning assembly and don’t pry the air-conditioning panel off directly.

    2. Pry the panel off with a lever. You need to lift the air-conditioning assembly and don't pry the air-conditioning panel off directly.
    2. Pry the panel off with a lever. You need to lift the air-conditioning assembly and don’t pry the air-conditioning panel off directly.


3.Unplug the air-conditioning assembly. Then unscrew the CD player and pull the CD player out.

  • 3-1.Unplug the air-conditioning assembly. Then unscrew the CD player and pull the CD player out.
    3-1.Unplug the air-conditioning assembly. Then unscrew the CD player and pull the CD player out.

    3-2.Unplug the air-conditioning assembly. Then unscrew the CD player and pull the CD player out.
    3-2.Unplug the air-conditioning assembly. Then unscrew the CD player and pull the CD player out.


  1. Disconnect the power plug behind the CD player and the plug of the radio aerials.

    4-1. Disconnect the power plug behind the CD player and the plug of the radio aerials.
    4-1. Disconnect the power plug behind the CD player and the plug of the radio aerials.

    4-2. Disconnect the power plug behind the CD player and the plug of the radio aerials.
    4-2. Disconnect the power plug behind the CD player and the plug of the radio aerials.


  1. Take off the plastic bracket frame behind the CD Player. Six screws are shown in the picture as follow. 4 of them are T20 screws, 2 of them are turnbuckles(no.8).

    5. Take off the plastic bracket frame behind the CD Player. Six screws are shown in the picture as follow. 4 of them are T20 screws, 2 of them are turnbuckles(no.8).
    5. Take off the plastic bracket frame behind the CD Player. Six screws are shown in the picture as follow. 4 of them are T20 screws, 2 of them are turnbuckles(no.8).


  1. Unscrew the 2 turnbuckles(no.8).After the removal, the bracket is not needed, because the DVD comes with its metal bracket panel.

    6. Unscrew the 2 turnbuckles(no.8).After the removal, the bracket is not needed, because the DVD comes with its metal bracket panel.
    6. Unscrew the 2 turnbuckles(no.8).After the removal, the bracket is not needed, because the DVD comes with its metal bracket panel.


7.Mount the metal bracket panel of DVD to the position where the factory CD bracket panel is dismounted.          Screw the 4T20 screws on.

  • 7-1.Mount the metal bracket panel of DVD to the position where the factory CD bracket panel is dismounted. Screw the 4T20 screws on.
    7-1.Mount the metal bracket panel of DVD to the position where the factory CD bracket panel is dismounted. Screw the 4T20 screws on.

    7-2.Mount the metal bracket panel of DVD to the position where the factory CD bracket panel is dismounted. Screw the 4T20 screws on.
    7-2.Mount the metal bracket panel of DVD to the position where the factory CD bracket panel is dismounted. Screw the 4T20 screws on.


  1. Connect the power plugs of DVD player and the CD player. Then connect the wires to the new Seicane stereo as t he user manual or the wiring diagram shows.

    8-1. Connect the power plugs of DVD player and the CD player. Then connect the wires to the new Seicane radio as t he user manual or the wiring diagram shows.
    8-1. Connect the power plugs of DVD player and the CD player. Then connect the wires to the new Seicane radio as t he user manual or the wiring diagram shows.

    8-2. Connect the power plugs of DVD player and the CD player. Then connect the wires to the new Seicane radio as t he user manual or the wiring diagram shows.
    8-2. Connect the power plugs of DVD player and the CD player. Then connect the wires to the new Seicane radio as t he user manual or the wiring diagram shows.


9.Turn on the new Seicane stereo to have a careful check if everything works well. If it doesn’t, please check whether all the cables are connected correctly.

10.Put the new Seicane stereo into the dash.

11.Put everything into their original place.


That’s all the installation method about a 2005-2012 BMW 3 Series E90 E91 E92 E93 car stereo. To make sure you have a successful upgrade, you need to be clear about every step before the installation. You also need to confirm that your new car stereo can be compatible with your car. If you don’t have one, then I’d like to introduce a great 2005-2012 BMW 3 Series E90 E91 E92 E93 car stereo from Seicane to you, please check out for more details:


http://www.seicane.com/2005-2012-bmw-3-series-e90-e91-e92-e93-oem-dvd-player-gps-navigation-system-radio-bluetooth-1080p-video-tv-tuner-dvr-usb-sd-canbus-3g-wifi-rearview-camera-s127109d


With an advanced WINCE 6.0 CORE operation system, this BMW 3 Series E90 E91 E92 E93 car stereo comes with a variety of useful and amusing and features for you to get the convenience and enjoyment on the way, such as the 3D GPS navigation system of high precision, bluetooth technology, DVD player, FM/AM radio, Ipod, Wifi, USB, SD, etc. What’s more, your steering wheel control can still work after installation. To have a brand new experience, it’s just your best choice!