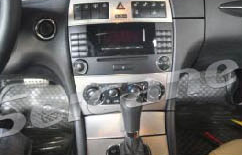
Practical Installation Manual of 2009-2012 Mercedes Benz GLK Stereo Navigation System with Bluetooth Carplay

Have you ever wonder to enjoy your free time inside your car by turning on your audio? As the fans of Mercedes Benz, it is not difficult to buy a new head unit but the difficult point lies in whether you’d like to buy the installation service of the radios or just replace it by yourself. For most of those who budget carefully, it’s the best choice for them to install a new radio on their own. And this article of 2009-2012 Mercedes Benz GLK Radio from Seicane will provide you with a general guide on how to do it. Hope you will get useful advice from the following instructions.

Before installation, you should pay attention to some important tips. First of all, you can disconnect the power and prepare some tools such as lever before the removal and the installation. Secondly, you should keep all the separate parts from the car and take great care of the dashboard to avoid scratching it during its detachment and installation.

Last but not least, you should keep handy any parts from the car and make use of all the original screws from the car as much as possible so that each related part of the unit can be fixed securely.

2009-2012 Mercedes Benz GLK car radio installation manual

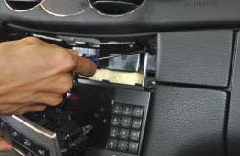
1. Lever vent panel and take off the connectors.

2.Lever the screen frame.

3.Take off the screws and the screen frame.

4.Pull out the screen and disconnect hardness cord.

5.Lever the decorative trim and take off it.

6.Take off the screws on both sides.

7.Pull up the buckle of head unit, take out the head unit and unplug power cable.

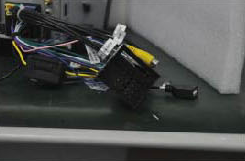
8.Connect original LVDS wire together with a new BMW 4.0 system box.

9.Connect the new LVDS wire.

10.Connect the original video power wire and the small speaker wire.

11.Install the new base and fix the screws.

12.Connect power cable and USB cable.

13.Install the new screen by fixing 2 screws, then recover all panels.

When you finished all the steps of installation, you can test the function of the new radio and its performance as well. Every step needs your practical attempt to make it comes true. And you will get successful experience as long as you’d like to try on your best to do it. Even though sometimes you still think it is a complicated procedure, you can ask for your car dealer for help or search for some detailed information from the websites. Here I’d like to share a link of 2009-2012 Mercedes Benz GLK car radio, which is fashionable and attractive enough to catch your attention.

With the latest operation system Android 10.0 and 16EQ DSP tuning systems, you can surf the Internet in the fastest speed and enjoy various sense of sound at the same time.Unlike the other screen, the IPS screen comes with higher resolution, which provides you with a clearer image and stronger sense of hierarchy.

In addition, the dual system free switching will allow the computer information display of the original car, highly analyze the original car protocol, and support multi-functional steering wheel control, etc. Moreover, if the original car is equipped with a reversing image system, the reversing track of the original car can be display on the large screen.

Last but not least, it supports different options including Car DVR, OBD II, TPMS, which ensure that you can enjoy your own time during the driving journey. So embrace it now just as you come to the new life.

An easy guide to replacing 2010-2015 Mercedes-Benz E-Class Radio Navigation System with Bluetooth Carplay

As the owner of Mercedes-Benz E-class, it is not difficult for you to buy the appropriate car radio online or offline . However, installing or replacing a radio can range in difficulty, especially as a person who has no experience of installation before. And there are also some factors that must be considerable such as the consuming time and the personal energy. Thus, I sincerely recommend you to read the following easy guide to replacing your 2010-2015 Mercedes-Benz E-Class Radio from Seicane. In this guide, you can see the whole process of installation and get what you need as you want.

Before installation, you should pay attention to some important tips. First of all, you can disconnect the power and prepare some tools such as lever before the removal and the installation. Secondly, you should keep all the separate parts from the car and take great care of the dashboard to avoid scratching it during its detachment and installation.

Last but not least, you should keep handy any parts from the car and make use of all the original screws from the car as much as possible so that each related part of the unit can be fixed securely.

2010-2015 Mercedes-Benz E-Class car radio installation guide

1. Lever original car screen frame and take off the two screws.

2.Pull out the screen and disconnect the cable.

3.Lever the vent panel and disconnect the emergency light wiring harness.

4.Take off the screws on the both sides.

5.Knock the screw down and pull out the monitor.

6.Pull out the monitor and disconnect the power cable.

7.Pull out the power cable and USB wire from the right side.

8.Connect original LVDS wire together with the new assembly box, the new LVDS wire and the original video power wire(only 4.0 system).

9.Install the new base and fix the screw.

10.Fix the nut cover and connect original car power cable with new power cable.

11.Plug in the new power cable.

12.Install the head unit and fix the 2 screws.

13.Connect the emergency light wiring harness and install the air outlet panel.

14.Connect the wiring harness and install the screen.

15.Fix the two screws to finish installation.

After finishing the whole installation, you can test the function of the car stereo on your own and check whether it can perform as well. As long as you tried all the steps above, you will have your clear plan about how to install your radio at the same time. But if you still feel it hard for you to finish this whole procedure by yourself, you can ask for your car dealer directly who will offer the most professional advice for you. In addition, you can also find various tutorials and relevant resource here on the Internet. Here I want to share one of the most impressive product from Seicane, 2010-2015 Mercedes-Benz E-Class car radio, which owns different functions and act as brilliant as other radios.

Unlike other operation system, it is equipped with the latest operation system Android 10.0, which ensure the best using feeling and care for each user’s need. What’s more, with multiple point high-sensitive touchscreen, it can bring smooth operation and you can enjoy visual feast on this 10.25 inch 1280*480 resolution display.

Built in GPS module, it support both online and offline navigation app from Google Play app market, which means you don’t need to worry about whether you will get lost during the driving with the help of the updated data from these apps.

Besides, integrated with BC6 Bluetooth module, it supports phonebook sync, hand-free call, and music streaming from your phone. And there are also other outstanding functions here such as the rear view camera, which supports RCA AV connector type rear view camera signal input, automatically switch to parking image when reversing gear engaged.

All in all, never hesitate to buy if you really desire it and embrace what you love now !

A Step-by-step Installation Guide for 2002-2008 Mercedes Benz W211 Car Stereo System with Bluetooth GPS Navigation

Here shows you an intelligent 2002-2008 Mercedes Benz W211 car stereo system from Seicane. The product comes with the latest operating system and 8-core CPU for you to upgrade your factory radio.


If you are going to replace your factory radio with a new aftermarket car stereo system, it’ll be great for you to know some installation instruction for it. The installation is not quite difficult, if you have some related installation experience and a correct guide, you can easily finish the installation on your own. Please look at the picture above, if you also have the same dashboard, you can refer to the following 2002-2008 Mercedes Benz W211 bluetooth car stereo instruction to help with the installation.


Precautions :

  1. Please disconnect the power before the installation.
  2. Please prepare unlock toolsbefore the removal and the installation.
  3. Please keep all the separate parts from the car. Please take great care of the dashboard to avoid scratching it during its detachment and installation. Please keep handy any parts from the car and make use of all the original screws from the car as much as possible. So each related part of the unit can be fixed securely.


2002-2008 Mercedes Benz W211 car stereo installation guide

The original dashboard.


Installation step 1. Use a lever to release the decoration panel and remove the cigarette lighter.

2004-2011 Mercedes-Benz CLS-W219 car stereo installation step 2


Installation step 2. Remove two screws under the 6-disc CD changer and take out the CD changer.

2004-2011 Mercedes-Benz CLS-W219 car stereo installation step 3


Installation step 3. Remove the two screws marked with red arrows and pull out the CD player.

2004-2011 Mercedes-Benz CLS-W219 car stereo installation step 4


Installation step 4. Connect the cables in the package.


Installation step 5. Remove the baffle-plate under the assistant driver seat, connect the CAN-H, CAN-L cable (green) with the CAN-BUS socket marked in the picture.

2004-2011 Mercedes-Benz CLS-W219 car stereo installation step 6


Installation step 6. Pry the decoration panel beside the driver’s seat, change fuse from 5A TO 10A

2004-2011 Mercedes-Benz CLS-W219 car stereo installation step 7


Installation step 7. Remove the screws for fastening the car pc in the left of the trunk.

2004-2011 Mercedes Benz CLS Class W219 car stereo installation step 8


Installation step 8. Find the amplifier in the left of the trunk and remove the four screws marked with red arrows.

2004-2011 Mercedes-Benz CLS-W219 car stereo installation step 9


Installation step 9. Remove the amplifier in the car.

2004-2011 Mercedes-Benz CLS-W219 car stereo installation step 10


Installation step 10. Connect the speaker cable with the speaker.


Installation step 11. Turn on the new Seicane bluetooth car stereo to have a careful check if everything works well.


Wish the above installation guide can be helpful for you. If you have any question, you can refer to your dealer or a professional for help. Please make clear every step before you start to install. If you find it too hard to understand all the steps, you’d better go to a car stereo upgrade center to have it installed.


In addition, to make sure you have a successful upgrade, you need to confirm that your new stereo is suitable for your car, so that it can work well with your car.


With this Android 10.0 Mercedes Benz W211 bluetooth car stereo which is 4G+64G and support touch screen spilt screen display in your car, you are enabled to play DVD, CD, VCD, FM/AM radio, HD 1080P Video, music, etc. The Bluetooth technology also makes you possible to dial and receive calls with your hands on the steering wheel control and your eyes on the road ahead to keep safe. The lane assist, voice prompts and accurate direction provided by the GPS navigation can lead you to your destination within the least time.


To improve your in-car environment and your driving experience, this Seicane Mercedes Benz W211 car stereo is just your ideal choice. Just take it and go!

Detailed installation instruction for a 1998-2002 Mercedes Benz A W168 head unit with DVD Player 1080P Video USB SD TV Tuner

1998-2002 Mercedes Benz A W168 head unit after installation

Some car owners have the prejudice that to install a new car radio is a job which is only mastered by professionals. In fact, more and more car owners have successfully installed their new radios on their own. Of course, they need to do it under the guidance of a correct installation guide. Here I’d like to introduce a detailed 1998-2002 Mercedes Benz A W168 head unit installation guide from Seicane to you. If you have the same dashboard as the following picture, the you can also follow it to help with your installation.

1998-2002 Mercedes Benz A W168 head unit after installation


Some tips before the installation:

  1. Please disconnect the power before the installation.
  2. Please prepare a lever and a screwdriver before the removal and the installation.
  3. Please keep all the separate parts from the car. Please take great care of the dashboard to avoid scratching it during its detachment and installation. Please keep handy any parts from the car and make use of all the original screws from the car as much as possible. so each related part of the unit can be fixed securely.

1998-2002 Mercedes Benz A W168 head unit installation guide

1. The picture of the original CD player and 6-disc CD player.

1. The picture of the original CD player and 6-disc CD player

2. First detach the gear shift panel.

2. First detach the gear shift panel.

3. Use a screw driver to remove the screw marked with a red circle to release the car charger and ashtray.

3. Use a screw driver to remove the screw marked with a red circle to release the car charger and ashtray.

4. Remove the car charger and ashtray assembly.

4. Remove the car charger and ashtray assembly.

5. Use a screw driver to remove the screw marked with a red circle.

5. Use a screw driver to remove the screw marked with a red circle.

6. Pry the air conditioner panel out with a plastic lever.

6. Pry the air conditioner panel out with a plastic lever.

7. Remove the original air conditioner panel.

7. Remove the original air conditioner panel.

8. Remove the heated seat and control panel assembly.

8. Remove the heated seat and control panel assembly.

9. Pay attention to this buckle.

9. Pay attention to this buckle.

10. Remove two screws.

10. Remove two screws.

11. Pull out the original CD player.

11. Pull out the original CD player.

12. Please be careful not to stretch the wiring harness behind the assembly.

12. Please be careful not to stretch the wiring harness behind the assembly.

13. The wiring diagram as follows. Put the plug of the car in the socket of the unit.

13. The wiring diagram as follows. Put the plug of the car in the socket of the unit.

14. The wiring diagram.

14. The wiring diagram.

15. The wiring diagram.

15. The wiring diagram.

16. Radio antenna lead.

16. Radio antenna lead.

17. Install the new Seicane unit back after the wiring harness has bee connected. Fasten the four screws.

17. Install the new Seicane unit back after the wiring harness has bee connected. Fasten the four screws.

18. Install the air conditioner panel, the car charger, the ashtray, the heated seat and the control panel back.

18. Install the air conditioner panel, the car charger, the ashtray, the heated seat and the control panel back.

19. Reinstall cigarette lighter.

19. Reinstall cigarette lighter.

20. Turn on the new Seicane unit and have a careful check if everything works well.

That’s all the installation guide for a 1998-2002 Mercedes Benz A W168 head unit. If you find your dashboard is a litter bit from that shown in the guide picture, please don’t worry, it won’t have much influence on the installation. If there is any question, you can consult your dealer or a professional.

Besides, you need to have a suitable car stereo for your car, so that it can be compatible with your car, and if you don’t have one, you can refer to this intelligent 1998-2002 Mercedes Benz A W168 head unit from Seicane, please click for more details:

https://www.seicane.com/android-gps-navigation-system-for-1998-2002-mercedes-benz-a-class-w168-with-radio-dvd-player-touch-screen-bluetooth-wifi-tv-ipod-hd-1080p-video-backup-camera-steering-wheel-control-usb-sd-s018802


This amazing Mercedes Benz A W168 head unit is integrated with a GPS navigation system and  a powerful DVD player for you to have fun all the way. You can get hands-free calling convenience and enjoy music streaming when you wirelessly pair with your mobile phone via the bluetooth technology. The turn-by-turn direction and voice prompts can be provided for you to find your way to any unfamiliar place.

How to easily install a 2004-2012 Mercedes Benz A class W169 car stereo with 1080P Video USB SD CANBUS TV Tuner DVR Bluetooth

Here shows an advanced 2004-2012 Mercedes Benz A class W169 car stereo. It is an image after installing this Seicane Mercedes Benz A class W169 car stereo in the dashboard of the Mercedes Benz A class.

2004-2012 Mercedes Benz A Class W169 car stereo after installation


Some car owners have no idea about how to install an ideal stereo in their car. Actually, the installation is not too complicated. With some related experience and a correct installation guide, a new stereo can be easily installed within about half an hour. If you have a Mercedes Benz A class W169 and also have the same dashboard as above, then you can refer to this installation guide to help with the installation.


Tips about the installation:


1.Please disconnect the power before the installation.

2.Please prepare a lever and a screwdriver before the removal and the installation.

3.Please keep all the separate parts from the car. Please take great care of the dashboard to avoid scratching it during its detachment and installation. Please keep handy any parts from the car and make use of all the original screws from the car as much as possible. so each related part of the unit can be fixed securely.


2004-2012 Mercedes Benz A Class W169 car stereo installation guide


  1. Detach the outer frame of the original CD player.

    1. Detach the outer frame of the original CD player
    1. Detach the outer frame of the original CD player
  1. Use a screw driver to remove the screws marked with red circles.

    2. Use a screw driver to remove the screws marked with red circles
    2. Use a screw driver to remove the screws marked with red circles
  2. Remove the screw on the lower right.

    3. Remove the screw on the lower right
    3. Remove the screw on the lower right
  3. Remove the screw on the lower left.

    4. Remove the screw on the lower left
    4. Remove the screw on the lower left
  1. Remove the screw on the upper left.

    5. Remove the screw on the upper left
    5. Remove the screw on the upper left
  2. Remove the screw on the upper right.

    6. Remove the screw on the upper right
    6. Remove the screw on the upper right
  3. Use a screw driver to remove the screws marked with red circles.

    7. Use a screw driver to remove the screws marked with red circles
    7. Use a screw driver to remove the screws marked with red circles
  4. Remove the original CD player.

    8. Remove the original CD player
    8. Remove the original CD player
  5. Insert the plug of the car into the socket of unit.

    9. Insert the plug of the car into the socket of unit
    9. Insert the plug of the car into the socket of unit
  6. Remarks:

    10. Remarks  a. Plug in the radio antenna.  b. Plug in the GPS antenna
    10. Remarks a. Plug in the radio antenna. b. Plug in the GPS antenna

a.Plug in the radio antenna.

b.Plug in the GPS antenna.


11.Install the new Seicane stereo into the dashboard.

  • 11. Install the new Seicane stereo into the dashboard
    11. Install the new Seicane stereo into the dashboard

12.Fasten the new Seicane stereo with 4 screws and install the frame back.

  • 12. Fasten the new Seicane stereo with 4 screws and install the frame back
    12. Fasten the new Seicane stereo with 4 screws and install the frame back

13.Turn on the new Seicane stereo to have a comprehensive check.


Now you probably have a general idea about how to install a new stereo in your car. If you have anything hard to understand, please don’ t hesitate to ask your dealer or a professional. If you don’t have any experience on the installation, please have your new stereo installed by a technician.


What’s more, you need to ensure your new stereo can be compatible with your car, so that it can be perfectly installed in your car. If you don’t know which stereo can fit your car, you can refer to this hot-selling 2004-2012 Mercedes Benz A class W169 car stereo from Seicane, please click:


http://www.seicane.com/car-dvd-player-gps-navigation-for-2004-2012-mercedes-benz-a-class-w169-a150-a170-support-radio-1080p-video-usb-sd-canbus-rearview-camera-tv-tuner-dvr-bluetooth-s127682d


This intelligent Mercedes Benz A class W169 car stereo comes with the latest GPS navigation system, you can go anywhere you’d like at the help of the turn-by-turn directions and voice prompts. The compatibility of bluetooth allows you to wirelessly link your enabled mobile phone with this unit for hands-free calls and streaming music. There is also a backup camera input for you to connect a rearview camera to help you park more easily.


Wish you like this amazing Mercedes Benz A class W169 car stereo and have a wonderful time with it! Good luck to you!