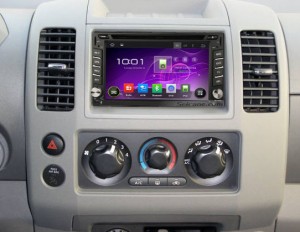
How to upgrade a 2001-2011 NISSAN FRONTIER radio with Pure Android 4.4.4 AUX DVD player touch screen GPS navigation

You may think it a bit troublesome to remove and install a new car stereo in your car, therefore, you keep your factory radio with its single function for a long time. As a matter of fact, it’s quite easy to install a new stereo in your car. it can be done within about half an hour. The picture below is a top 2001-2011 NISSAN FRONTIER radio after installation from Seicane, if you have a similar or exactly same dashboard, you can take the step-by-step NISSAN FRONTIER radio installation guide as a reference.

2001-2011 NISSAN FRONTIER radio after installation


Precautions:

  1. Please apply the parking brake before the installation.
  2. For your safety, please disconnect the negative cable on the vehicle battery.
  3. Please prepare a lever and a screwdriver for the installation.


2001-2011 NISSAN FRONTIER radio installation guide

Step 1:

Use a screwdriver to remove two screws above the Nissan Frontier radio.

2001-2011 NISSAN FRONTIER radio installation step 1


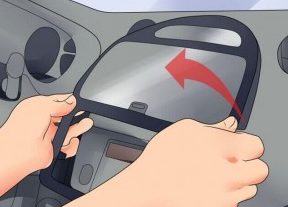
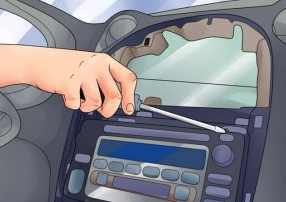
Step 2:  Remove the trim panel.

Please wedge a flat tip screwdriver under the trim panel and pry up on it to remove the trim panel. To protect the trim from being accidentally scratched, you can use a clean rag while prying up on the trim panel.
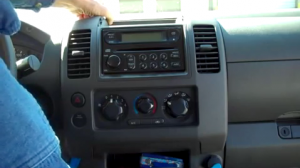
2001-2011 NISSAN FRONTIER radio installation step 2


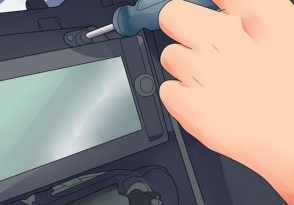
Step 3: Unscrew the four screws which are holding the factory radio in place with a screwdriver. Then gently take the factory radio off the panel.

2001-2011 NISSAN FRONTIER radio installation step 3


Step 4: Disconnect the radio antenna in the back of the factory radio and unplug the electrical plugs running to the back of the radio.

2001-2011 NISSAN FRONTIER radio installation step 4


Step 5: Connect the antenna in the back of the new Seicane radio and plug the electrical plugs running to the back of the radio. If you have any question on how to connect the antenna to new radio, please take the user manual as a reference or turn to the dealer for a wiring diagram.


Step 6: Turn on the new Seicane radio to have a careful check if it works well with your car. If it doesn’t, please check whether all the cables are connected correctly.


Step 7: After the test, please put the new Seicane radio into the dash.


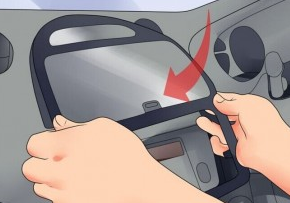
Step 8: Install all the screws and the trim panel into their original place.


Wish the above installation guide can be helpful for you. If you find the dashboard in the picture above is different from yours, you can rest assured because it won’t have much impact on the installation which is similar on the whole. If you have any questions, please don’t hesitate to ask your dealer or a professional for help.


Besides, you need to make sure you have a right radio for your car so that it can work well after installation. If you don’t have one, you can take the following 2001-2011 NISSAN FRONTIER radio from Seicane as a reference, which is equipped with high configurations and great capabilities, please click:


http://www.seicane.com/seicane-s127005-quad-core-pure-android-4-4-4-universal-bluetooth-dvd-in-dash-car-navigation-system-with-3g-wifi-am-fm-radio-mirror-link-obd2-16g-flash-backup-camera-hd-1024-600-multi-touch-capacitive-screen-aux


With the software upgraded and the firmware improved, this NISSAN FRONTIER radio is the best replacement for you to replace your factory radio. A wide range of entertainment formats are supported to provide you with tons of fun and enjoyment, such as DVD/VCD/CD/MP3/MPEG4/DIVX/CD-R/WMA/JPEG, etc.


The functionality of Bluetooth allows for hands-free calls and streaming music is also included. Utilize the GPS function, you’ll get the most accurate direction to arrive at your destination.

Go and enjoy your best journey with this amazing NISSAN FRONTIER radio all the time from now on! Good luck to you!


How to replace a 2001-2011 VW Volkswagen MK5 car stereo with Car stereo RDS 3G WiFi Quad-core CPU DVD player

No matter you are keeping up with trend or want to pursue a comfortable life in your car, it’ s a great idea for you to upgrade your factory car stereo with a new aftermarket car stereo which can be compatible with a lot of up-to-date features. Look at the picture below, it’s an intelligent 2001-2011 VW Volkswagen MK5 car stereo from Seicane. If you have the same dashboard, you can read this passenger carefully to help with the installation of your new stereo.

2001-2011 VW Volkswagen MK5 car stereo after installation


Some tips before the installation:

  1. Please disconnect the power before the installation.
  2. Please prepare a lever and a screwdriver before the removal and the installation.
  3. Please keep all the separate parts from the car. Please take great care of the dashboard to avoid scratching it during its detachment and installation. Please keep handy any parts from the car and make use of all the original screws from the car as much as possible. so each related part of the unit can be fixed securely.


2001-2011 VW Volkswagen MK5 car stereo installation guide

  1. The original CD player.

    2001-2011 VW Volkswagen MK5 car stereo installation step 1
    2001-2011 VW Volkswagen MK5 car stereo installation step 1


  1. Insert two removal keys into the small port of two sides of the CD player.

    2001-2011 VW Volkswagen MK5 car stereo installation step 2
    2001-2011 VW Volkswagen MK5 car stereo installation step 2


  1. Gently remove the original CD player out of the dashboard.

    2001-2011 VW Volkswagen MK5 car stereo installation step 3
    2001-2011 VW Volkswagen MK5 car stereo installation step 3


  1. Press the removal key on the side of the CD player and release the key. Then do the same on the other side.

    2001-2011 VW Volkswagen MK5 car stereo installation step 4
    2001-2011 VW Volkswagen MK5 car stereo installation step 4


  1. Disconnect the harness at the back of the CD player.
    2001-2011 VW Volkswagen MK5 car stereo installation step 5-1
    2001-2011 VW Volkswagen MK5 car stereo installation step 5-1

    2001-2011 VW Volkswagen MK5 car stereo installation step 5-2
    2001-2011 VW Volkswagen MK5 car stereo installation step 5-2
  2. Connect the harnesses to the back of the new Seicane car stereo.
  3. Connect cables of the new Seicane car stereo as the user manual shows.
  4. Turn on the new Seicane car stereo to have a careful check if everything works well. If it doesn’t, please check whether all the cables are connected correctly.

9.Put the new Seicane car stereo into the dash.

  1. Put everything into their original place.


That’ s the step-by-step installation guide for a 2001-2011 VW Volkswagen MK5 car stereo. If you have any questions, you can ask your dealer or a professional for help. Make sure you are clear about every step before you install it. If you don’t have enough confidence to do it on your own, you can go to a car stereo upgrade center to install it.


Before the installation, it’s also crucial for you to make sure you have a suitable car stereo for your car. If you are still looking for one, I’d like to recommend this amazing Seicane VW Volkswagen MK5 car stereo to you, here’s the link, please click:


http://www.seicane.com/seicane-s127648-android-4-4-4-in-dash-gps-dvd-bluetooth-system-for-2001-2011-vw-volkswagen-mk5-with-radio-rds-3g-wifi-mirror-link-obd2-quad-core-cpu-16g-flash-hd-1080p-video-steering-wheel-control-mp3


What makes this VW Volkswagen MK5 car stereo special is its powerful RK3188 1.6 GHz Cortex A9 Quad-core CPU which greatly smoothes the operation. The large 7 inch multi-touch screen with 1024*600 pixel resolution also creates a visually radiant display to watch the videos. You can utilize the precise GPS navigation system and the Bluetooth technology which allows you to have hands-free calls and stream audio to reach your destination safely and pleasantly.


Wish you like this great VW Volkswagen MK5 car stereo and have a wonderful time with it on all trips from now on!

How to upgrade a 2005-2012 Mercedes Benz GL Class X164 head unit with CD DVD Player 3G WiFi Bluetooth


First shows you a great 2005-2012 Mercedes Benz GL Class X164 head unit from Seicane, it’s the picture of after installation. It looks cool, doesn’t it? It is the best choice for you to improve the car interior environment. What’s more important, you are able to enjoy a lot of convenience and enjoyment it provides for you. As a matter of fact, it’s easy for you to install such a fantastic head unit in your car. If you have the same dashboard, you can refer to the following installation guide to help you with the installation.

2005-2012 Mercedes Benz GL Class X164 head unit after installation


Precautions:

  1. Please apply the parking brake and remove the negative cable on the vehicle battery before the removal to ensure safety.
  2. A lever and a screwdriver need to be prepared before the installation.


2005-2012 Mercedes Benz GL Class X164 head unit installation guide:


1.Pry out the air conditioner panel along gap with a lever.

2005-2012 Mercedes Benz GL Class X164 head unit installation step 1


2.Remove the air conditioner panel.

2005-2012 Mercedes Benz GL Class X164 head unit installation step 2


3.Remove two screws holding the stereo in the dashboard frame with a screwdriver.

2005-2012 Mercedes Benz GL Class X164 head unit installation step 3


4.Pull the buckles down.

2005-2012 Mercedes Benz GL Class X164 head unit installation step 4


5.Carefully take the original CD player out of the dashboard.

2005-2012 Mercedes Benz GL Class X164 head unit installation step 5


6.Disconnect the ISO plug of the car in the socket of the DVD player.

2005-2012 Mercedes Benz GL Class X164 head unit installation step 6


7.Connect the cables of the new Seicane head unit as the user manual shows.


8.Connect the ISO plug.


9.Put the new Seicane head unit back into the dash.


10.Put the buckles back into its original place.


11.Install two screws and the air conditioner panel.


12.Turn on the new Seicane head unit and have a comprehensive test if everything works well.


Warning:

Please don’t pull out the GPS SD card with the power on in case of data corruption.


Installation tips for the GPS antenna.

Please don’t shorten or lengthen the GPS antenna to avoid a short circuit or antenna problems. Please place the antenna on the dashboard or on the roof of the car in a horizontal position as best as possible. If there if any film on the windows and heat insulation in the car, it may have a direct effect on the GPS antenna, like positioning precision and signal intensity.


If it’s the first time for you to upgrade your factory radio, you may find it difficult to understand all the steps. In that case, you’d better go to a car stereo upgrade center or ask a professional to install it. If you have any questions, you can consult your dealer.


In addition, it’s suggested you confirm you have a head unit which is suitable for your car. Or it can’t work or be installed perfectly in your car. If you have no idea which head unit can fit your  2005-2012 Mercedes Benz GL Class X164, I’d like to share an intelligent Mercedes Benz GL Class X164 head unit from Seicane for you. It’s the latest head unit with the most advanced features for 2005-2012 Mercedes Benz GL Class X164. Here’s the link:


http://www.seicane.com/seicane-s127511-android-4-4-4-in-dash-gps-radio-system-for-2005-2012-mercedes-benz-gl-class-x164-gl300-gl350-gl420-with-3g-wifi-cd-dvd-player-mirror-link-obd2-bluetooth-music-aux


Built in an Android 4.4.4 operation system, this Mercedes Benz GL Class X164 head unit is an ideal replacement to enhance the software and hardware of your factory radio. The upgraded RK3188 1.6 GHz Cortex A9 Quad-core CPU greatly improves the performance of the stereo. You can also enjoy watching videos on a more intuitive interface due to the 7 inch multi-touch screen with HD 1024*600 pixel resolution. What’s more, the latest GPS system allows you to get to anywhere you like without getting lost. A backup camera is also compatible with this unit to offer help to you when you are parking.


Just take this amazing Mercedes Benz GL Class X164 head unit on all your trips and enjoy your driving al the time! It’ s you best choice! Good luck to you!

How to upgrade a 2012 Geely Emgrand EC7 car stereo with 3G WiFi AM FM Radio Bluetooth DVD GPS navigation


If you own a fantastic 2012 Geely Emgrand EC7, you must want to have a comfortable in-car environment and enjoy your driving all the way. The car stereo matters a lot at that point. When you find your original car stereo can’t meet all your needs or bring you with great pleasure, it’s time for you to replace it with a new aftermarket car stereo. Please look at the following picture which is an excellent Geely Emgrand EC7 car stereo from Seicane after installation, you can take the below installation guide as a reference.

2012 Geely Emgrand EC7 car stereo after installation


Here are some tips about the installation:


1.Please disconnect the power before the installation.

2.Please prepare a lever and a screwdriver before the removal and the installation.

3.Please keep all the separate parts from the car. Please take great care of the dashboard to avoid scratching it during its detachment and installation. Please keep handy any parts from the car and make use of all the original screws from the car as much as possible. so each related part of the unit can be fixed securely.


2012 Geely Emgrand EC7 car stereo installation guide

1·Remove the original panel with a plastic knife, pry gently along the gap and pick up the panel, then remove it and then set it aside.

2012 Geely Emgrand EC7 car stereo installation step 1


2·Remove screws that fixed the radio on the dashboard.

2012 Geely Emgrand EC7 car stereo installation step 2


3·Pull the factory radio out of the dash. Pull it with medium force, as the wires are connected to the radio.

2012 Geely Emgrand EC7 car stereo installation step 3


4·Unplug the connectors at the back of the factory radio.

2012 Geely Emgrand EC7 car stereo installation step 4


5.Make antennas and cables connected step by step as installation instructions show, and you should be very careful when you are doing this for it will affect whole procedure.

2012 Geely Emgrand EC7 car stereo installation step 5


6.Put the new Seicane car stereo into your car, you should check whether your connections are correct, and you’d better have a tidy for the cables.


7· If everything is OK, firm screws into their original place.

2012 Geely Emgrand EC7 car stereo installation step 7


8·Firm the panel on the new Seicane car stereo. Finally the new Seicane car stereo is installed and a comprehensive test should be conducted on the new radio.

2012 Geely Emgrand EC7 car stereo installation step 8


That’s all the step-by-step installation guide for a 2012 Geely Emgrand EC7 car stereo, wish it can be helpful for you. It’s normal if you encounter some problems during the whole process of the installation. In that case, you can seek help from your dealer or a professional on the car stereo installation.


Besides, it’s quite important for you to make sure you have a right car stereo for your car before the installation. If you are unsure which car stereo can fit your car, I’d like to share a modern Geely Emgrand EC7 car stereo from Seicane with you, please click:


http://www.seicane.com/seicane-s126001-quad-core-2012-geely-emgrand-ec7-android-4-4-4-dvd-gps-navigation-car-stereo-with-3g-wifi-am-fm-radio-bluetooth-music-mirror-link-obd2-16g-flash-rearview-camera-steering-wheel-control-mp3


The latest RK3188 1.6 GHz Cortex A9 Quad-core fast processor of this stereo ensures a better performance than before. The accurate navigation system can guide you to any unfamiliar location on time. You can also provide entertainment for your passengers via USB/SD card connection along with playing videos and Bluetooth music.


Under a big discount at present , you’ll feel greatly surprised at this high-end Geely Emgrand EC7 car stereo with a lot of advanced components at such a competitive price. Just take it right now and enjoy yourself on all trips!

How to replace a 2009-2014 Ford F150 F250 F350 Expedition car stereo with Sat Nav In Dash DVD Player

As the technology is changing all the time, new car stereos for Ford F150 F250 F350 Expedition from 2009 to 2014 are upgrading with rapid development. No matter you are to catch the trend or just want the advanced features in your car, it’s great for you to install this amazing Seicane  Ford F150 F250 F350 Expedition car stereo for cars from 2009 to 2014, which is shown as follow. It comes with a lot of high-end practical features for you to enjoy more convenience and enjoyment on your way.


When you get an ideal car stereo for your car, you must want to install it in your car as soon as possible. Some of you may go to a car stereo upgrade center or ask a professional to install it. Few of car owners know the installation is actually not too difficult. With some related experience and a correct guide, you can easily finish the installation on your own. The following is the detailed installation instruction of a 2009-2014 Ford F150 F250 F350 Expedition car stereo for your reference.


Here are some tips for you before the installation:

1.Please make sure that you have disconnected the negative battery cable before starting the removal procedure.

2.In case of the power is on, please don’t do self-service or maintenance under condition that you have no experience.

3.When you are connecting the interfaces, make it as tidy as possible, for the space for it is very small.


2009-2014 Ford F150 F250 F350 Expedition car stereo installation guide:

1.Remove the rubber mat at the top of the stereo trim panel.

2009-2014 Ford F150 F250 F350 Expedition car stereo installation step 1


2.Take out the exposed 2 screws.

2009-2014 Ford F150 F250 F350 Expedition car stereo installation step 2


3.Fasten and remove the side panels containing the a/c vents away from the stereo trim panel. It’s not necessary to pull out the panels absolutely.

2009-2014 Ford F150 F250 F350 Expedition car stereo installation step 3


4.Loosen and remove the stereo trim panel.

2009-2014 Ford F150 F250 F350 Expedition car stereo installation step 4


5.All molex plugs should be unclipped.

2009-2014 Ford F150 F250 F350 Expedition car stereo installation step 5


6.Unscrew 4 screws to remove the factory radio.

2009-2014 Ford F150 F250 F350 Expedition car stereo installation step 6


7.Take out the original radio and disconnect all connectors at the back of the original radio.

2009-2014 Ford F150 F250 F350 Expedition car stereo installation step 7-1


2009-2014 Ford F150 F250 F350 Expedition car stereo installation step 7-2


8.Make antennas and cables of the new Seicane car stereo connected step by step as installation instructions show, and you should be very careful when you are doing this for it will affect the whole procedure.

  1. Put the new Seicane car stereo into the dash.
  2. Turn on the new Seicane car stereo and check whether the radio is working properly.
  3. Install screws and panels accordingly, and put everything into their original place.


The above is the step-by-step installation guide for 2009-2014 Ford F150 F250 F350 Expedition car stereo. Wish it can be helpful for you to install your new car stereo. Before the installation, one important thing should arouse your attention, which is to make sure your new car stereo can be seamlessly installed in your car. If you have no idea whether a car stereo can fit your car, I’d like to share a great Ford F150 F250 F350 Expedition car stereo from Seicane with you, please click:


http://www.seicane.com/seicane-s127303-quad-core-2009-2014-ford-f150-f250-f350-expedition-android-4-4-4-sat-nav-in-dash-dvd-player-with-3g-wifi-radio-rds-mirror-link-obd2-rearview-camera-hd-1080p-video-16g-flash


This car stereo is upgraded with an advanced Android 4.4.4 operating system and a great RK3188 1.6 GHz Cortex A9 Quad-core processor. You are able to enjoy a faster and more stable performance with this car stereo in your car.


The 3D navigation of high precision can guide you to any location with turn-by-turn directions and spoken guidance. You can keep your hands on the steering wheel control to make and receive calls to keep safe thanks to the Bluetooth functionality. Besides, you are also enabled to stream music for relaxation in this way.


Relax yourself in your car and enjoy your trips with this wonderful Ford F150 F250 F350 Expedition car stereo all the time from now on!

An easy installation guide of a 2003-2014 VW Volkswagen Transporter head unit with Mirror Link OBD2 DVD Player GPS

If you want to have a more convenient and interesting driving experience, you can choose to upgrade your factory radio with a modern multifunctional head unit. Some of you may think it will cost a lot to do it. Actually, the installation can help you save a lot from upgrading a new head unit. With a detailed installation guide, you can achieve the installation on your own at your home. The below picture is a Seicane 2003-2014 VW Volkswagen Transporter head unit after installation, if you have the same dashboard, you can follow the below step-by-step guide.

2003-2014 VW Volkswagen Transporter head unit after installation


There are some tips before installation:

  1. Ensure the power cable is disconnected for safety.
  2. Make sure the ignition is off to avoid short circuit and connect the yellow and res cable at last before connecting.


2003-2014 VW Volkswagen Transporter head unit installation guide

  1. Remove the original radio with the unlock tools.
2003-2014 VW Volkswagen Transporter head unit installation step 1


  1. Disconnect the harness at the back of the factory radio.
2003-2014 VW Volkswagen Transporter head unit installation step 2


  1. Unplug the connectors.
2003-2014 VW Volkswagen Transporter head unit installation step 3


  1. Disconnect the car radio wiring.
2003-2014 VW Volkswagen Transporter head unit installation step 4


  1. Remove screws behind the console.
2003-2014 VW Volkswagen Transporter head unit installation step 5


  1. Put the harness into the new Seicane head unit as user manual shows.
  2. Put the new Seicane head unit into dash.
  3. Turn on the new Seicane head unit to check if everything works well.
  4. Install the screws and put the new Seicane head unit into the dash.


That’s all the instruction on how to install a 2003-2014 VW Volkswagen Transporter head unit. Wish you can get some help for your installation. If it’s the first time for you to do it, you’d better make clear everything or do it under the guidance of a professional.


To upgrade your factory radio, you need to pick a suitable head unit for your, so that it can be perfectly installed and work well with your car. If you haven’t found one yet, I’d like to share an intelligent VW Volkswagen Transporter head unit from Seicane to you.


http://www.seicane.com/seicane-s127402-quad-core-android-4-4-4-2003-2014-vw-volkswagen-transporter-radio-bluetooth-in-dash-car-navigation-system-with-3g-wifi-mirror-link-obd2-cd-dvd-player-16g-flash-rearview-camera-canbus


This double din DVD player GPS navigation system with Android 4.4.4 is suitable for 2003-2014 VW Volkswagen Transporter. The built-in GPS navigation system can provide you with the world real-time traffic information to help you reach your destination faster than before.


A large 7 inch multi-touch screen with HD 1024*600 pixel resolution makes you easier to operate the map and watch the videos. Pairing your Bluetooth-enabled with this unit for hands-free calls can enhance your safety, and you can also relax yourself by streaming music. The USB/iPod connection allows you to have more choices to have fun according to your own preference.


Wish you have a good time with this VW Volkswagen Transporter head unit and good luck to you!

Installation instructions of a 2003-2011 VW Volkswagen Golf B5 B6 radio DVD Player GPS navigation with WIFI touch screen

Without not much professional skills about cars, car owners can finish the installation on their own, which not only saves a lot of money but also makes themselves fill with sense of achievement. Therefore, if you are a car owner of 2003-2011 VW Volkswagen Golf B5 B6, you are able to install a VW Volkswagen Golf B5 B6 radio with the precise installation instructions which are shown as follows. However, if you are a total green hand on the installation ,it’s still suggested you ask for a professional technician for help.


Precautions:

  1. Please apply the parking brake and remove the negative cable on the vehicle battery before the removal to ensure security.
  2. A lever and a screwdriver need to be prepared before the installation.


Please refer to the below step-by-step removal and installation instructions for 2003-2011 VW Volkswagen Golf B5 B6 radio as a reference:


Step1: Remove the trim panel.

Please pry around the trim panel with a lever. While prying, please loosen the trim panel with your one hand. When the trim panel is loosened, please remove the trim panel off the dashboard and gently place it aside for further removal.

2003-2011 VW Volkswagen Golf B5 B6 radio installation step 1


Step2: Remove the four screws on the radio.

Please unscrew the four screws which are holding the radio at four corners with a screwdriver. Then keep them well in a small box for the installation of a new head unit.

2003-2011 VW Volkswagen Golf B5 B6 radio installation step 2


Step3: Take the factory radio out of the dash.

2003-2011 VW Volkswagen Golf B5 B6 radio installation step 3


After the four screws are unscrewed, you can easily pull the factory out of the dash.

Step4: Disconnect the wiring harness.

Before you put the factory radio aside, please disconnect the wiring harness at the back of the factory radio.

2003-2011 VW Volkswagen Golf B5 B6 radio installation step 4


Step 5: Connect the new Seicane car radio to the original wiring harness as the user manual or the wiring diagram shows.

Step 6: Turn on the new Seicane car radio to have a careful check if everything works well. If it doesn’t, please check whether all the cables are connected correctly.

Step 7: Put the new unit into the dash and install the four screws.

Step 8: Install the trim panel into its original place.


Wish the above installation guide can do some help for your upgrading. If you have any questions, it’s suggested you turn to a professional or your dealer for help. If you don’t have a suitable car radio for your car, I’d  like to share an amazing VW Volkswagen Golf B5 B6 radio from Seicane to you:


http://www.seicane.com/seicane-s09004-oem-android-4-4-4-gps-navigation-dvd-player-canbus-radio-for-vw-volkswagen-with-obd2-bluetooth-touch-screen-dvr-backup-camera-tv-usb-sd-hd-1080p-video-wifi-steering-wheel-control-quad-core-cpu-mirror-link


This unit is upgraded to Android 4.4.4 version and RK PX3 1.6 GHz Quad-core processor, so you can utilize the latest hardware and software for car stereos. With the built-in GPS navigation, you can arrive at any locations you like according to the turn-by-turn directions and the voice prompts. The Bluetooth technology lets you wirelessly link with Bluetooth-enabled devices for hand-free calls and streaming music. The rearview camera connectivity enables you to easily connect a back-up camera (as an option) to aid in parking.


Take this wonderful VW Volkswagen Golf B5 B6 radio on all your trips, an exciting and brand new driving experience will be always with you from now on!

Easy installation guide of a 2006-2013 Mercedes Benz R Class W251 radio with DVD player GPS navigation Bluetooth

If you have a good car, you must want to install a remarkable car radio next, which can improve your car interior on one hand, on the other hand, the high-end configuration and intelligent features will bring you the exciting experience. When you install an ideal car radio in your car by yourself, you must have the sense of achievement. Then a professional guide of the installation is essential for you particularly when you don’t have much experience on that. This article will provide the detailed installation instructions of a 2006-2013 Mercedes Benz R Class W251 radio for you as a reference.

2006-2013 Mercedes Benz R Class W251 radio  after installation
2006-2013 Mercedes Benz R Class W251 radio after installation


Before installing the new radio, there are some tips for you:

  1. Please disconnect the power before the installation.
  2. Please prepare a lever and a screwdriver before the removal and the installation.
  3. Please keep all the separate parts from the car. Please take great care of the dashboard to avoid scratching it during its detachment and installation. Please keep handy any parts from the car and make use of all the original screws from the car as much as possible. so each related part of the unit can be fixed securely.


The below is the step-by-step instruction on how to install a 2006-2013 Mercedes Benz R Class W251 radio:

  1. Pry out the air conditioner panel along gap with a lever.

    2006-2013 Mercedes Benz R Class W251 radio  installation step 1
    2006-2013 Mercedes Benz R Class W251 radio installation step 1
  2. Remove the air conditioner panel.

    2006-2013 Mercedes Benz R Class W251 radio installation step 2
    2006-2013 Mercedes Benz R Class W251 radio installation step 2
  3. Remove two screws holding the stereo in the dashboard frame with a screwdriver.

    2006-2013 Mercedes Benz R Class W251 radio installation step 3
    2006-2013 Mercedes Benz R Class W251 radio installation step 3
  4. Pull the buckles down.

    2006-2013 Mercedes Benz R Class W251 radio installation step 4
    2006-2013 Mercedes Benz R Class W251 radio installation step 4
  5. Carefully take the original CD player out of the dashboard.

    2006-2013 Mercedes Benz R Class W251 radio installation step 5
    2006-2013 Mercedes Benz R Class W251 radio installation step 5
  6. Disconnect the ISO plug of the car in the socket of the DVD player.

    2006-2013 Mercedes Benz R Class W251 radio installation step 6
    2006-2013 Mercedes Benz R Class W251 radio installation step 6
  7. Connect the cables of the new Seicane radio as the user manual shows.
  8. Connect the ISO plug.
  9. Put the new Seicane radio back into the dash.
  10. Put the buckles back into its original place.
  11. Install two screws and the air conditioner panel.
  12. Turn on the new Seicane radio and have a comprehensive test if everything works well.


In the process of the installation, you may encounter some questions, it’s suggested you consult a professional or your dealer. There may be a little difference on the installation among different car years, but which won’t affect much on the whole. Since a fitting radio matters a lot, if you don’t have a new car radio yet, you can click the following link which is a wonderful 2006-2013 Mercedes Benz R Class W251 radio from Seicane:


http://www.seicane.com/all-in-one-android-4-4-4-2006-2013-mercedes-benz-r-class-w251-r280-r300-r320-r350-r500-r63-autoradio-gps-head-unit-1024-600-multi-touch-capacitive-screen-3g-wifi-bluetooth-dvd-mirror-link-obd2-backup-camera-k7510


This 2006-2013 Mercedes Benz R Class W251 radio comes with the latest pure Android 4.4.4 operating system and a powerful RK3066 1.6GHz Cortex A9 Dual-core CPU to enhance the capabilities, which you can enjoy a smoother and more stable operation than ever.


With the GPS navigation system to provide 3D street view, landmark display, voice prompts, route planning and turn-by-turn direction, you won’t get lost no matter wherever you go. The Bluetooth function allows you to link your enabled mobile phone with this unit to get access to hands-free calls and streaming music. Practical features like digital TV, DVR, OBDⅡ, mirror link, rearview camera, 3g module can all be compatible, you can add them to this unit as options to meet your different needs.


If there is an optic fiber, you can also add an optic fiber decoder to this unit to make your original car’s optic fiber and all your original car’s speakers work after installing this unit. The installation of this decoder is quite simple. And you can be provided the detailed instruction of it to make things easier. After the installation, you can enjoy the high-quality sound in your car.


Just take this 2006-2013 Mercedes Benz R Class W251 radio right now and go!

How to upgrade 2005 2006-2010 Nissan PATHFINDER Radio to touch screen bluetooth DVD player

Before the installation, first show you the Seicane 2005-2010 Nissan PATHFINDER Radio.

2005-2010 Nissan PATHFINDER Radio after installation

Nissan PATHFINDER is absolutely good. In order to improve the in-car environment, most owners of Nissan PATHFINDER upgrade their factory radio. If you want to get a new aftermarket radio and replace your factory radio, you’d better read this essay patiently. Some of you may think it’s too hard to remove the factory radio, or some of you have already tried and failed. To be honest, This Nissan PATHFINDER Radio is easy remove. The new aftermarket radio in waving to you. And what are you waiting for? Here is professional instruction.


Some safety notes

1)Please apply the parking brake before the upgrade.

2)Please disconnect the negative cable on the vehicle battery to ensure security.

3)Please prepare tools for the upgrade. A lever and a screwdriver are needed.

4)Please protect the front seats and trim panel during upgrade.

2005-2010 Nissan PATHFINDER Radio installation

1)Disconnect the cable running to the negative battery terminal by loosening the nut on the cable clamp and pulling the cable off the negative terminal.

2)Remove the two screws above the Nissan PATHFINDER Radio opening with the head screwdriver.

2005-2010 Nissan PATHFINDER Radio installation step 1

3)Pull the radio trim panel off. You may need to wedge a flat tip screwdriver under the trim and pry up on it to remove the trim. Use a clean rag to protect the trim from being accidentally scratched while prying up on the trim.

2005-2010 Nissan PATHFINDER Radio installation step 2

4)Remove the four screws holding the radio in place using a head screwdriver and pull the radio out.

2005-2010 Nissan PATHFINDER Radio installation step 3

5)Disconnect the radio antenna in the back of the radio and unplug the electrical plugs running to the back of the radio.

2005-2010 Nissan PATHFINDER Radio installation step 4


Of course,there may have other situations.You’d better ask some professionals for help at the first time.If the steps of radio ramoval are too difficult to you,you should go to a car radio shop to remove your factory radio.


Some of you may haven’t got a suitable aftermarket radio for your Nissan PATHFINDER.Here is a good aftermarket car radio I want to share with you.It has many useful functions,such as bluetooth,3D navigation,car DVR and so on.More about this unit:

http://www.seicane.com/android-hd-1024-600-touch-screen-radio-gps-navigation-system-for-2005-2010-nissan-pathfinder-with-bluetooth-dvd-player-mirror-link-obd2-rearview-camera-dvr-tv-3g-wifi-usb-sd-ipod-1080p-video-s166226

You can dial, answer, reject and mute calls without taking your hands off the steering wheel. And you can perform Google search on the road with quick search box, play online games, watch videos, download online data and check emails by connecting to any WiFi hotspot in range or 3g internet, download any applications in the android market for access to games, Skype, MSN, YouTube, twitter, E-Book, Gmail etc and so on. So, have fun with your new Nissan PATHFINDER Radio.

Guides of 2006 2007-2010 Toyota Terios Radio installation

Look at this image, this is Seicane 2006-2010 Toyota Terios Radio after installation.

2006-2010 TOYOTA Terios Radio after installation

Install a new aftermarket radio on your car is a good choice. And now, it becomes a popular trend among most people. Have a better in-car environment, start by install a new aftermarket radio. Here are some professional instructions of Toyota Terios Radio installation. But if you didn’t install a radio before, you’d better do it with the help of a professional technician in case of some irreparable damage is being made.


If you have the same dashboard with the picture shows, you can follow the instructions below.


Precautions before installation:

1.Before you begin any work, remember to disconnect negative power cable to avoid danger

2.Please turn off your car series include the radio unit and park your car well.

3.Before connecting, please make sure the ignition is off to avoid short circuit and connect the yellow and res cable at last.


2006-2010 Toyota Terios Radio installation

1)First remove two trim panels at each side of center console and set it aside.

2006-2010 TOYOTA Terios Radio installation step 1

2)Remove the top panel and set it aside.

2006-2010 TOYOTA Terios Radio installation step 2

3)Remove 4 screws holding the unit with a Phillips screwdriver.

2006-2010 TOYOTA Terios Radio installation step 3

4)Gently take out the panel on the radio interface.

2006-2010 TOYOTA Terios Radio installation step 4

5)Then take out the radio and disconnect cables at back of it.

2006-2010 TOYOTA Terios Radio installation step 5

6)Connect the cables on the new head unit as the user manual shows and place them well.

7)Put the new head unit into the dash.

8)Turn on the new head unit and have a comprehensive check if it works well.

9)Install 4 screws back to their original position.

10)Check whether the unit is working without problem.

11)If everything is OK, make trim panel back on your new Seicane radio.


By the way, you should make sure whether the aftermarket radio fits your car before installation, and here is a good aftermarket radio of Seicane which fits Toyota Terios well:

http://www.seicane.com/seicane-s126002-all-in-one-android-4-4-4-radio-gps-navigation-system-for-2006-2010-toyota-terios-with-800-480-touch-screen-bluetooth-3g-wifi-dvd-player-steering-wheel-control-aux-mirror-link-obd2

This Toyota Terios Radio GPS Navigation System For 2006 2007 2008 2009 2010 TOYOTA Terios is equipped with the most advanced Android 4.4.4 version and 1.6 GHz Cortex A9 Quad-core CPU to process the database and information with smoother performance. The unit comes with worldwide real-time navigation function of high accuracy and digital touch screen is ideal for the navigation system and other operation. Besides, you will keep enjoyable all the way with a variety of entertainment options supported by this unit, such as DVD, CD, VCD, MP3, MP4, radio, Ipod, etc.If you are uncertain if it works with your car, please send a picture of your dashboard and the year and the model of your car to [email protected].