FAQs for using car stereo autoradio

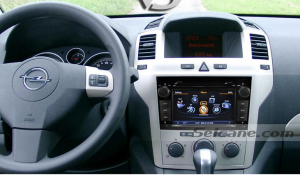
Nowadays installing a new upgraded stereo for car is become very popular among drivers.Many people choose the new unit because of its new entertaining functions and its nice appearance.Here is an image for it,a car stereo autoradio with gps bluettoth touch screen.

car stereo autoradio with gps bluettoth touch screen

After seeing it,we may know why there are so many people make that decision.It’s more advanced than original one and can bring people much convenient and make life in car more comfortable.But do you know how to use this stereo?

Faqs during usage of car stereo autoradio:

1.How to upgrade the map?

You know,this unit has gps nav system,it can support IGO,Tom-tom,Route 66,Papago etc.Thus you upgrade your radio by downloading map on the Internet

2.How to find the SD card?

Everything should be in the machine when you ordered from a shop,and the SD card are generally placed on the foam when you open up the package or inserted in the GPS a lot.If you still can’t find out it,please check it carefully again in the package

3.How to make GPS work?

Before you use GPS,please make sure that you have inserted the SD card into the GPS slot,this is very important.And you should also ensure that you have installed the GPS antenna and set the file path correctly before you start it up.

4.How to make the radio got channels?

If you find that there are no channels on radio,you need to check the radio antenna in the package to see whether it is correctly connected to your original car’s radio antenna,in addition,the radio area should be selected correspondingly to your location.With all these well done,you will surely find channels on the stereo

5.Where should the TV antenna place?

The TV antenna is suggested to be placed outside of your car to getting better signal

6.How to connect the rearview camera?

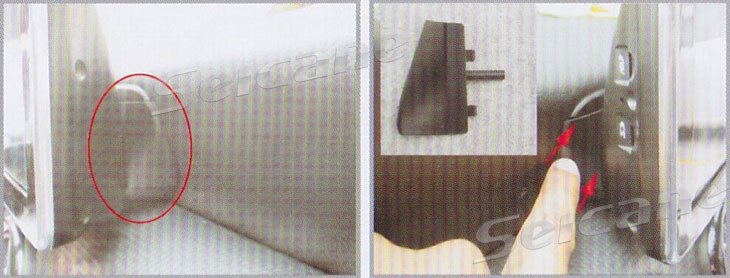
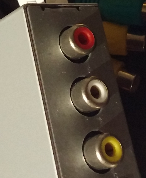
There are three pictures which will show you specific instructions for its connection,and mind that your rearview camera’s video input is supposed to be connected to this unit’s back-video-in.

connect the rearview camera


connect the rearview camera2


connect the rearview camera3


If you still meet some other questions or doubts,you can visit our website:http://www.seicane.com,there are more detailed information and solutions there.

After you have a new stereo autoradio,actually keeping it well is the most important thing in usage.But before this,of course,you should make sure that you have succeed finishing whole installation,next there won’t be any big problems in latter time on case that you don’t protect the unit well.

Therefore,please mind to protect your radio while you are using it.Here are some tips for you about using car stereo autoradio with nav system.

Precautions during using new stereo:

1.You should pay more attention to the screen when you are heavy raining days for moisture may gather on it.which may arouse damage to screen

2.Please use touch screen to operate the unit,without any other sharp objects

3.Please do not use any chemicals to wash the machine,if you really need to clean it up,you can use a clean cloth and gently tidy the surface the radio

4.Do not do any self-repairment or maintance when you have no experience on it,you’d better ask someone who is professional on this when something can’t work well,or it can be dangerous

Keeping you safe and then enjoy your life is the wisest choice we should make.

How to install 2004-2009 OPEL Astra gps radio with bluetooth music

Do you know how to install 2004-2009 OPEL Astra gps radio with bluetooth music?

Here is an image for car stereo after installation,dvd player with aftermarket navigation system bluetooth touch screen of 2004-2009 OPEL Astra.If the panel of your car radio is alike this one,it means that this unit can be installed in your beloved car.

car stereo after installation,dvd player with aftermarket navigation system bluetooth touch screen of 2004-2009 OPEL Astra

Recent car radio is upgrading with a very fast speed.Because the requirements of people to cars is getting higher,they hope that cars can bring them more entertainments when they are driving.So car radio become a main machine except the car itself.We know that factory stereo is operated mainly by button controls while car stereo nowadays has touch screen which can be worked with a touch screen pen.

More importantly,it has increased the gps navigation system.This is a very popular function that attracts a lot of people.Nowadays people have been accustomed to look for directions with sat nav system.When you entered in a destination,a map will occur on the screen and you only need to drive as the map points.

But what should we do to install this new radio with new functions?Don’t worry,we have general steps for this installation.

2004-2009 OPEL Astra car stereo removal and installation:

1.Insert removal tool into two holed on left side of car stereo

insert removal tool into two holed on left side of car stereo


2.Insert removal tool into two holed on right side of car stereo

insert removal tool into two holed on right side of car stereo


3.Grasp removal tools and pull car stereo from dash

grasp removal tools and pull car stereo from dash


4.Release trigger on connector to remove,remove antenna and car stereo

release trigger on connector to remove,remove antenna and car stereo


5.After that,you can remove under control buttons and disconnect the connector

remove under control buttons


6.remove the screw and the other corresponding one

remove the screw and the other corresponding one


7.remove trim panel by releasing the lower place first and then top of it

remove trim panel by releasing the lower place first and then top of it


You see the removal steps can be very simple with removal tools and right removal guide,then we still need to continue and install the new unit into your car.

8.Plug all connectors of new stereo to the car’ correctly and firm screws that were removed

9.Install removed panels to the car,with all things done you can turn on your new radio and check whether this new unit can work or not

I believe that everything will be ok only if you can act the OPEL Astra gps installation procedure according to right installation guide step by step.It’s neither a hard thing,nor a thing that can only be finished by professional person,you can also achieve it by yourself.Of course,you should be careful and patient enough during this process,such as putting removed panels and screws in a safe place,be gentle when you are removing something to avoid any damage.

After you have installed new unit successfully and willing to drive it to enjoy your labor work,you may be not very familiar with those new functions,so you can visit next website for more detailed information about this unit:http://www.seicane.com/sat-navi-radio-replacement-car-a-v-system-for-2004-2009-opel-astra-support-dvr-file-management-with-3g-wifi-dvd-recoding-function-c019-2.

Here are some notes for you to attention after your radio mount,

Precautions after installation:

1.Do not pay too much attention on it when you are driving especially on a crowded road,it’s very dangerous

2.To ensure it can be used longer,please remember to use touch screen pen to operate it

3.If you want to clean up it,please use a clean cloth and gently tidy the surface,no any other liquid on it


How to choose a right car dvd player

dvd player with a lot of functions

Do you have a DVD player like the above picture shows? Nowadays the CD player is gradually replaced by DVD player because the latter has some functions which are more convenient and entertaining.But how to choose a right car DVD player? Next there will be some advices for you.

There are mainly two types of car dvd players: DVD players with built-in monitor and those that require external monitors. You can always hook up additional monitors throughout the car even if your DVD head unit includes a built-in monitor.In addition, using your built-in monitor with a rearview backup camera will allow you to see  the behind you when you are backing in reverse or parallel parking.

1. DOUBLE DIN application

If you want to choose a right DVD player for your car, first of all, you must make it clear if the stereo will fit your car. Most in-dash DVD receivers are DIN-sized models, which will fit in regular DIN dash slots. However, certain are specifically designed as DOUBLE DIN models, they will fit in cars with DOUBLE DIN dash holes. Thus  you should check our DOUBLE DIN application to know your car’s dash slot size at first.

2. Security feature

Most DVD players have convenient playlist control for touchscreen. For example, if you use the screen to scan your favorite music, the screen will display the song and artist information. Some DVD players have motorized screens that you only need to press a button. This is a great security feature that you can pay attention to when you are buying the DVD player.

3.Important functions

Besides playing CDs, MP3s, and DVDs, some receivers also have Bluetooth compatibility, iPod controls, and are possible for Sirius or XM satellite radio. Certain DVD players also offer GPS navigation function, which is very convenient especially for people who are busy when he is driving.So choosing a dvd player of the car with gps nav system is a wise choice.On-screens maps and a computer generated voice will give you directions clearly.

4.Accounts about other passengers

Actually it’s according to your own interests about the various functions. When choosing a DVD player, you can look for great features such as dual-zone capability, built-in wireless FM modulators and so on.Dual-zone systems enable front seat passengers to listen to their music or station while the rear passengers watch a movie or listen to an alternative music. Built-in FM modulators and infrared transmitters allow your passengers to use wireless headphones, also can afford you peaceful silence on the road, you will enjoy yourself very well.

In a word,you should have a detailed look at the car dvd player to see whether it can installed in your car.And then, it’s about functions, choosing one that can make you feel satisfied is choosing the right one.


How to solve the installation problems of car dvd player for Mercedes-Benz

 Recently,we are accepting some customers’ response of the related problems about How to solve the installation problems of car DVD player for Mercedes-Benz OK,we focus those problems to give our solutions, and wishing it will be helpful to you.

Firstly, a customer put up this problem: why plugs can not be inserted?

Car DVD player for Mercedes-Benz_1

In fact,optical fiber can be inserted, but you should additionally plus 3 meters speaker wire.

Car DVD player for Mercedes-Benz_2

  To make this unit power on,you need to connect canbus connector B2 and B3-B6.

Car DVD player for Mercedes-Benz_3

There are 3 kinds of connections:

1+2+5

1+4+5

1+3+6

Please try all these 3 kinds of connections, and see which one can make this unit power on. Canbus box also need to be connected to make this unit power on.


After this unit power on , you will find that there is no sound. So please use this 6 meter long cable to connect speakers, or you also can connect 4 pairs long cables separately.

1. Please use this 6 meter long cable as a speaker long cable.

  2. Please cut this 6 meter long cable’s plug 2 and plug 3.

3. Please connect the short power cable to this unit’s back.

4. Please connect this 6 meter long cable plug 2’s 4 pair speaker cables to the short power cable. Just joint the same color together.

5. Please connect this 6 meter long cable plug 3’s 4 pair speaker cables to your original car’s optic fiber amplifier plug’s 4 pair speaker cables.


Car DVD player for Mercedes-Benz_4


Then the speaker cables are all connected well.

Secondary, if you also have following problems, go on.

Car DVD player for Mercedes-Benz_5

According to above picture, if you don’t know how to connect lines or plugs, try to connect part 5,6 to 3.Then determine to use 5 or 6 with what can work normally.

Part 2,3,4 should connect to 1, but finally determine to use 2,3 or 4, we should observe what one can boot.

Thirdly, a customer deliver a picture to us.

Car DVD player for Mercedes-Benz_6


Car DVD player for Mercedes-Benz_7

His or her question is don’t know the tail box plug to connect what.

Answer:


Car DVD player for Mercedes-Benz_8


Car DVD player for Mercedes-Benz_9


The part 4 should connect to power, and you should find another 8 lines to connect to original car’s speaker wire. Of course, you can cut B5 power lines for your usage.

About how to solve the installation problems of car dvd player for Mercedes-Benz,we write here.If you also have any doubt about our products,please contact with us, we will  answer for your questions warmly.


How to install 2012 2013 Mercedes Benz A Class B Class DVD sat nav head unit

In order to ensure the safety and usage of the product,please commissioned by professional technicians for installation.In addition,to avoid damage and accident,please do not disassemble the host privately.Before installation,you can start the engine to check the dashboard function display and button operation whether is normal;the car inside and outside surface whether have the squandering phenomenon.Then the installer will reflect to customers if have any problems.One car DVD player will bring you too much entertainment and convenience.But the installation is different from each other.Today I will tell you how to install 2012 2013 Mercedes Benz A Class B Class DVD sat nav head unit.When installing,the wire arrangement must be reasonable.Normally,the space for installation is limited.It is recommended to reduce the unnecessary wirings to make the Android 4.4 car DVD easy to install and access.The cables and wires to the car radio head unit must be routed properly to avoid touching any moving parts,such as steering wheel column acceleration pedal and brake pedal.all the cables must be bonded properly to against any loose during driving.If you need to install the reverse camera,you must enter into the setting menu to choose reverse power on.There are detailed steps to this Mercedes Benz car DVD player removal.

1.The Mercedes A180 appearance
2.The dashboard

Android 4.4 2012 2013 Mercedes Benz A Class W176 B Class navigation installation guide

3.Combined sleeve,plastic crow plate,3m electrical adhesive,3m adhesive,cotton and screwdriver
4.Use a knife to pull out the air-conditioning window card slot

Android 4.4 2012 2013 Mercedes Benz A Class W176 B Class navigation installation guide

5.Use a knife to pull out the air-conditioning window card slot

6.The effect after removed

Android 4.4 2012 2013 Mercedes Benz A Class W176 B Class navigation installation guide

7.Loosen the fixing two screws on the original car audio host
8.Pry the original CD machine

Android 4.4 2012 2013 Mercedes Benz A Class W176 B Class navigation installation guide

9.Pull out the right side’s connection cables

10.Pluu out the connection cable and take out the CD machine

Android 4.4 2012 2013 Mercedes Benz A Class W176 B Class navigation installation guide

11.Loosen the 2 screws on the top of original display screen

12.After loose,pull it out

Android 4.4 2012 2013 Mercedes Benz A Class W176 B Class navigation installation guide

13.Take out all connection cables

14.The effect

Android 4.4 2012 2013 Mercedes Benz A Class W176 B Class navigation installation guide

15.Pry the original screen rear seat support plastic frame
16.The effect

Android 4.4 2012 2013 Mercedes Benz A Class W176 B Class navigation installation guide

17.Remove the fixing screws

18.Remove the original display screen below the bracket

Android 4.4 2012 2013 Mercedes Benz A Class W176 B Class navigation installation guide

19.The effect

20.Pry the side’s panel

Android 4.4 2012 2013 Mercedes Benz A Class W176 B Class navigation installation guide

21.The effect
22.Remove the fixing screws

Android 4.4 2012 2013 Mercedes Benz A Class W176 B Class navigation installation guide

23.Remove the screws on the storage box

24.Remove the screws on the storage box

Android 4.4 2012 2013 Mercedes Benz A Class W176 B Class navigation installation guide

25.The effect

26.Take out the connection cables

Android 4.4 2012 2013 Mercedes Benz A Class W176 B Class navigation installation guide

27.Take out the connection cables

28.The effect

Android 4.4 2012 2013 Mercedes Benz A Class W176 B Class navigation installation guide

29.Fix our car DVD player

30.The equipped bracket

Android 4.4 2012 2013 Mercedes Benz A Class W176 B Class navigation installation guide

31.Lock the fixing screws

32.Insert our equiped cables

Android 4.4 2012 2013 Mercedes Benz A Class W176 B Class navigation installation guide

33.Fix our car DVD player

34.Insert the right side’s objection

Android 4.4 2012 2013 Mercedes Benz A Class W176 B Class navigation installation guide

35.The effect

36.Insert the left side’s objection

Android 4.4 2012 2013 Mercedes Benz A Class W176 B Class navigation installation guide

37.The effect

38.Connect all the cables

Android 4.4 2012 2013 Mercedes Benz A Class W176 B Class navigation installation guide

39.Connect all the cables

40.Install the dashboard

Android 4.4 2012 2013 Mercedes Benz A Class W176 B Class navigation installation guide

41.The effect after installed

Android 4.4 2012 2013 Mercedes Benz A Class W176 B Class navigation installation guide

When finished all of these steps,you can check out all installation and make sure whether it has reversed or not.Testing navigation card and navigation antenna to make sure whether it has been connected correctly or not.It should be able to search and locate GPS. Then you can check the radio signal and whether the radio antenna works or not.You car DVD will work normally if the installation is completed in right ways.Confirming Bluetooth function and linking to Bluetooth to make sure it works or not.Usually,Mercedes Benz car nav machine is a little complicated comparing with other car models.So having professional staff do it is a wise choice.You will obtain a great journey after installing our Android 4.4 car DVD player!

Usage and maintenance of replaced car DVD player for 2007-2011 Toyota Sequoia Tundra

The lifetime of one car DVD player is concerned by all of owners who are using it.Anything has its lifetime just like us people.Electronic products are no exception.And they will be affected by user obviously.So besides installation,usage and maintenance of replaced car DVD player for 2007-2011 Toyota Sequoia Tundra is also important and a good way to extend the lifetime of the car radio sat nav head unit.Disc is a very important function for one car nav machine.Entertainment function is the most attractive one among various of functions.Playing dirty or harmed disk,the sound would be jumping.In order to get the best sound quality effect,you should pay attention that don’t use discs with torn tag or stick paper or tape to the disc.Before playing,wipe the disc outwards from the center with soft and clean cloth.Using any solvent such as alcohol,thinner,commercially available cleaners is not a wise act when using the disc.

main menu of replaced car DVD player for 2007-2011 Toyota Sequoia Tundra

At first,let us know about the basic operations:When you turn the head unit on,it has been set to standard setting,you can change the detailed setting according to your favor.Operation the car DVD machine for the first time,you had better reset the unit.Press “RES” button with a pointed object to set the unit to initial pointedure,If the unit at any time malfunctions use the reset button first before troubleshooting other aspects.About radio,I will just say one point:When a station is received,searching stops and the station is played. APS: Press the “APS’ button to scan each stored station for 7 seconds respectively then press “APS” again to start playing that station.Press and hold “APS” button for more than 1 second start the automatically memory storing function,The unit will auto scan and store all the stations in current band.iPod and iPhone connection is another convenient and great function of our car DVD player.You just need note that iPod must be attached to the unit before entering iPod mode,otherwise you need to switch to other mode first and then switch back again.

replaced car DVD player for 2007-2011 Toyota Sequoia Tundra after installation

The video below will help you in a efficient way:

PIP function is a new one for us.This Toyota car radio machine has been designed for it.Maybe there are many persons don’t know how to use it.In this car DVD player GPS navigation system,you can enter the “settings” “other settings” button,choosing “yes” to open picture-in-picture function in other settings page.PIP window will be active when you switch from DVD/USB/SD/TV mode to navigation mode.Click on the title bar of the PIP window,a tool bar will slice in from the edge.You can adjust the size and opacity of the PIP window on it.The button “exit PIP” can disable PIP function directly,that means you need to go to configure menu if you want to reenable it again.You can move the PIP window to whatever you want by dragging the title bar.Some general issues you may meet during using it will be list below to help you solve them.On power:Check and make sure whether the fuse is blown,replace with the proper value if necessary.Unable to receive stations:Check and make sure whether the antenna is connected it properly if not.No picture:The video line from main unit to the TV is not connected properly.If these tips don’t solve your problems at all,you can visit our website and ask our customer service for help.If you are planning to buy one,you also can contact us to get more information usefully no matter whether you buy one or not.

General issues about Android 4.4.4 2000-2007 BMW X5 E53 DVD GPS radio removal

Before placing your order of one car DVD player,you have to make sure some information is exact and right.You may have got this.All right,you must know if this head unit is compatible with your car dashboard.This is really one of the General issures about Android 4.4.4 2000-2007 BMW X5 E53 DVD GPS radio removel.It seems that it is very easy to confirm these information like size,model and years.But many sales have to admit there are many problems exist in it.In fact,you needn’t worry about this issue at all only if you refer to the years and models listed on our website. If you are unsure,sending a picture of your car’s dashboard including the year and model to our website.Then we will help you check.If you have done those all,you can believe that what you choose from our website will fit your car perfectly without any problem.

main menu of Android 4.4.4 2000-2007 BMW X5 E53 DVD GPS radio removal-1

Besides,there are many other questions about buying or installing the car DVD machine.Here is the list:

1.How to make payment?

We currently accept international PayPal, western union and bank transfer. If you have any questions, please feel free to contact us.

If you need to pay via credit card, please add this unit to cart and go to payment page. Select the payment method PayPal and then go on and select “I have no PayPal account”. Then, you can pay via your credit card.

2.What is Pure Android?

Most android GPS navigation systems in the aftermarket autoradio car stereo market are not pure android but are wince and android systems. This unit utilizes the latest pure android 4.4.4 operation system. All the interfaces are android based not only the GPS.

3.Does it work with my rearview camera? Can it switch automatically to the camera mode when the car is put into reverse?

This unit can support your original car’s rearview camera if it is of AV Plug.

Yes, the screen of this unit can automatically turn to the camera image while reversing the car.

4.I have not installed backup camera but it displays “No signal” every time I reverse the car. How can I solve this?

There’s a pin definition sticker of our power cable at the top of the unit, please cut the reverse cable on the power cable referring to the pin definition and then this issue will be solved.

5.How to use the mirror link to connect my Iphone?

Please refer to the video or information on our website and you will find the answer you want to get.

6.How to connect the OBD?

Please plug the OBD scanner to the DLC port of your car and then open this unit’s Bluetooth to connect to it. Then, you can check the data in the OBD menu.

7.For the 3g and WiFi, Do I need to buy WiFi dongle?

This stereo has built-in WiFi module. You do not need buy any extra WiFi dongle.

This unit supports 3g internet connection but the 3g module is optional. If you need it, please select the option while placing order.

8.How to connect the digital TV?

Please connect A port to this unit’s back B:

General issues about Android 4.4.4 2000-2007 BMW X5 E53 DVD GPS radio removal-2
General issues about Android 4.4.4 2000-2007 BMW X5 E53 DVD GPS radio removal-3

Please connect 2 digital TV antenna as below:

General issues about Android 4.4.4 2000-2007 BMW X5 E53 DVD GPS radio removal-4

And the following 3 ports don’t need to be connected:

General issues about Android 4.4.4 2000-2007 BMW X5 E53 DVD GPS radio removal-5

This car DVD player GPS upgrade stereo is also special for BMW car model.mirror link, car DVR and OBD features are its unique advantages among all kinds of car radio removal.These new features will help you get more convenience from your car.You driving will get more entertainment.Android 4.4.4 is the newest car nav head unit at present.Just like the cellphone or computer,old members will be replaced by newer ones.Science and technology is amazing to our world.Your car need the popular thing to decorate as well.If you want to know about the functions it contains or the effect after installation even the installation steps,you can  visit our website by clicking the link above.I am sure that you will get one immediately after you view our website if you are looking for such machine or even just for view.


Something you should pay attention to about DVD player replacement for Android 4.4.4 2004-2007 Mercedes-Benz C Class W203

For the sake of safety and proper use of this car DVD player head unit,it is highly recommended that the product is installed by professional staff or an authorized dealer. dismantling or repairing this car DVD machine by yourself is not a good idea to save a little money but in fact paying more.This advice is just to avoid additional damage or accident.The content of the car radio sat nav head unit determine that you had better treat it carefully.So I will say Something you should pay attention to about DVD player replacement for Android 4.4.4 2004-2007 Mercedes-Benz C Class W203.No matter who install it,remember that you should remove all the metal or other hard objects to avoid the seat or interior trim of the car being damaged when installing the product.Starting the engine before you install this car nav machine,then check the display of the auto dashboard.After that,check all the buttons in the car.Also checking if there are any scratches outside or inside the car surface.If so,you should notify the client immediately.

main menu of Android 4.4.4 2004-2007 Mercedes-Benz C Class W203 C180 C200 C220 C230 C240 C270 C280 C320 C350 C32 C30 C35 DVD player

Put the components away when replacement to avoid interior trim being damaged.To avoid short circuit,any joints must be done well and insulated.To prevent damaging active components when in the process of connecting wires(such as the steering wheel control,throttle and brake pedal etc.)Keeping the connection wires safe(such as GPS antenna,cassette mechanism wire,reverse wire etc.)Remembering that do not connect the wires or accessories when in the boot-up state to avoid the host computer and accessories being damaged.The information about the ports in the back of the car DVD player is here.

The ports information of Android 4.4.4 2004-2007 Mercedes-Benz C Class W203 C180 C200 C220 C230 C240 C270 C280 C320 C350 C32 C30 C35 DVD player

Put car into reverse gear after installing a rear view camera. GPS antenna should be installed correctly to make sure that the GPS navigation system can work normally.And this is the most important function in the car DVD player for users.So you had better check this function carefully to make sure it is in the right state while using it.While our professional staffs will test it again and again at first,we should consider about the external factors like transportation etc.Then I will introduce the way to install the GPS antenna. Separating the GPS antenna and power wire when connecting.For testing,place the GPS antenna on the passenger seat. After replacement is complete,checking the GPS position and signal reception etc.When connecting these wires you should get the right port to connect them to avoid damaging the pins on them.If you have the professional install it,he must know these matters need attention.Wish you have a great driving journey after installing our android car DVD player!

Some FAQs about 2001-2007 Chrysler 300M Car Nav head unit with DVD Audio System

When you are reading this article but your car model is not Chrysler 300M,you can take the following information as references.These car models can use it commonly: Chrysler 300M PT Cruiser Sebring Concorde Grand Voyager Town & Country.In fact,all car DVD players are similar to a large extent.No matter what your car model is,this page is worth to read.Next,we will collect Some FAQs about 2001-2007 Chrysler 300M Car Nav head unit with DVD Audio System.Before discussing these questions,I will give you an advice about safety.Safety is the most important thing when using the car DVD player. Please do not watch or operate the car DVD while driving,as it can distract your attention.You can park your car at a safe place if you want to watch this unit.It sounds so easy but most of drivers will make this mistake carelessly.The auto antenna will extend automatically when use the car nav head unit.It may not work properly in high humidity atmosphere like raining weather,as humidity may gather on unit.In addition,to get high playing quality,do not splash liquid on the disc or unit.Turn off the car DVD player first before you shut down your car.

2001-2007 Chrysler 300M Car Nav head unit after installation

These questions are a part of the problems you may meet when installing or using the car DVD.

1. How to check if this unit works with my car?
You can refer to the listed the car years and models which the unit can work with. For double confirmation, please send a picture of your car’s dashboard with the year and model included to [email protected] or consult with us online via live chat.

2. How long does it take to arrive?
It takes 3-5 working days to process your order and 3-5 days to reach your door after shipping.

3. Do you have installation instruction for this unit?
We do not have specific installation guide for every unit. You can check if there’s any installation guide available by clicking “INSTALLATION” on the product page. We suggest arranging a professional to install it. If you have any questions about installation, please send us photos about your original car’s plugs. Maybe we can make a wiring diagram for your car.

4. Why there’s a warning message “warning, do not watch” on the screen but no video play while driving?
About message “Warning, do not watch”, please make sure that “brake” in the “Settings” is closed. It is just a safety measure for prohibiting the drivers from watching video while driving.

5. Why doesn’t the radio get any channel?
The radio antenna of the unit needs to be connected to your original car’s radio antenna and the radio area should be selected correspondingly according to your location. Please check if you have installed the radio antenna and set the radio area correctly.

6. How to connect the rearview camera?
The following is the wire connection instruction for the rearview camera for your reference:

2001-2007 Chrysler 300M Car Nav head unit rearview camera connection

To make your car radio sat nav machine live longer,you had better operate the unit according to guidance and instruction of this manual correctly when you try to install it by yourself or use it in daily life.It will effect the useful life of unit when continually play for long time use and convert to radio mode some times.Please do not attempt to modify this unit by yourself,it can cause an accident.It can damage pick up if play disc while car running on very bumpy road.When the car nav navigation system is operated extremely,such as operated with maximum power output for a long time,or the temperature is over 70 degrees,it will enter heat protection mode,the volume will be lower automatically,This is normal.The reason for appearing so many problems when install or use the unit is mainly the incorrect installation steps or using ways.The quality is promised for certain.After all,it is not a simple accessory for the car.Any problems you have met can be solved through asking us for help.If it not shown here you can contact with us by email or call us directly.On our website there are much information about the car radio head unit.

How to install Android 4.4 2014 BMW 3 Series F30 Car Radio Upgrade Sat Nav System

After buying a car DVD player,what may makes us crazy is the installation for it.Having professional do it is a wise choice for you especially when you are not so familiar with your beloved car.Installation manual and cautions is necessary if you want to get this by yourself.How to install Android 4.4 2014 BMW 3 Series F30 Car Radio Upgrade Sat Nav System successfully?Maybe you should read some useful guide to avoid some wrong steps.Next,I will list the detailed installation steps for this car DVD head unit of Android 4.4 BMW 3 Series F30.

1.BMW 3 series appearance
2.Original car dashboard

Android 4.4 2014 BMW 3 F30 Autoradio DVD stereo upgrade installation guide

3.Using the plastic crowbar to pry the decorative frame of the air-conditioning gate

4.Remove the decorative frame,and unplug the wiring harness of emergency light

Android 4.4 2014 BMW 3 F30 Autoradio DVD stereo upgrade installation guide

5.The effect

6.Remove the two screw on the fixed original car display screen,and pull out the display screen by upward

Android 4.4 2014 BMW 3 F30 Autoradio DVD stereo upgrade installation guide

7.Using plastic crowbar to loose the decorative plate at the bottom of the original car CD

8.Remove the decorative plate at the bottom of the original car CD

Android 4.4 2014 BMW 3 F30 Autoradio DVD stereo upgrade installation guide

9.The effect

10.Remove the screws on the fixed host button panel,and remove the button panel

Android 4.4 2014 BMW 3 F30 Autoradio DVD stereo upgrade installation guide

11.Remove the screws on the fixed host
12.Take out the host,and unplug the wiring harness

Android 4.4 2014 BMW 3 F30 Autoradio DVD stereo upgrade installation guide

13.The effect

14.Remove the original car LVDS wire

Android 4.4 2014 BMW 3 F30 Autoradio DVD stereo upgrade installation guide

15.Original car LVDS wire

16.The CPS-SD wire/LVDS wire from the factory

Android 4.4 2014 BMW 3 F30 Autoradio DVD stereo upgrade installation guide

17.The power cable from the factory

18.Connecting the LVDS wire

Android 4.4 2014 BMW 3 F30 Autoradio DVD stereo upgrade installation guide

19.The effect

20.Connecting the LVDS wire

Android 4.4 2014 BMW 3 F30 Autoradio DVD stereo upgrade installation guide

21.Connecting the power cable

22.Connecting the original car host power cable

Android 4.4 2014 BMW 3 F30 Autoradio DVD stereo upgrade installation guide

23.Install the host and fix the screws

24.Stick on the factory Velcro

Android 4.4 2014 BMW 3 F30 Autoradio DVD stereo upgrade installation guide

25.The update box from the factory

26.According to upgrade box on the wiring diagram,connect the wiring harness

Android 4.4 2014 BMW 3 F30 Autoradio DVD stereo upgrade installation guide

27.Fix the update box

28.Connecting the original car control panel

Android 4.4 2014 BMW 3 F30 Autoradio DVD stereo upgrade installation guide

29.Fix panel screws,the effect after installed

30.Original car display screen

Android 4.4 2014 BMW 3 F30 Autoradio DVD stereo upgrade installation guide

31.Remove the back cover fixed screw of original car display screen

32.The effect

Android 4.4 2014 BMW 3 F30 Autoradio DVD stereo upgrade installation guide

33.Remove the frame screws on the fixed screen

34.The effect

Android 4.4 2014 BMW 3 F30 Autoradio DVD stereo upgrade installation guide

35.the touch screen panel from the factory

36.Install the touch screen panel from the factory into the original car display screen

Android 4.4 2014 BMW 3 F30 Autoradio DVD stereo upgrade installation guide

37.The effect

38.Fix the screen screws

Android 4.4 2014 BMW 3 F30 Autoradio DVD stereo upgrade installation guide

39.Fix the back cover

40.The effect

Android 4.4 2014 BMW 3 F30 Autoradio DVD stereo upgrade installation guide

41.Fixed the two screws of the back cover

42.The effect

Android 4.4 2014 BMW 3 F30 Autoradio DVD stereo upgrade installation guide

43.Connecting the LVDS wire

44.Connecting the touch panel wire

Android 4.4 2014 BMW 3 F30 Autoradio DVD stereo upgrade installation guide

45.The effect

46.Install the display screen

Android 4.4 2014 BMW 3 F30 Autoradio DVD stereo upgrade installation guide

47.The effect

48.Fix the display screen screws

Android 4.4 2014 BMW 3 F30 Autoradio DVD stereo upgrade installation guide

49.Install the air-conditioning gate and the decorative panel

50.The effect

Android 4.4 2014 BMW 3 F30 Autoradio DVD stereo upgrade installation guide

51.Install at the bottom of the decorative panel

52.The effect after installed our special car DVD player

Android 4.4 2014 BMW 3 F30 Autoradio DVD stereo upgrade installation guide

After installation of this unit, you will have two interfaces: The original interface and the new.Your all the original car’s functions will be maintained and can be accessed via the idrive. About Car radio Navigation’s installation,different car models have the different ways and steps to finish them.Some details may lead to failure if you didn’t do it in the right way.If your car is not BMW 3 series but you are looking for the installation ways,you can ask us for help by clicking our website link.You can view them on the website page or you can directly ask our customer service.We will provide the best service and the most exact information.You can trust us.