How to install Mercedes Benz A Class W176 B Class W246 Head Unit GPS Navigation System

Nowadays,more and more owners are willing to install a GPS Navigation System in their cars.This fully shows that installing a GPS Navigation System is really necessary and convinent.But do you know how to install a GPS Navigation System for your car?Don’t worry,this article will tell you in some detail.Next,we will show you how to install Mercedes Benz A Class W176 B Class W246 Head Unit GPS Navigation System.

Announcements:Please check the appearance and the unit functions before install the unit.Don’t shorten or extened the GPS antenna,it will lead to the antenna problem.Don’t make the GPS antenna winding the steering wheel and shift lever,it will be dangerous.

Warm prompt:

1.Don’t use strong chemicals,cleaning agents,strong detergent to washing the machine.

2.Please use a clean soft fabric to wipe the screen,don’t use ordinary fabric.

3.Please use the touch screen pen to operation unit,please don’t use other sharp objects,or it will damage to the screen.

4.Please don’t self-service,maintenance or install the unit,in case of the power is on,don’t install or repair the unit,it is very dangerous if the person who did not receive the electronic equipment or vehicle installation training or lack of experienced personnel to install and repair the unit.

5.Please protect the original display when the staff dismounting the original CD and keep the original CD,try to use the original screw.

6.Navigation and rearview camera only to auxiliary function,it can’t replace your attention and judgment.

7.When the customer choose the digital TV,our unit could realized the digital TV touch.


Mercedes Benz A/B class Navigation & Audio System Installation Instruction Manual.
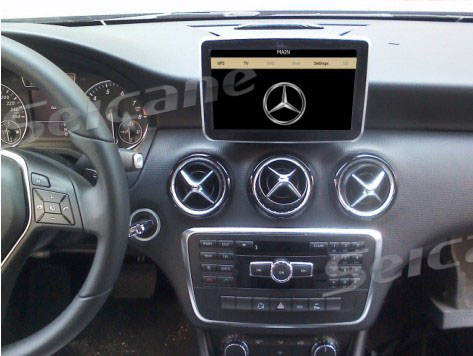
Mercedes Benz A/B class Navigation System Installation Manual

1.Original car console.

Original Mercedes Benz A/B class console

2.The accessories.

The accessories
The accessories

3.Remove the screws and take out the display screen.

Remove Mercedes Benz A/B class screws and take out the display screen


Remove Mercedes Benz A/B class screws and take out the display screen

4.Remove the framework holder and the 3 fixed screws.

Remove the framework holder and the 3 fixed screws

5.Remove the Air Conditioner vent.

Remove the Air Conditioner vent

6.Loose the CD fixed screws in left and right vents.

Loose the CD fixed screws in left and right vents

7.Pull out the left and right screws and remove the original CD,unplug the main cable connector.

Pull out the left and right screws and remove the original CD,unplug the main cable connector

8.Remove the storage box and decorative plate in the co-polit seat for wiring.

Remove the storage box and decorative plate in the co-polit seat for wiring

9.Connect our power cable to original CD’s connector,and plug our male connector to original CD.

Connect our power cable to original CD's connector,and plug our male connector to original CD
Connect our power cable to original CD’s connector,and plug our male connector to original CD
Connect our power cable to original CD's connector,and plug our male connector to original CD
Connect our power cable to original CD’s connector,and plug our male connector to original CD

10.Put the mini speaker to the central dashbord.

Put the mini speaker to the central dashbord

11.Plug the CAN BUS.

Plug the CAN BUS
Plug the CAN BUS

12.Fix the framework holder and tight the 3 fixed screws.

Fix the framework holder and tight the 3 fixed screws

13.Connect the GND to the original CD’s shell.

Connect the GND to the original CD's shell
Connect the GND to the original CD’s shell

14.Pull 2 original CD fixed screws and put back the original CD then tight the screws.

Pull 2 original CD fixed screws and put back the original CD then tight the screws

15.Plug the all cables and fix the head unit.

Setting sounds come out from original speakers

16.Picture after installation.

Picture after installation

Steps to setting up the sounds come out and interface switching.

1.Setting sounds come out from original speakers.Enter into original CD main menu first,select the Audio interface by original knobs,enter into AUX interface,now the our head unit sounds come out from original speakers.

Setting sounds come out from original speakers

2.Setting the navigation sound come out from mini speaker while listening original CD and Radio.While in original CD or radio interface,press the navigation shortcut key in steering wheel control to enter into navigation interface.Now the original CD and radio play continued and the navigation sound come out from mini speaker.To use this shortcut key to foreground and background switching.

Setting the navigation sound come out from mini speaker while listening original CD and Radio

3.Touch the original menu to switch to our menu.

Touch the original menu to switch to our menu

4.While in our menu,you can select the original functions to enter the original system.

While in our menu,you can select the original functions to enter the original system

Below is the video how to use the GPS Navigation System for Mercedes Benz A Class W176 B Class W246:

Through the detailed description,we believe that you have mainly grasped how to install Mercedes Benz A Class W176 B Class W246 Head Unit GPS Navigation System.For more information,please visit:  http://www.seicane.com/8-inch-touch-screen-mercedes-benz-a-class-w176-head-unit-gps-navigation-system-with-usb-sd-ipod-canbus-aux-srd-8848   If you still have any problem on it,tell us and we will be happy to offer some help for you.At the same time,you will get a pleasant installation journey obviously.Then you will find how convinent and pefect when the GPS Navigation System comes in your car.At that moment,you will be proud of yourself for making such wise choice.Do you have a GPS Navigation System in your car? Why or why not?

What you should know about BMW X5 E53 aftermarket radio

BMW X5 E53 aftermarket radio is actually a micro computer. Generally, navigation systems use PPC(2003,2005), sybian s60, SP(2003,2005) and PC(XP) operation system, and some car navigation system also use WinCE5.0 and WinCE6.0. WinCE offers a virtual hardware platform to allow testing some application systems. System WinCE6.0 supports ARM simulator, so we can test some interfacial pregame and some other simple pregame, we can directly test the new system in the ARM simulator, if it succeed, it usually can run in navigation. Thus, if we download a new navigation system and new map or other WinCE software, we don’t need to copy the downloaded into our SD card and insert the card into aftermarket radio navigator, frequently unplugging and inserting cards will harm to the navigation slot.

Aftermarket radio for BMW X5 can voice remind drivers the coming cross and navigation situations that you can decide if you need to turn your steering wheel. One important function from voice navigation is that drivers can arrive destination safely without watching operating terminal. At the radio operation terminal, BMW X5 E53 aftermarket radio will show you your current position, driving speed, the distance to your spots, and the planned routes, once you drive away from the planned routes, or drive on a wrong direction, the radio navigation system will design a new route for you. Radio GPS navigation is a high-precision, 24-hours service and global system, and works well for your different demand, even in the unmanned midnight.

For now, BMW X5 E53 aftermarket radio is rely on GPS technology to locate., and GPS system is make up of three parts: Ground control, the space segment, and users’ set. So GPS can receive signal just like a radio, perhaps something will influence GPS receiving signal, but technically, how wide you can see the sky, how much signal could your navigation gets. So when you should use navigation system in an open terrain.

The video for BMW X5 E53 aftermarket radio

Hummer H3 Stereo upgrade for Bluetooth

Stereo built-in Bluetooth is an in-car wireless hand-free system that relying on wireless Bluetooth technology. It aims at applying drivers hand-free phone talk during driving, and this technology decrease the traffic hidden trouble in a certain extent.

However, if we want to buy a good quality and convenient radio, we need to consider some aspects of it. For example, good sensitive of receiving signal and compatibity and stableness of software and hardware. Secondly, the operation panel must be human oriented design. Thirdly, it needs excellent mechanical anti-vibration and electronic shock protection, and good resolution of screen.

Hummer H3 stereo fits to Hummer H3(2006-2009), for Hummer H3 users, the original screen’s function is very limited, they complained that the original screen almost becomes a decoration for vehicle, and they finally would have sellers in auto Dealerships or auto remodeling factory upgrade the vehicle to get more functions, but it spend much money if you have someone to add one, you can do it yourself.

The video for hummer h3 stereo

Mercedes-Benz E-Class W211 E200 E220 E240 E270 E280 GPS Navigation System Upgrade

Having a navigation system brings much convenience to us specially when we are in a strange city.Nowadays,most cars have been occupied with sat-navi device.There is no doubt that Mercedes-Benz E-Class W211 E200 E220 E240 E270 E280 GPS Navigation System Upgrade is more and more important.Even there is no such device in your car,connect to a device with navigation function,like smart phone,can also meet our requirement.

Mercedes-Benz E-Class W211 E200 E220 E240 E270 E280 GPS Navigation System is aimed at introducing driving lines to drivers consistently by audio or sound ways.It can direct drivers to where they want to go by using GPS datas.Driving speed and direction, and then showing in ways of signs,digital maps and voice output.Dynamic navigation system can read the traffic condition in time and figer out the best driving line to destination.

One picture about Mercedes-Benz E-Class W211 E200 E220 E240 E270 E280 GPS Navigation System:

Mercedes-Benz E-Class W211 E200 E220 E240 E270 E280 GPS Navigation System

These are all the accessories about Mercedes-Benz E-Class W211 E200 E220 E240 E270 E280 GPS Navigation System Upgrade.All these cables are useful for this device’s upgrade.You need to remove your original Mercedes-Benz E-Class W211 E200 E220 E240 E270 E280 car’s CD player.Disconnect your original car’s plug,and then install this unit to your dashboard.

Counting the line is based on the best driving time or driving line including avoid highway,crossing or bridge which take charges.After know the destination,Mercedes-Benz E-Class W211 E200 E220 E240 E270 E280 GPS Navigation System was expected to work out the recommending driving line in 30 seconds.If it is deviated from the best line,it will need to do it again.Tracking the destination means to compare the real driving lien with the counting time for drivers to decide whether they need to make a turning or not in the following road.

One video about Mercedes-Benz E-Class W211 E200 E220 E240 E270 E280 GPS Navigation System Upgrade and how to use:


During driving,navigation system will give points before turning or changing road. If there is a turning,it will point to the driving direction on this unit’s screen.Besides,the average driving time of every section is according to there we start to count. Navigation system can work out the crowding section by analysing traffic informations on the road where we are driving. More details about this Mercedes-Benz E-Class W211 E200 E220 E240 E270 E280 GPS Navigation System Upgradehttp://www.seicane.com/car-dvd-player-for-mercedes-benz-e-class-w211-with-gps-radio-tv-bluetooth-srd-8797 . When this device gets to recount the line,it will set a lower driving speed according to the degree of traffic.It will give you much helpful information when your are driving.


Upgrade Hummer H3 Sat-Navi GPS Navigation System 2006 2007 2008 2009

Maybe you not familiar with Sat-Navi GPS Navigation System.Navigation map’s function include schedual,address routing,help and close menu for choosing.Here we will introduce more details about upgrade Hummer H3 Sat-Navi GPS Navigation System 2006 2007 2008 2009.If your car is Hummer H3,and the year is from 2006 to 2009,then this 2 din device in car we introduce will give you more information.

Please look at this picture: Upgrade Hummer H3 Sat-Navi GPS Navigation System 2006 2007 2008 2009. It is an after market Hummer H3 GPS Navigation System:

Upgrade Hummer H3 Sat-Navi GPS Navigation System 2006 2007 2008 2009

From this Hummer H3 GPS Navigation System,you can directly easily find your destination or where you are.So when you look for the place,you can write down the place or input the words according to the 26 letters on the screen.You also can set the time 24 hours or 12 hours.This active GPS map can know the road that your car has driven.Besides you also can use the local service.It will show the car speed.If your speed are faster than the standard,the gps navigation system will remind you about this.

This is a video introducing the upgrade of Hummer H3 Sat-Navi GPS Navigation System from year 2006 to year 2009:

At the same time,this Gps navigation system can combine with the radio,firstly the navigation and also play radio.So you are not only using Sat-Navi,but also can play radio.It also supply some useful other functions to you.You can view pictures by using the photo browsing function.By using the 4GB SD card,this navigation system also support mp3 and mp4 playing.When you are busy,it is very easy for you to answer the phone by bluetooth hands free.Speciallly,you can read the calling record and contact from it.

At last,maybe you want to know more parameters about this  Hummer H3 Sat-Navi GPS Navigation System: http://www.seicane.com/car-dvd-player-for-hummer-h3-with-gps-radio-tv-bluetooth-srd-8724 The Chipset of Sat-Navi is SIRF STAR 3,Sumsung 400Mhz,and the Frequency is 1.575GHz,really very fast. This unit has 20 channels.The biggest fixed height is 18000m and the biggest velocity is 515m/s.Don’t be hesitate to ipgrade Hummer H3 Sat-Navi GPS Navigation System 2006 2007 2008 2009.It will give you more convinience and entertainment.

How to make BMW X1 E84 GPS Navigation System Screen bright in Italy

More and more Italy people are going shopping car GPS Navigation System online now.But the difference between Italy and other countries is that in Italy car owners have car ligths always on, for this reason BMW X1 E84 GPS Navigation System device beleave that it is “night”.And the level of  this device’s screen is low.The luminosity of this device is not bright enough.So users want to make BMW X1 E84 GPS Navigation System Screen bright in Italy.Most people know that they can adjust this device’s screen luminosity in settings.But you need to adjust it every time when this BMW X1 E84 GPS Navigation System power on.So some people will ask:

“I do not want to change settings every time, how can i solve the problem?”

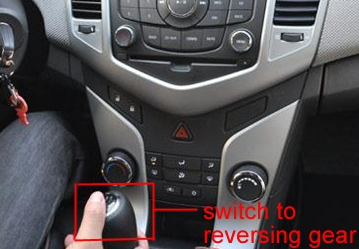
There are many ways to solve this problem.One enginenr said that please switch to reversing gear,then the light will bright.If you are not quite understand how to operate,please refer to this picture about how to switch to reversing gear:

make BMW X1 E84 GPS Navigation System Screen bright

There are other ways to solve the problem of light.

The first one: please adjust the screen brightness in the settings.

The second one: if you want the the brightness of the device always ON,please cut the “ILL” wire of this unit.Please find the sticker at the bottom of this unit,then you will find which one is “ILL” wire.That means if you don’t connect the “ILL” wire,then the screen will always on.

Some peopel maybe don’t know how to find the ILL wire.There is a sticker at the bottom of this BMW X1 E84 GPS Navigation System.Please find out this sticker.There are all the wires definition on this sticker.And there is one wire which is marked “ILL” or “ILLUMI”.

The sticker on your unit is similar to this one:

How to make BMW X1 E84 GPS Navigation System Screen bright

BMW X1 E84 GPS Navigation System’s screen is touch screen with 8 inch 800*480 digital high definition TFT LCD.The screen is bigger that your orginal car CD’s screen.So it is a good choice for you to change your BMW X1 E84 original car’s small screen to bigger BMW X1 E84 GPS Navigation System touch screen: http://www.seicane.com/car-gps-navigation-for-bmw-x1-e84-with-8-inch-digital-screen-two-way-can-bus-srd-8839. Above are several ways of making BMW X1 E84 GPS Navigation System Screen bright in Italy.Hope you can operate it according to these instructions and check if the BMW X1 E84 GPS Navigation System Screen was made bright.Or if you have any other good method to solve this problem,we are glad to hear any iders from you.


How to install 1998-2004 Mercedes-Benz CLK-W209 DVD player with Special Optic Fiber Amplifier

If you original car’s amplifier has optic fiber,and your optic fiber looks like this one in following picture,then your original car’s Optic Fiber Amplifier is very special.We will tell you how to install 1998-2004 Mercedes-Benz CLK-W209 DVD player with Special Optic Fiber Amplifier.This installation instructions not only can be used in Mercedes-Benz CLK-W209 DVD player,but also can be used in all Mercedes-Benz series cars which has such special optic fiber amplifier.

Mercedes-Benz special optic fiber amplifier

Following is about all the accessories in the package for Mercedes-Benz CLK-W209 DVD player.You can find that these is one 6 meter long cable in the package.This one 6 meter long cable is for the cars with Optic Fiber Amplifier. You need to connec t this 6 meter long cable from front head unit to your car’s rear trunk.

Mercedes-Benz CLK-W209 DVD player 6 meter long cable for special optic fiber amplifier

When you are installing this aftermarket Mercedes-Benz CLK-W209 multimedia stereo,you may find that the cables is not compatible with your car.Please don’t be worry.Because Some Mercedes-Benz CLK-w209 has optic fiber and the installation will be a little complex.We can provide you more detailed instruction with photos about how to connect our cable to your plug.You don’t need to cut your original car’s wires,just need to cut our cables.Your original optic fiber amplifier will not work after installation.This Mercedes-Benz CLK-W209 DVD player has built-in amplifier,and can support 5 speakers in your car.It also will have very good sound.

1. Please use this 6 meter long cable as a speaker long cable.

W209 DVD player 6 meter long cable connection


2. Please cut this 6 meter long cable’s plug 2 and plug 3.

3. Please connect the short power cable to this unit’s back.

4. Please connect this 6 meter long cable plug 2’s 4 pair speaker cables to the short power cable. Just joint the same color together.

Mercedes-Benz CLK-W209 DVD player with Special Optic Fiber Amplifier power cable connection


5. Please connect this 6 meter long cable plug 3’s 4 pair speaker cables to your original car’s optic fiber amplifier plug’s 4 pair speaker cables:

Mercedes-Benz CLK-W209 DVD player Special Optic Fiber Amplifier plug speaker cables connection


Then the speaker cables are all connected well.To make this unit power on, you need to connect canbus connector B2 and B3-B6.

Mercedes-Benz CLK-W209 DVD player Special Optic Fiber Amplifier plug short power cable connection

There are 3 kinds of connections:

1+2+5

1+4+5

1+3+6

Please try all these 3 kinds of connections, and see which one can make this unit power on.

At last,1998-2004 Mercedes-Benz CLK-W209 DVD player with Special Optic Fiber Amplifier installation are finished.You can find that this is a wonderful Mercedes-Benz CLK-W209 DVD player.This is a video about how to use Mercedes-Benz CLK-W209 DVD player with Special Optic Fiber Amplifier:


This specialized China Top 2 din multimedia stereo can combined with your original car with Special Optic Fiber Amplifier perfectly.No need to cut your original car’s cables, just need to remove your Mercedes-Benz CLK-W209 original CD, and install this head unit. This Mercedes-Benz CLK-W209 DVD player’s detail information: http://www.seicane.com/car-dvd-player-for-mercedes-benz-clk-w209-with-gps-radio-tv-bluetooth-srd-8802-6 It will keep your steering wheel control works as original after replacement.Fit like OEM, Keep original Style, Upgrade Perfectly.GPS is brilliant for roads.Guidance with this aftermarket sat nav, you can go anywhere.Bluetooth is also so helpful.If you have any questions about installation,please send us photos about your original car’s plugs.Maybe we can make a wiring diagram for your car.If your car has special Optic Fiber Amplifier,then we will suggestion you read this article about how to install 1998-2004 Mercedes-Benz CLK-W209 DVD player with Special Optic Fiber Amplifier.After you read this article,I think you will be clear about how to remove and how to install.You will find you are proud when you install this  Mercedes-Benz CLK-W209 DVD player with Special Optic Fiber Amplifier sucessfully.


Audi Q3 2012 2013 GPS Navigation System Installation

1.Audi Q3 original stereo

Audi Q3 original stereo


2.1. Pry and take out the air-condition outlet panel

Audi Q3 air-condition


2.2. Take the air-condition outlet out

Audi Q3 air-condition outlet


3.1. The screw is fixing the original screen

Audi Q3 original screen


3.2. Take this screw out

Take Audi Q3 screw out


4.1. Use a pry to loosen the screen panel

Loosen the Audi Q3 screen panel


4.2. Take out the screen panel

Take out the Audi Q3 screen panel


5.1. Pry and loosen the screen’s rear cover

Pry and loosen the Audi Q3's rear cover
Pry and loosen the Audi Q3’s rear cover


5.2. Take out the rear cover of the frame

Take out the Audi Q3 rear cover of the frame


6.1. Take these two screws out

Audi Q3 screws
Audi Q3 screws


6.2. Take the original screen out of the frame

Take the Audi Q3 original screen out of the frame


7.1. New HD screen and original frame

New Audi Q3 HD screen and orginal frame


7.2. Put the new HD screen onto the frame

Put the Audi Q3 new HD screen onto the frame


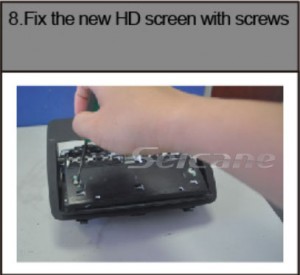
8. Fix the new HD screen with screws

Fix the Audi Q3 new HD screen with screws


9.1. Use the dismantle tool to insert the hole of the original stereo

Use this dismantle tool to insert the hole of the Audi Q3 stereo


9.2. Take it out of dash board

Take it out of Audi Q3 dashboard


10.1. Take the screw out which is fixing on glove box

Take the screw out which is fixing on glove box of Audi Q3


10.2. Take out the glove box

Take out the Audi Q3 glove box


11. Put the cables through the hole of the glove box

Audi Q3 glove box
Audi Q3 glove box


12. Pry and take out the side over of the dashboard (driver side)

Audi Q3 dash board
Audi Q3 dash board


13.1 Take out the screws as picture

Take out the Audi Q3 screws


14.1. Pry and loosen the panel of speed meter

Panel of Audi Q3 speedmeter


14.2. Disconnect the plugs and take the panel out

Audi Q3 panel
Audi Q3 panel


15.1. Pull out the red plug from the gateway socket

Audi Q3 gateway socket


15.2. Connect it with the extension cable

Audi Q3 extension cable


15.3. Connect the other side of extension cable’s plug to the socket

Connect Audi Q3 extension cable's plug
Connect Audi Q3 extension cable’s plug


16. Connect the ISO connect from new system to the original plug

Connect the ISO connect to Audi Q3 original plug


17. Connect the other side of the connector to the original stereo

Connect the connector to the original stereo


18.1. Connect the new screen with the original plugs

Connect the new screen with Audi Q3 original plugs


18.2. Fix the cables on the panel

Fix the cables on the Audi Q3 panel


19. The original 2-pin plug for the screen does not need to be connected

The Audi Q3 original 2-pin plug


20. Put the DVD GPS box into the glove box, and fix it there with bracket

Put the Audi Q3 DVD GPS box into the glove box


21. Switch on and test the new unit

Switch o and test the Audi Q3 new unit


22. After installation

 After Audi Q3 unit installation
After Audi Q3 unit installation


23. Tip A. Those two green CAN connectors should be connected together as the pictures

Two green Audi Q3 CAN connectors


23. Tip B. Connect as the picture

Audi Q3 connectors
Audi Q3 connectors


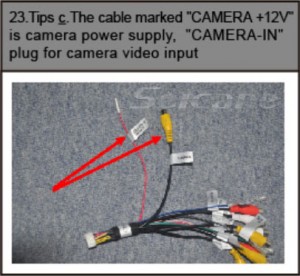
23. Tip C. The cable marked “CAMERA+12V” is camera power supply, “CAMERA-IN” plug for camera video input

 Audi Q3 cables
Audi Q3 cables


Aftermarket Audi A4 GPS Navigation System

GPS is short for Globle Position System which is the system to locate the globle position. Aftermarket Audi A4 GPS Navigation System is a huge astronat and flight program that American government has spent 20years and 1200 billion dollars which is capable of providing information of the object on earth globly all the time so as to locate the datas of the exact location,spead and operation of the object.

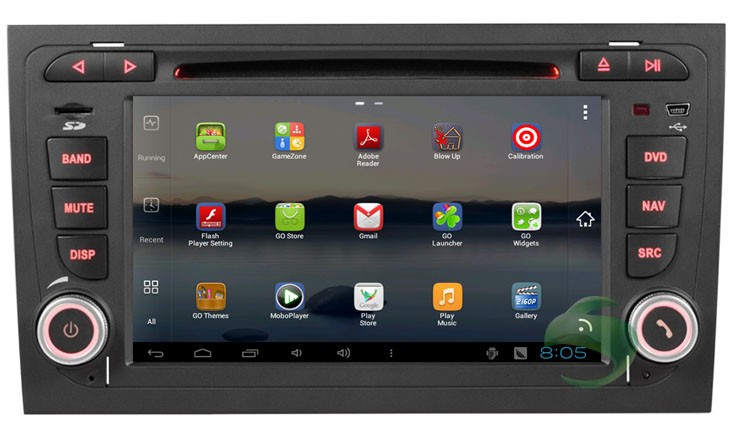
This is a photo about aftermarket Audi A4 GPS Navigation System:

Aftermarket Audi A4 GPS Navigation System

Audi A4 GPS Navigation System are consisted of 24 manmade satellites which are operationg 26560 feet high away from the earth.Every satellite is about to cycle planet every 12 hours which is divided into 6 orbital plane including 3 earth plane.Every satellite launches digital signal to earth constantly,and then the GPS user on earth figures out his location,speed and operation via receiving the information from the 4 satellites at the same time.

Maybe you don’t know that Aftermarket Audi A4 GPS Navigation System provides P and C/A location service.P offers accurancy location,expertising to serving for the military while C/A offers standard service which is for thoes non-military usage like navigation for voyage and vehicle.As for standard GPS service,the accurancy of the location is 25 meters,but if there is humen disturbance,it becomes 100 meters.

Nowadays,people come to realize the importance of its effect and the universe of its application field.Except for military,it has been wildly applied in flight,navigation,calculation and so on. As the Aftermarket Audi A4 GPS Navigation System is becoming cheaper and its function is improving.It becomes popular in the application of GPS system to against theft.When your Audi A4 is stolen,GPS can provide the car’s location constantly so as to help police to find your car very fast.

This is a video about this aftermarket Audi A4 GPS Navigation System’s all functions.Not only about the GPS Navigation fucntion,but also about many other useful functions. If you are interested in purchasing GPS Navigation System,please watch it.It is a wonderful entertainment and navigation system.

At last,we will tell you something more about this  Aftermarket Audi A4 GPS Navigation System. For more information,please visit details: http://www.seicane.com/android-7-inch-car-dvd-player-for-audi-a4-touchscreen-gps-tv-ipod-3g-wifi-sia-9102 You can find more useful information. It can still keep your steering wheel control works as original,it also can combined with your original car perfectly,and the installation is just plug and play.We also can provide this GPS Navigation System’s map upgrade.We can provide the newest map to you all the time.

Fiat Croma Sat Navi

More and more in-dash special dvd players have come to market now. Today we have a new one 1 din Sat Navi.It is Fiat Croma Sat Navi.This all-in-one machine fixed in navigator means that the machine matched GPS Sat Navi with electronic-dog.Then get perfectly compatible through adjusting.

This Fiat Croma Sat Navi has many kinds of useful functions.And it can fit Fiat Croma 2005,2006,2007,2008,2009,2010,2011,2012 year.If your car is just Fiat Croma,and the year is from 2005 to 2012,then this unit can fit your car perfectly.Let’s look at one picture of this unit:

Fiat Croma Sat Navi
Fiat Croma Sat Navi

Internet Point is often say POI(Point of interest) which is the information included by map production company.The included information is used for auto car friends to search destination,such as building and so on.This Fiat Croma Sat Navi also has the function of route planing.Route is the data planned in GPS memory storage that contained a starting-and-ending coordinate,also contained the coordinate which has some middle points.In a word,route is a refference way supplied for friends that drived for the destination.

The most important function of this unit is early warning in Sat Navi.This Fiat Croma Sat Navi has early warning function.Early warning is divided into fixed early warning and moved early warning,and there are great differences about working principle.Fixed early warning is off line data information that comes from wiped information by software,when the fixed position reaches the early warning position,the navigator will ask driving friends to drive as driving princeiple.Moving early warning is often fitted in electronic.Fiat Croma Sat Navi is fixed electronic detector inside,and it warns driving friends the presence of speed-testing photograph through the function of detecting the wave section shot by electronic nearby.

This is a video about all the functions of this Fiat Croma Sat Navi


At last,we will introduce you another important function of this Fiat Croma Sat Navi. It is double screen show.When navigator poses crossing road,merging road or rotation during the operation,GPS will show double screen pattern which contains normal route way in one position and maxible road choosing initate pattern.Now present navigation map emerged another double-screen that is divided into two.How useful of this cuntion!

Afterall,Fiat Croma Sat Navi also have many kinds of other important functions.It will bring great entertainment to you for your driving.And the useful functions are GPS,DVD,USB,SD,Radio,Bluetooth and so on.Do you like this Fiat Croma Sat Navi? If you like it,please refer to this link for more information: http://www.seicane.com/fiat-croma-head-unit-touch-screen-dvd-player-gps-navigation-system-car-stereo-with-radio-tv-bluetooth-ipod-srd-8829 If you have any questions about this unit,please contact us online.We are ready to help you online.Hope we can help you make a decision to buy it if you are still hesitating about this.Only USD$450 for fast shipping.It really worth your money.Buy it now,place order on our website directly now!