Here comes an advanced 2003-2011 Porsche Cayenne car stereo from Seicane after installation. It is equipped with the stable Android 5.1.1 operation system and the powerful quad-core CPU for you to upgrade your factory radio for your 2003-2011 Porsche Cayenne. Today I would like to show you a detailed 2003-2011 Porsche Cayenne gps dvd car stereo installation guide for your reference and introduce you how to make this stereo normally work if there is no sound coming out from it.

Please pay attention to the tips about the installation:
1.Please disconnect the power before the installation.
2.Please prepare a lever and a screwdriver before the removal and the installation.
3.Please keep all the separate parts from the car. Please take great care of the dashboard to avoid scratching it during its detachment and installation. Please keep handy any parts from the car and make use of all the original screws from the car as much as possible. so each related part of the unit can be fixed securely.
4.For your convenience, here’s the recommended tools for removal and installation from Seicane, please check for more details: http://www.seicane.com/car-dvd-dismantling-devicesrd-400
2003-2011 Porsche Cayenne car radio installation guide
1. Pry out the trim piece along the perimeter of the center dashboard with a lever.

2. Remove 2 screws holding the stereo in the dashboard frame (green arrows). Please note that there will be four screws in the cars with navigation.

3. Carefully take the factory stereo out of the dash. When removing the factory radio, please note that there are two locking tabs on the lower tray that can break easily.

4. Here is a close-up of the underside of the stereo. These two plastic fingers (green arrows) fit into the tabs on the top edge of the lower tray.

5. Press the tab (green arrow) on the antenna lead and pull it out of the stereo.

6. Pull out the connectors at the back of the stereo (green arrows). Note that some cars may have different setups based on the vehicle’s different years.

7. Check all the accessories for the new Seicane car radio.

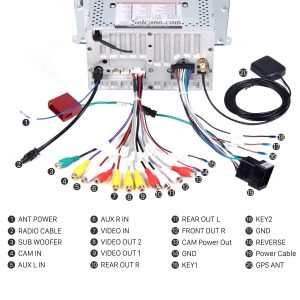
8. Connect the harnesses to the back of the new Seicane car radio.

9. Connect the Seicane car radio to your original car radio’s plugs. And put the new Seicane car radio back into the dash.
10. Install two screws and trim piece.
11. Turn on the new car radio and have a comprehensive test.
Before or during the installation, if you have any questions, you can turn to a professional for help. Besides, if you are interested in this intelligent 2003-2011 Porsche Cayenne gps dvd car stereo from Seicane, please check out the following link:
This amazing 2003-2011 Porsche Cayenne gps dvd car stereo is integrated with a wide range of features to meet almost all your needs in car, which mainly includes GPS navigation, Bluetooth connectivity, DVD player, radio tuner, USB/SD connection, etc. Apart from these basic features, there are also some optional features that can be added to this unit according to your preference, such as backup camera, OBD2, DAB and so on.
Just install this powerful 2003-2011 Porsche Cayenne gps dvd car stereo in your beloved car and you will embrace a more wonderful driving experience than ever before.

Recent Comments