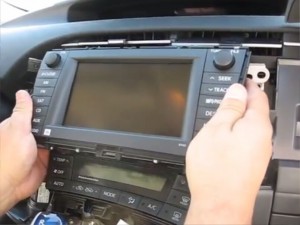
How can I improve my car interior environment? How can I get extraordinary driving experience? The best way for you is to upgrade your old factory radio. It’s not only improve your car interior environment, but also bring convenience and entertainment feature to you. So, the detailed installation instruction is necessary for the car owner. I’d like to share a detailed installation instruction for a 2009-2013 Toyota PRIUS right head unit from Seicane with you and you can take it as reference.

Precautions for this installation:
1.Before you start up any work, park your car well and unplug the negative power cable to avoid any danger.
2.Please make sure that all fastened wires are isolated with electrical tape.
3.Please make sure the ignition is off to avoid short circuit.
4.For your convenience, here’s the recommended tools for removal and installation from Seicane, please check for more details: http://www.seicane.com/car-dvd-dismantling-device-srd-400
Toyota PRIUS right head unit installation instruction
1. Remove the shift panel right of the steering wheel. The panel simply pulls free of the dash with medium force from a trim pry tool.

2. Remove the dash panel below the stereo. Grab the panel by the right edge and pull with significant force to detach the plastic pin that holds the panel in place. Grab the bottom edge of the panel and pull it from the dash.

3.Remove the vent panel to the right of the stereo as you did the left panel. It is only connected with clips that can be pulled free with moderate force.

4. Disconnect the wiring.

5. Remove the stereo by removing the four screws near the corners of the stereo mounting bracket with a Phillips-head screwdriver.

6. Pull the radio toward you slowly.

7. Pull the stereo from its dock and pull the wire groups from the back of the stereo. Grab the groups by the white plastic wire binders, not the wires themselves.

8. Check all the accessories for the new Seicane car radio.
9. Connect the harnesses to the back of the new Seicane car radio.
10. Connect the Seicane car radio to your original car radio ‘s plugs.
11. Turn on the new Seicane radio to have a careful check if everything works well. If it doesn’t, please check whether all the cables are connected correctly.
12. Put the new Seicane radio into the dash.
13. Put everything into their original place.
That’s all the detailed installation instruction for a 2009-2013 Toyota PRIUS right head unit. If you find it is hard to install by yourself, it suggests you to the dealer ask for help or arrange the professional to install it. If the picture shown above is different from your dashboard, please rest assured that the instruction is much same. Besides, you have to find the suitable head unit for your car. If you don’t have one, here is the wonderful 2009-2013 Toyota PRIUS right head unit from Seicane to recommend.
This hot 2009-2013 Toyota PRIUS right head unit is loaded with a powerful 1.6 GHz Cortex A9 Quad-core to enhance the processing ability for users. The hard disc capacitance up to 16G allows more information and database to be processed in this head unit. You will be accurately guided to anywhere you like with its 3D precise GPS and enjoy yourself with a multiple entertainment options supported by it while you are driving. Enjoy a good time with it from now!

Recent Comments