How to Install an Android Plug and Play Unit with CarPlay (Lexus RX 2016-2019)

Hi everyone! In this blog post, we’ll teach you how to upgrade 2016-2019 LEXUS RX car system. This upgrade includes AOS Wireless CarPlay and Android Auto. Once connected, you can make calls, listen to music, use online map navigation, and access many other mobile phone applications.

Firstly, we will remove the brown decorative panels on both sides.

Again, there are two screws on each side that fix the host. We will unscrew them.


Then we will dismantle the entire original car engine and unplug all the plugs on its back.

This is what it looks like when taken apart.

Now start connecting the cables.

Now connect the power harness to the two plugs on the back of the original screen. Reconnect the communication serial port.

Connect the audio plug to the RCA cable. Finally, connect the power plug to the Android screen. Install and fix it again.

Now start connecting to the host section. Restore the corresponding plug on it.

Restore the silver decorative strip as well. Finally, install these two brown panels back in place. The installation is now complete.

As this car comes with Canbus, it needs to be set up for the first use. Now, our Android system has no sound when we first use it.

We need to switch to audio mode, and we can observe the switching status through the dashboard. Of course, this car supports the original car system.

We can click on Aux to enter the original car system and then control audio output through the original Canbus. After the setup is complete, we can start experiencing the Android car radio.

This supports synchronizing the original car air conditioning information, supports the regional car reversing camera, and supports switch reminders.

It also has many other rich features for watching online movies. You can use offline or online maps, support Bluetooth phone, and Bluetooth music.

Enjoy wireless CarPlay or Android Auto function from your phone in your car. Okay, that’s all for the video. Thank you for watching.

How to install 2004-2009 OPEL Astra gps radio with bluetooth music

Do you know how to install 2004-2009 OPEL Astra gps radio with bluetooth music?

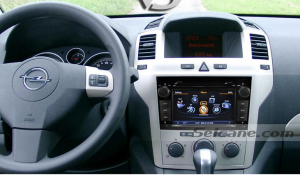
Here is an image for car stereo after installation,dvd player with aftermarket navigation system bluetooth touch screen of 2004-2009 OPEL Astra.If the panel of your car radio is alike this one,it means that this unit can be installed in your beloved car.

car stereo after installation,dvd player with aftermarket navigation system bluetooth touch screen of 2004-2009 OPEL Astra

Recent car radio is upgrading with a very fast speed.Because the requirements of people to cars is getting higher,they hope that cars can bring them more entertainments when they are driving.So car radio become a main machine except the car itself.We know that factory stereo is operated mainly by button controls while car stereo nowadays has touch screen which can be worked with a touch screen pen.

More importantly,it has increased the gps navigation system.This is a very popular function that attracts a lot of people.Nowadays people have been accustomed to look for directions with sat nav system.When you entered in a destination,a map will occur on the screen and you only need to drive as the map points.

But what should we do to install this new radio with new functions?Don’t worry,we have general steps for this installation.

2004-2009 OPEL Astra car stereo removal and installation:

1.Insert removal tool into two holed on left side of car stereo

insert removal tool into two holed on left side of car stereo


2.Insert removal tool into two holed on right side of car stereo

insert removal tool into two holed on right side of car stereo


3.Grasp removal tools and pull car stereo from dash

grasp removal tools and pull car stereo from dash


4.Release trigger on connector to remove,remove antenna and car stereo

release trigger on connector to remove,remove antenna and car stereo


5.After that,you can remove under control buttons and disconnect the connector

remove under control buttons


6.remove the screw and the other corresponding one

remove the screw and the other corresponding one


7.remove trim panel by releasing the lower place first and then top of it

remove trim panel by releasing the lower place first and then top of it


You see the removal steps can be very simple with removal tools and right removal guide,then we still need to continue and install the new unit into your car.

8.Plug all connectors of new stereo to the car’ correctly and firm screws that were removed

9.Install removed panels to the car,with all things done you can turn on your new radio and check whether this new unit can work or not

I believe that everything will be ok only if you can act the OPEL Astra gps installation procedure according to right installation guide step by step.It’s neither a hard thing,nor a thing that can only be finished by professional person,you can also achieve it by yourself.Of course,you should be careful and patient enough during this process,such as putting removed panels and screws in a safe place,be gentle when you are removing something to avoid any damage.

After you have installed new unit successfully and willing to drive it to enjoy your labor work,you may be not very familiar with those new functions,so you can visit next website for more detailed information about this unit:http://www.seicane.com/sat-navi-radio-replacement-car-a-v-system-for-2004-2009-opel-astra-support-dvr-file-management-with-3g-wifi-dvd-recoding-function-c019-2.

Here are some notes for you to attention after your radio mount,

Precautions after installation:

1.Do not pay too much attention on it when you are driving especially on a crowded road,it’s very dangerous

2.To ensure it can be used longer,please remember to use touch screen pen to operate it

3.If you want to clean up it,please use a clean cloth and gently tidy the surface,no any other liquid on it