How to Remove&install car radio for 2018-2022 Chevrolet Volrando with CarPlay HD Touchscreen?

Hi everyone! In this blog post, we’ll teach you how to upgrade 2018-2022 Chevrolet Volrando car system. This upgrade includes AOS Wireless CarPlay and Android Auto. Once connected, you can make calls, listen to music, use online map navigation, and access many other mobile phone applications.

Want to know how to upgrade? Follow these steps:

  • The first step is to remove the protective cover on the back of the original car screen.
  • Secondly, unscrew the two screws that secure the screen.
  • Thirdly, remove your original car screen, then unplug all the plugs on the back.
  • Now let’s start wiring.
  • This is the network antenna
  • This is a GPS antenna

  • This is a video input cable
  • This is a USB transmission cable
  • And this is the original car USB adapter cable.
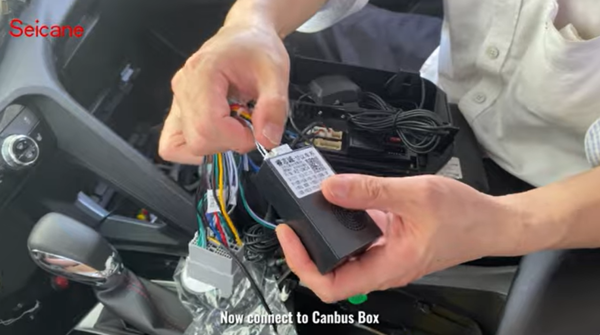
  • Now connect to the Canbus box
  • Reconnect the speaker
  • Reconnect the RC audio cable
  • Then connect the protocol serial port.
  • Now connect the screen power plug
  • Then connect the reverse rearview plug.
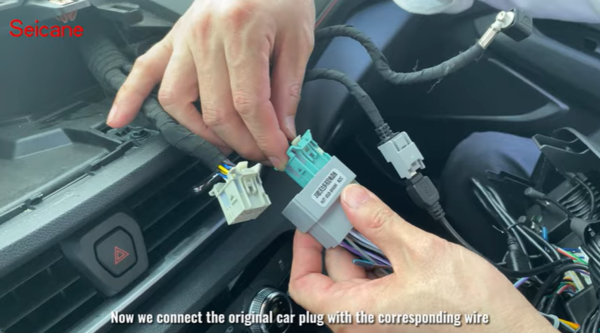
  • Now we connect the original car plug with the corresponding wire.
  • Finally, we will install the new screen and tighten its two screws.
  • The installation is now complete. As it is the first time installing, we need to set up Canvas.
  • After setting it, it can support reversing, the original car support during wheel button control.
  • In addition, it also supports wireless CarPlay, Android Auto, watching online movies, using the radio to automatically search for channels, online map navigation, Bluetooth phone, and Bluetooth music.

Thank you for reading this blog post. We hope this guide helps you successfully upgrade your Chevrolet Volrando car system.

How to upgrade radio Carplay yourself? 10.1 screen for 2005-2010 Lexus IS250 IS300 IS200 IS220 IS350

In this blog post, we’ll teach you how to upgrade the Lexus IS car system. This upgrade includes AOS Wireless CarPlay and Android Auto. Once connected, you can make calls, listen to music, use online map navigation, and access many other mobile phone applications.

Want to know how to upgrade? Follow these steps:

  1. Rotate the Gear Grip: First, rotate the gear grip to the left and then remove the black decorative strips on both sides.
  • Open the Gear Panel: Open the gear panel. The back of the plug does not need to be removed; just set the panel aside.
  • Remove the Cigarette Lighter Panel: Unscrew the two screws that fix the cigarette lighter panel and remove the panel.
  • Unscrew the Bottom Screws: Unscrew the two screws at the bottom of the original car screen panel. Then remove the air outlet.
  • Unscrew the Top Screws: Remove the two screws above the original car screen panel.
  • Remove the Original Car Screen Panel: Remove the original car screen panel and unplug it from the back.

After removal, here’s how to install the new system:

  1. Install Metal Accessories: Attach the two metal accessories to the back of the new car radio.
  • Remove the Original Screen’s Metal Part: Separate the original screen host from the CD host. Reinstall the two metal supports on the CD host.
  • Connect Wires: Insert the two adapters of the new wire into the CD host. Insert the k-pad plug into the new screen. Connect the screen power supply, the communication serial port line, the canvas box, and the OBD interface cable. Insert the other end into the original car OBD interface.
  • Connect Additional Wires: Connect the GPS antenna, video input line, USB transmission line, and the RC line. The red and white plugs on the power wire are connected to the EU plug of RC CA.
  • Reinsert Plugs: Connect the new wire to the original car plug according to size. Reinsert some plugs of the original CD host back. Connect the two plugs of the new wire to the plug of the original car.
  • Reconnect the Radio Antenna: Reconnect the original car radio antenna. After all connections are made, install the new screen and secure it. Reinstall the air outlet, cigarette lighter panel, gear panel, and the two decorative strips. Finally, reinstall the gear grip.

Before use, you need to configure the CAN bus settings:

  1. Enter the settings menu.
  2. Select factory settings and input the password.
  3. Enter CAN bus settings, select protocol options, and choose the vehicle model.
  4. Click to confirm. Note that the first setting needs to be connected to the network.

After completing the settings, you can use the new screen button to control the original car’s air conditioning. Additionally, the system has many other features, including the use of local or online maps, listening to your favorite radio station, preserving the original car CD function, adjusting the sound tone, and setting the sound size in the car.

Thank you for reading this blog post. We hope this guide helps you successfully upgrade your Lexus IS car system.